Procreate: Tips and Tutorials for Fashion Designers
Estimated read time: 17 minutes

If you're a fashion designer, you know how important it is to have the right tools to bring your creative visions to life. Whether working on rough concepts, technical flat sketches, or anything in between, having a reliable, intuitive, and feature-rich app can make all the difference.
That's where Procreate comes in. As a highly capable drawing and illustration app specifically designed for the iPad, Procreate is perfect for fashion designers to create designs with efficiency and ease. In this article, we'll explore the key benefits of Procreate for fashion design, secrets for getting the most out of the app, and Procreate's limitations and ways to work around them.
This post is NOT sponsored by Procreate; I simply love using the app and often share my work from it. I receive many questions about the app, so I decided to share my insights and experiences in this article.

Sketching in Style: How Procreate Upgrades Your Fashion Design Game

More Natural and Intuitive Drawing Experience for Fashion Designers
One of the key benefits of using Procreate for fashion design is its intuitive and natural feel when drawing with the apple pencil. For example, when using the pen tool in Adobe Illustrator, getting a smooth and natural line can be challenging, as the program tends to be more precise and rigid. In contrast, drawing in Procreate is designed to mimic the feel of drawing with a traditional pen or pencil, making it much easier to create fluid and expressive lines. This can be especially helpful for fashion designers who want to create rough sketches or freehand illustrations with a more organic feel. Additionally, Procreate allows designers to adjust the pressure sensitivity of their pencil, further enhancing the natural feel of drawing.
🚀 Discover the secret to smooth lines in Procreate.
One thing that can be annoying about drawing in Procreate is the smooth surface of the iPad screen. It can feel unnatural if you're used to pencil and paper, especially if you want a detailed and expressive sketch. If you're looking for a way to make the drawing experience more natural and comfortable, check out the solution later in this article.
Wide Range of Capabilities: from Rough Sketches to Polished Illustrations and Videos
Procreate is an incredibly versatile app perfect for fashion designers looking to create various design styles and end uses. Whether you're just starting to brainstorm ideas for a new collection or working on final illustrations, Procreate has the tools and features you need to get the job done. One of the key benefits of using Procreate is its ability to accommodate different creative processes, from rough sketches and brainstorming sessions to polished illustrations and technical flat drawings. No matter what stage you're at in your design process, Procreate has the features you need to bring your ideas to life.
Procreate is also an excellent choice for creating time-lapse videos to showcase your design process, tutorials, and courses. Time-lapse videos are a great way to engage with your audience, particularly if you're looking to showcase your design process or inspire others with your work.
Design Like a Pro with Digital Workflow Tools

One of the significant advantages of using Procreate for fashion design is the ability to brainstorm and adjust your ideas quickly and efficiently. Procreate's digital nature means you don't have to worry about wasting physical resources like paper, pencils, and paint. If a design isn't working, you can delete it and try something else. This flexibility can save time and resources and make exploring and developing new ideas easier.
Changes to designs can be made easier with the selection and transform tools. By using the selection tool, such as the lasso or magic wand, designers can select specific elements of their designs for editing or manipulation. Through the transform tool, designers can resize and rotate elements of their designs. This is especially useful when testing out different sleeve lengths, necklines, and other garment elements and for fine-tuned adjustments to the proportions of details such as collars and pockets.
Additionally, elements of a sketch can be organized in the layers panel, allowing designers to work on parts of their designs independently of each other. By working in layers, changes can be made to one element without affecting others. This can save time and resources by reducing the need to redraw or repaint design elements.
🚀 Here’s how to use layers in Procreate for fashion design.
Various tools within Procreate can greatly improve the efficiency of sketching. The symmetry tool, for instance, allows designers to create mirror images of their sketches in real-time, making it easier to visualize the final design.
With a single stroke, the Quickshape tool allows designers to create precise shapes, such as circles, squares, straight lines, and curves, which is useful when sketching details like buttons, zippers, and hemlines. Please continue to the next section of this guide to learn how to use these tools and see more examples of their specific uses.
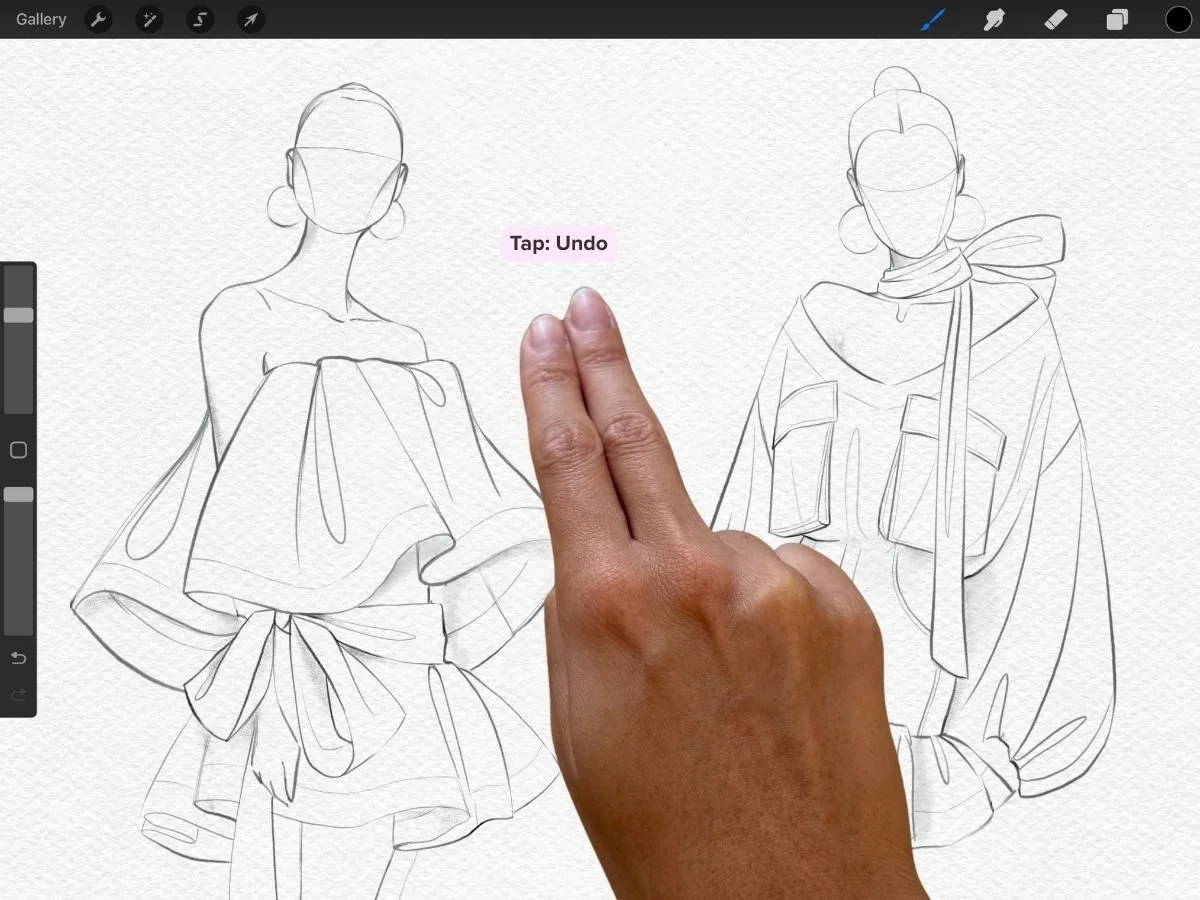
Lastly, The undo and redo feature removes the stress of making mistakes and makes it easy to try out different ideas without worrying about permanently altering your design. To undo your last action, use a two-finger tap. To redo an action, use a three-finger tap. You can also tap and hold to undo or redo a series of steps, up to 250 actions.
🚀 Explore more hand gestures in the Best Procreate Shortcuts for Fashion Designers (Beginner’s Guide).
Design Anywhere, Anytime
Procreate makes remote work possible by providing features that make it easy to save, organize, and share designs. With Procreate, you can create and edit your designs anywhere, as it's a self-contained app that doesn't require the internet or WiFi to work on an iPad. You can use all of its features and tools offline without any limitations. You'll only need an internet connection to update the app, share your files with others, or back up files to the cloud. Otherwise, you're free to use Procreate to its full potential, even when not connected to the internet.
Additionally, the compact and portable nature of the iPad makes it easy to sketch on the go, in a coffee shop, or in bed while watching Netflix. This flexibility benefits fashion designers who need to work on their designs anytime and from any location. A designer on Reddit reported: “The sheer freedom of Procreate rehydrated my desire to make stuff.”
🚀 Here are 5 reasons Procreate rekindles the joy of sketching.
If you’re serious about learning Procreate for fashion design, check out my the Procreate for Fashion Design Course. Through step-by-step lessons, you can learn essential Procreate tools, install custom fashion brushes and templates, and draw better tech flats and illustrations.
Procreate for Fashion Course
“I highly recommend this course for fashion illustration and technical drawing; truly one of the best out there!"
-Ava
7 Procreate Tips for Fashion Designers:

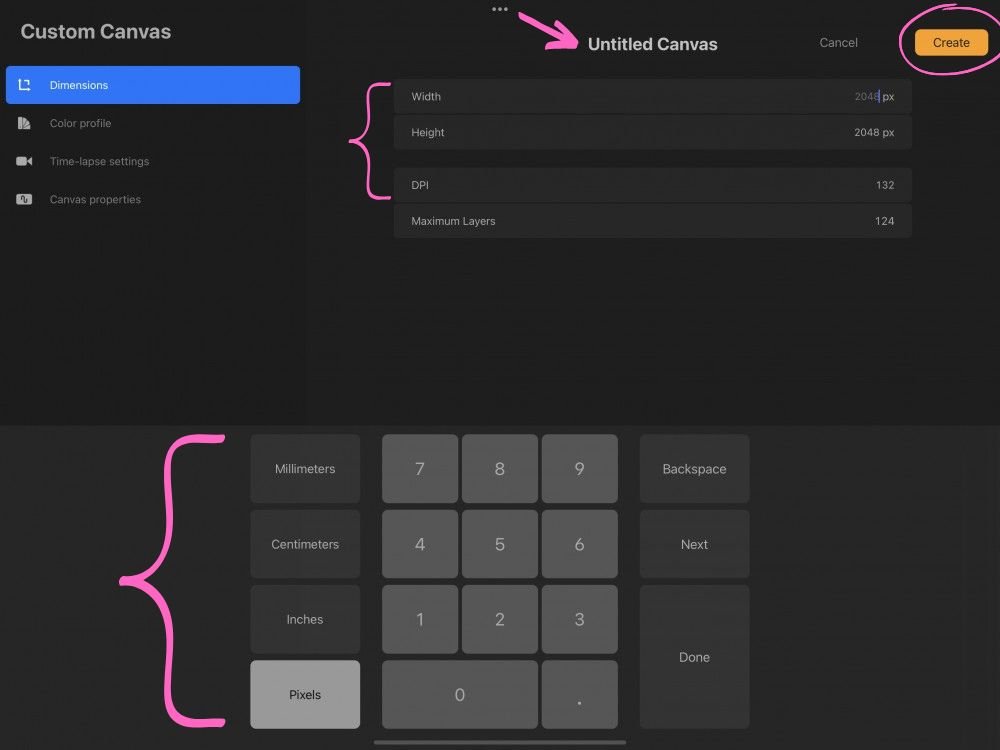
1. Customize Your Canvas Size for Enhanced Resolution and Clarity
One of the common mistakes when using Procreate is setting up a canvas with a low resolution, which can lead to pixelated designs. This can be incredibly frustrating for fashion designers who need crisp lines to illustrate silhouettes and details accurately. To avoid this, it's essential to set up your canvas with a high enough resolution, at least 300 DPI, with appropriate dimensions for your final product. For example, if you're creating an illustration for printing, you may want to use dimensions of 8.5" x 11" (Letter Paper). Keep in mind that the larger the canvas, the higher the resolution you'll need to maintain the quality of your design.
Another thing to consider when setting up your canvas in Procreate is the aspect ratio. The aspect ratio refers to the proportion of the width to the height of the canvas. Different aspect ratios will be more suitable for different designs, so choosing one that will work well for your specific needs is important. For example, a portrait aspect ratio (taller than it is wide) might be more suitable for a fashion illustration. In contrast, a landscape aspect ratio (wider than it is tall) might be better for a technical flat drawing. Keep this in mind when setting up your canvas to ensure that your design will fit properly and look its best.
If you're working on a project for common platforms and are uncertain about the aspect ratio, a quick solution is to search for it online. For social media platforms, a simple Google search can provide the specific aspect ratio you need. Just type "aspect ratio + [platform] [media type]". For instance, if you're looking for the aspect ratio for Instagram Reels, search "Aspect ratio Instagram Reel" on Google.
To set up a new custom canvas in Procreate, follow these steps:
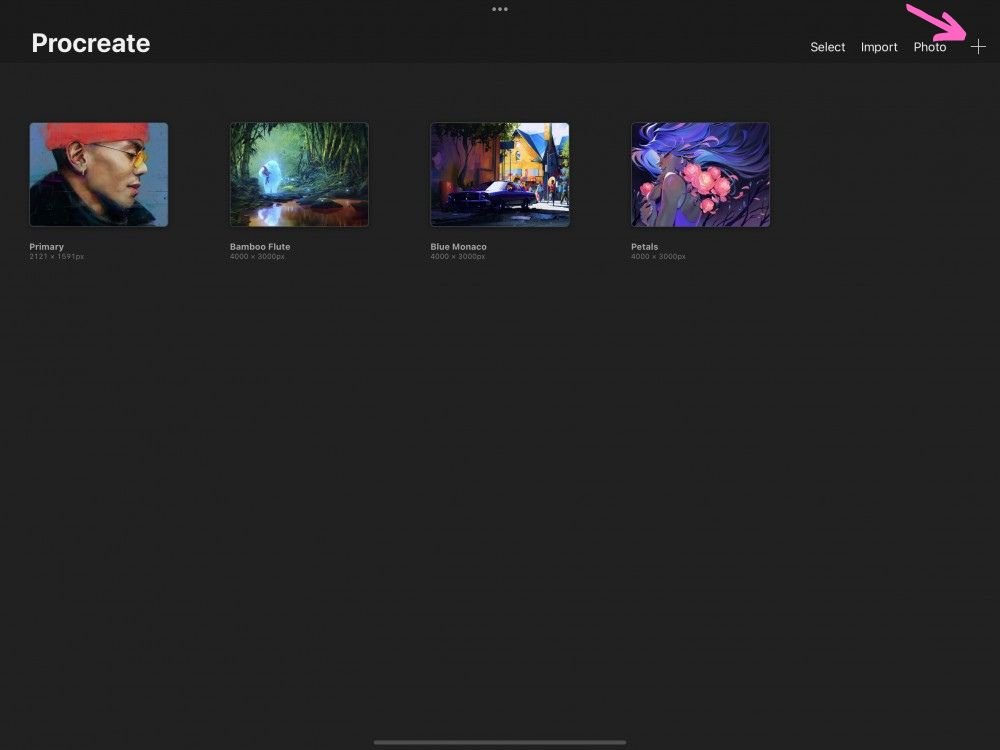
Open Procreate on your iPad and tap the + icon in the top-right corner of the screen.
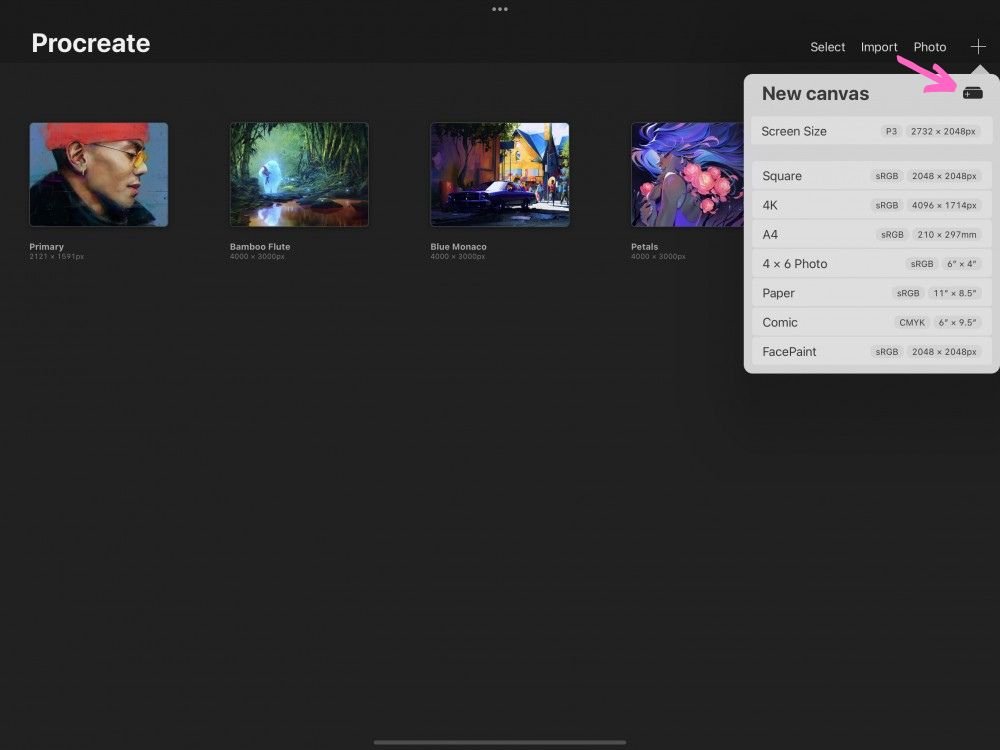
Tap the icon of a rectangle with a + in the top right to open the Custom Canvas screen.
Tap the words Untitled Canvas at the top of the screen to name your canvas.
Change the Width, Height, and DPI by tapping on the value you want to adjust. This will open a numerical keypad below, where you can enter the size you need. You can change the unit of measurement on the left of the keypad at the bottom of the screen.
Tap Create to create your new custom canvas.
For more on canvas settings and how to to turn your canvas into a simple, reusable template (so you don’t start from scratch every time) check out this post.
2. Maximize Your Drawing Comfort With Accessories
The Apple Pencil is an indispensable tool when working with Procreate on the iPad.
It allows for precise control and pressure sensitivity (changes the stroke width with pressure), making it possible to create detailed and expressive illustrations and designs. The Apple Pencil is also highly responsive, allowing smooth and fluid lines and brushstrokes. It's an excellent tool for fashion designers, as it allows for creating accurate and detailed illustrations and technical flat drawings.
Ensure the Apple Pencil you purchase is compatible with your specific iPad model (the Apple website lists compatible iPad models with each pencil option.) Also, ensure your Apple Pencil supports pressure sensitivity. The USB-C version and many third-party styluses don’t support pressure sensitivity.
Another issue that some designers may need help with when using Procreate is the smooth surface of the screen, which can feel unnatural compared to drawing with pencil and paper. Textured screen protectors can enhance the precision and tactile feel of drawing with the Apple Pencil on an iPad.
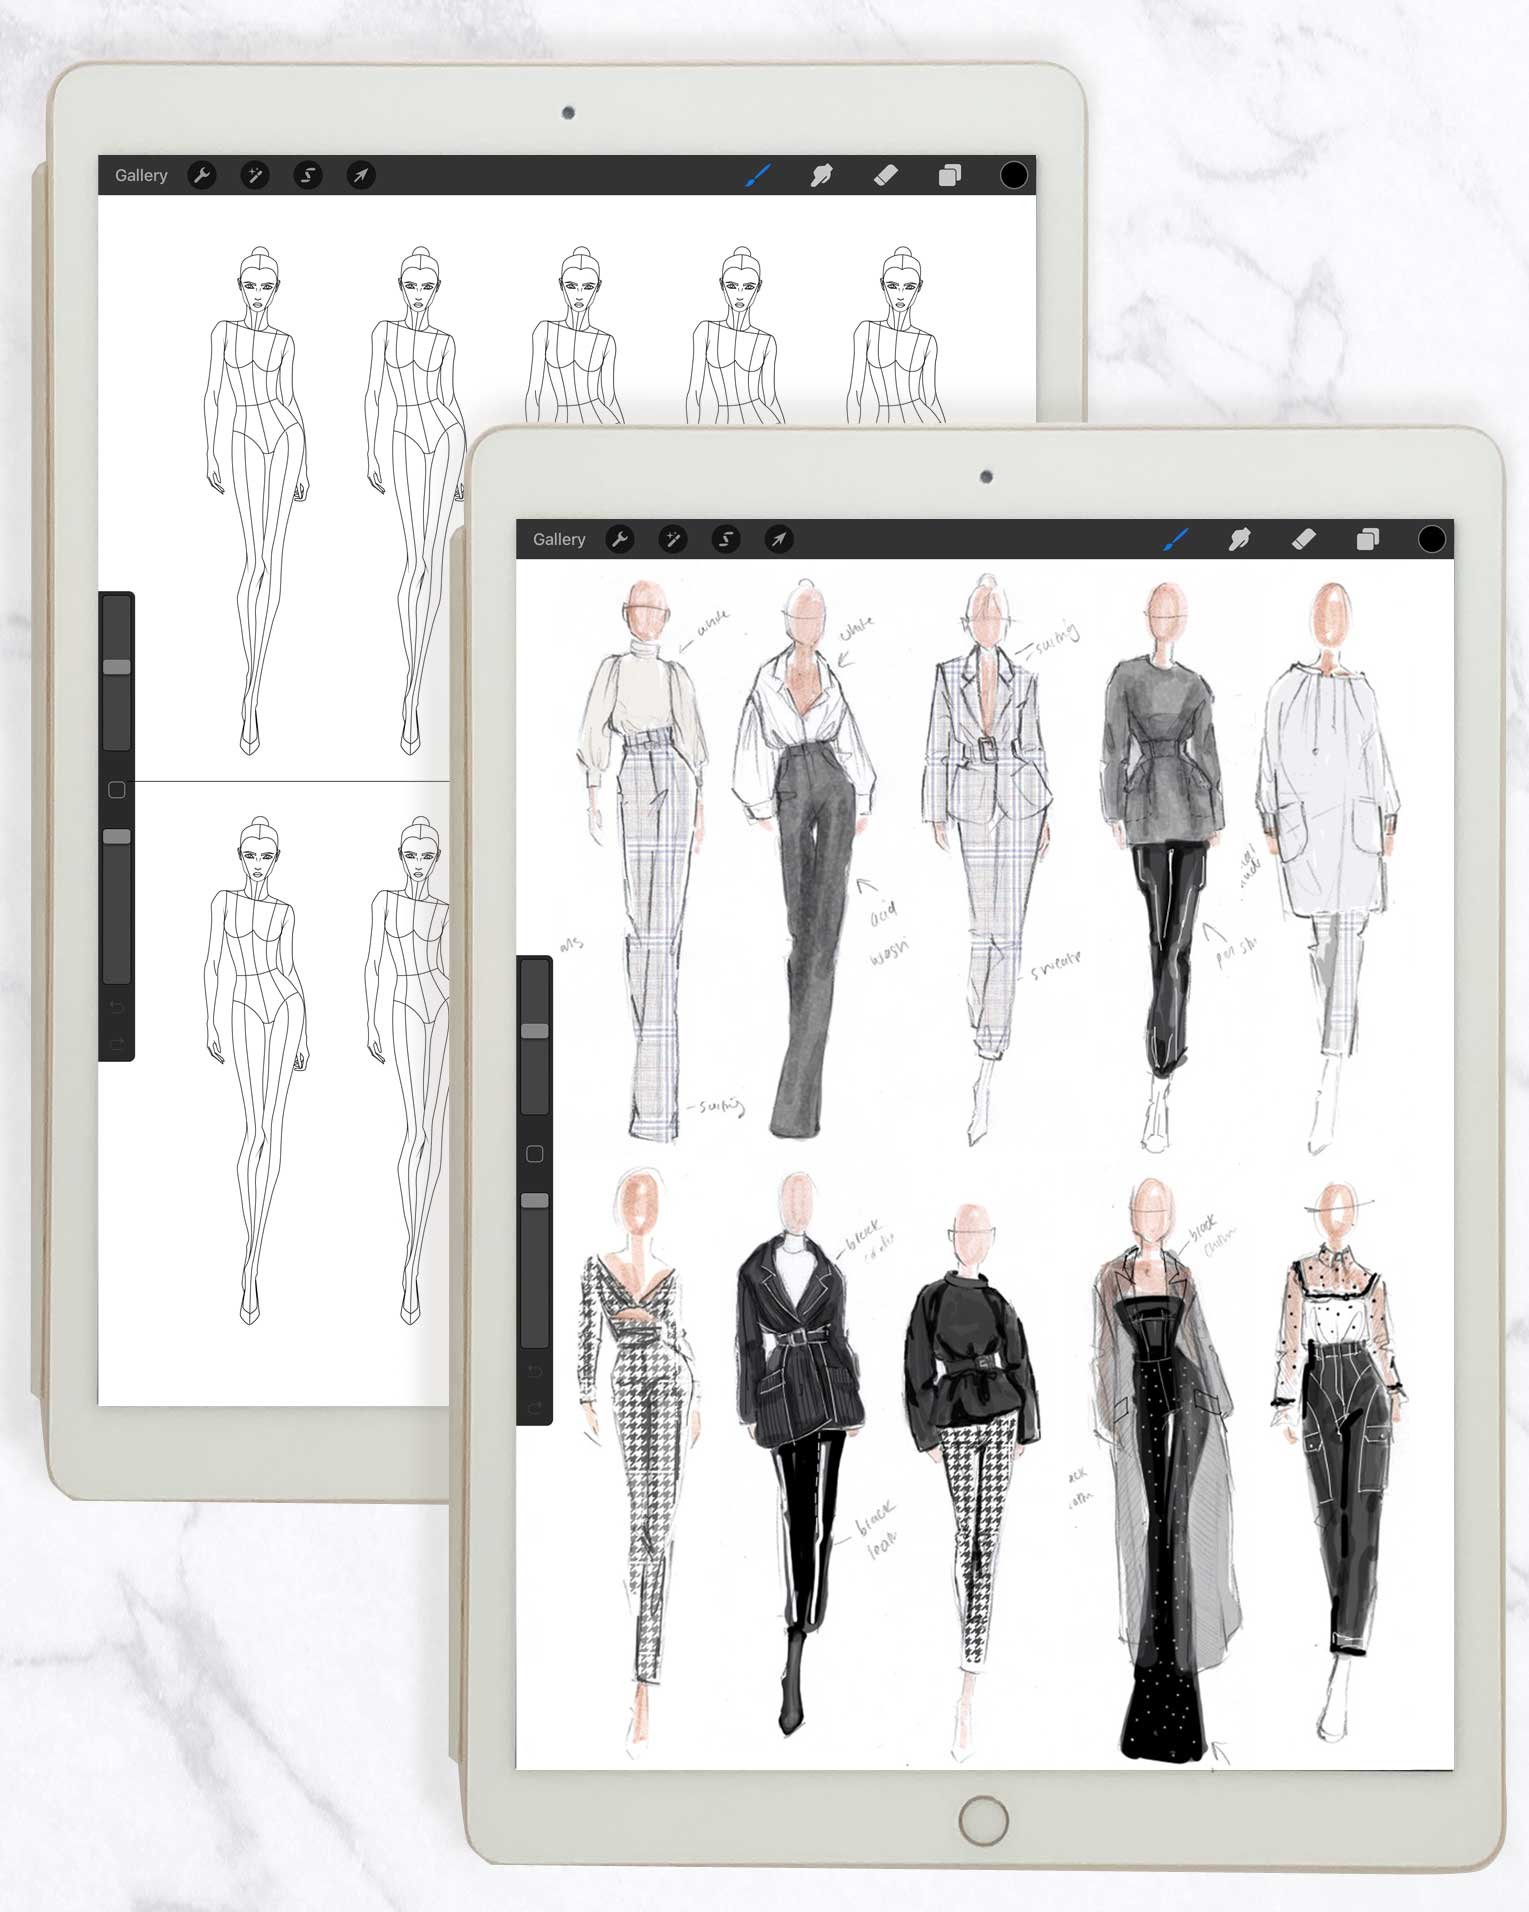
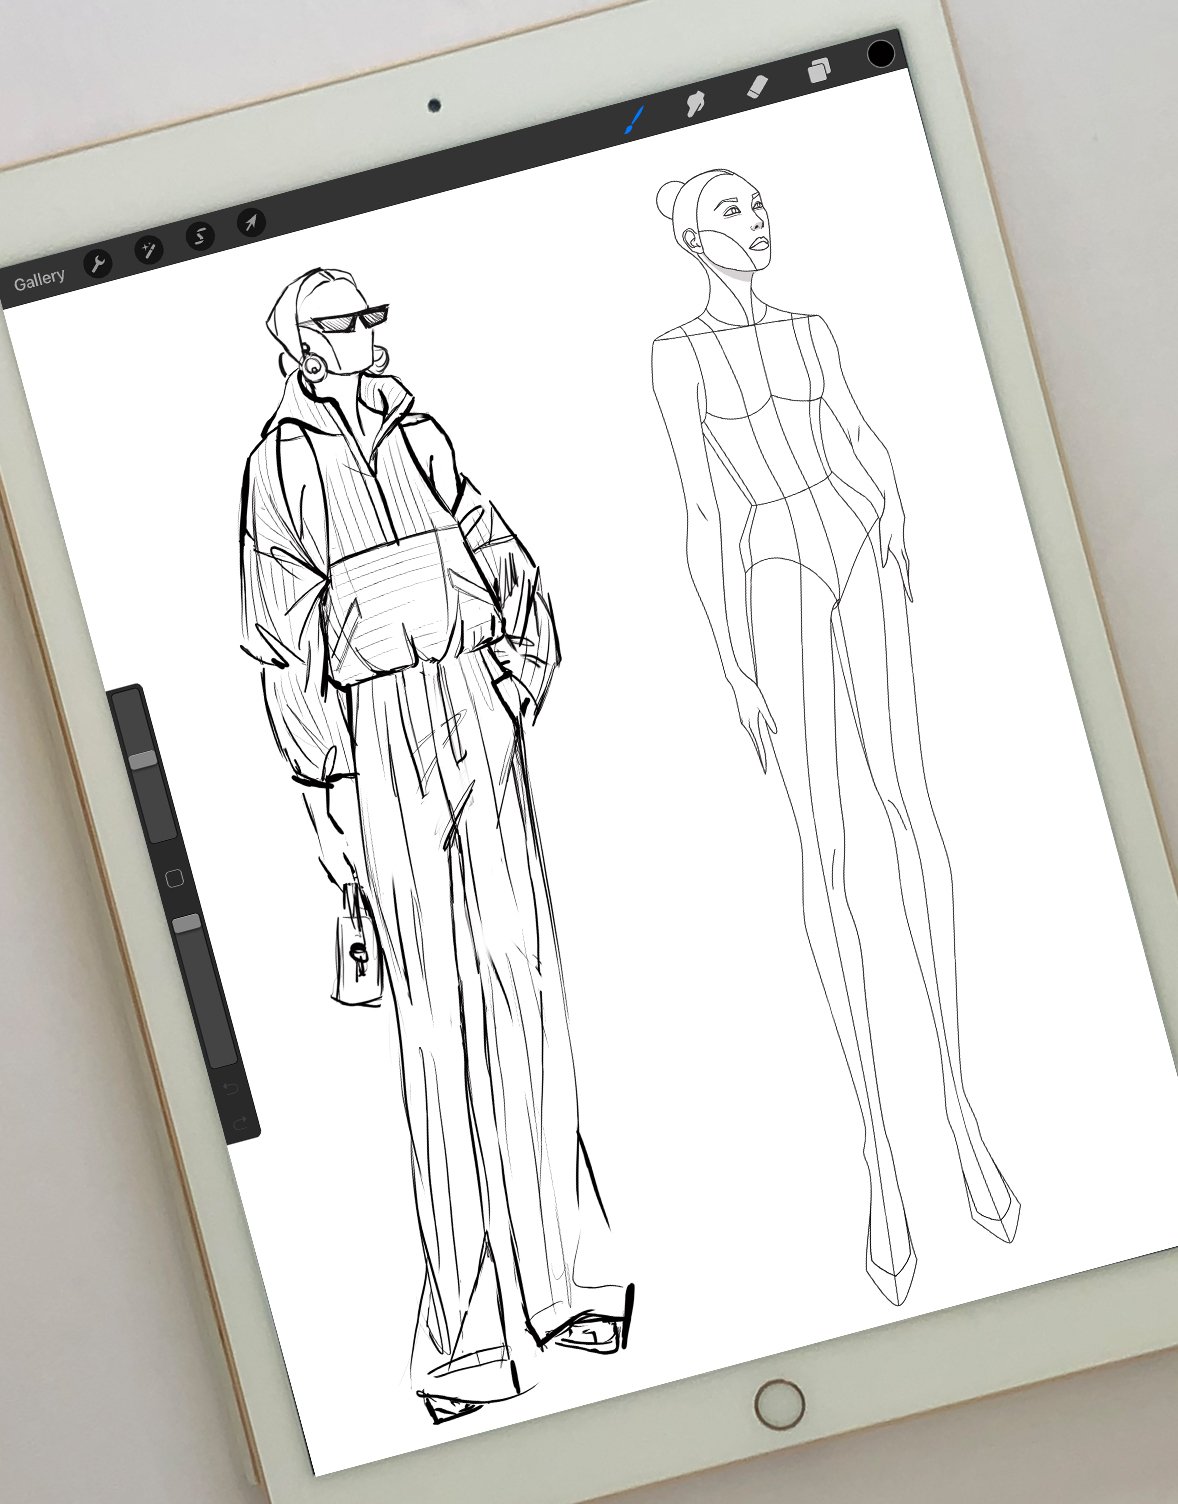
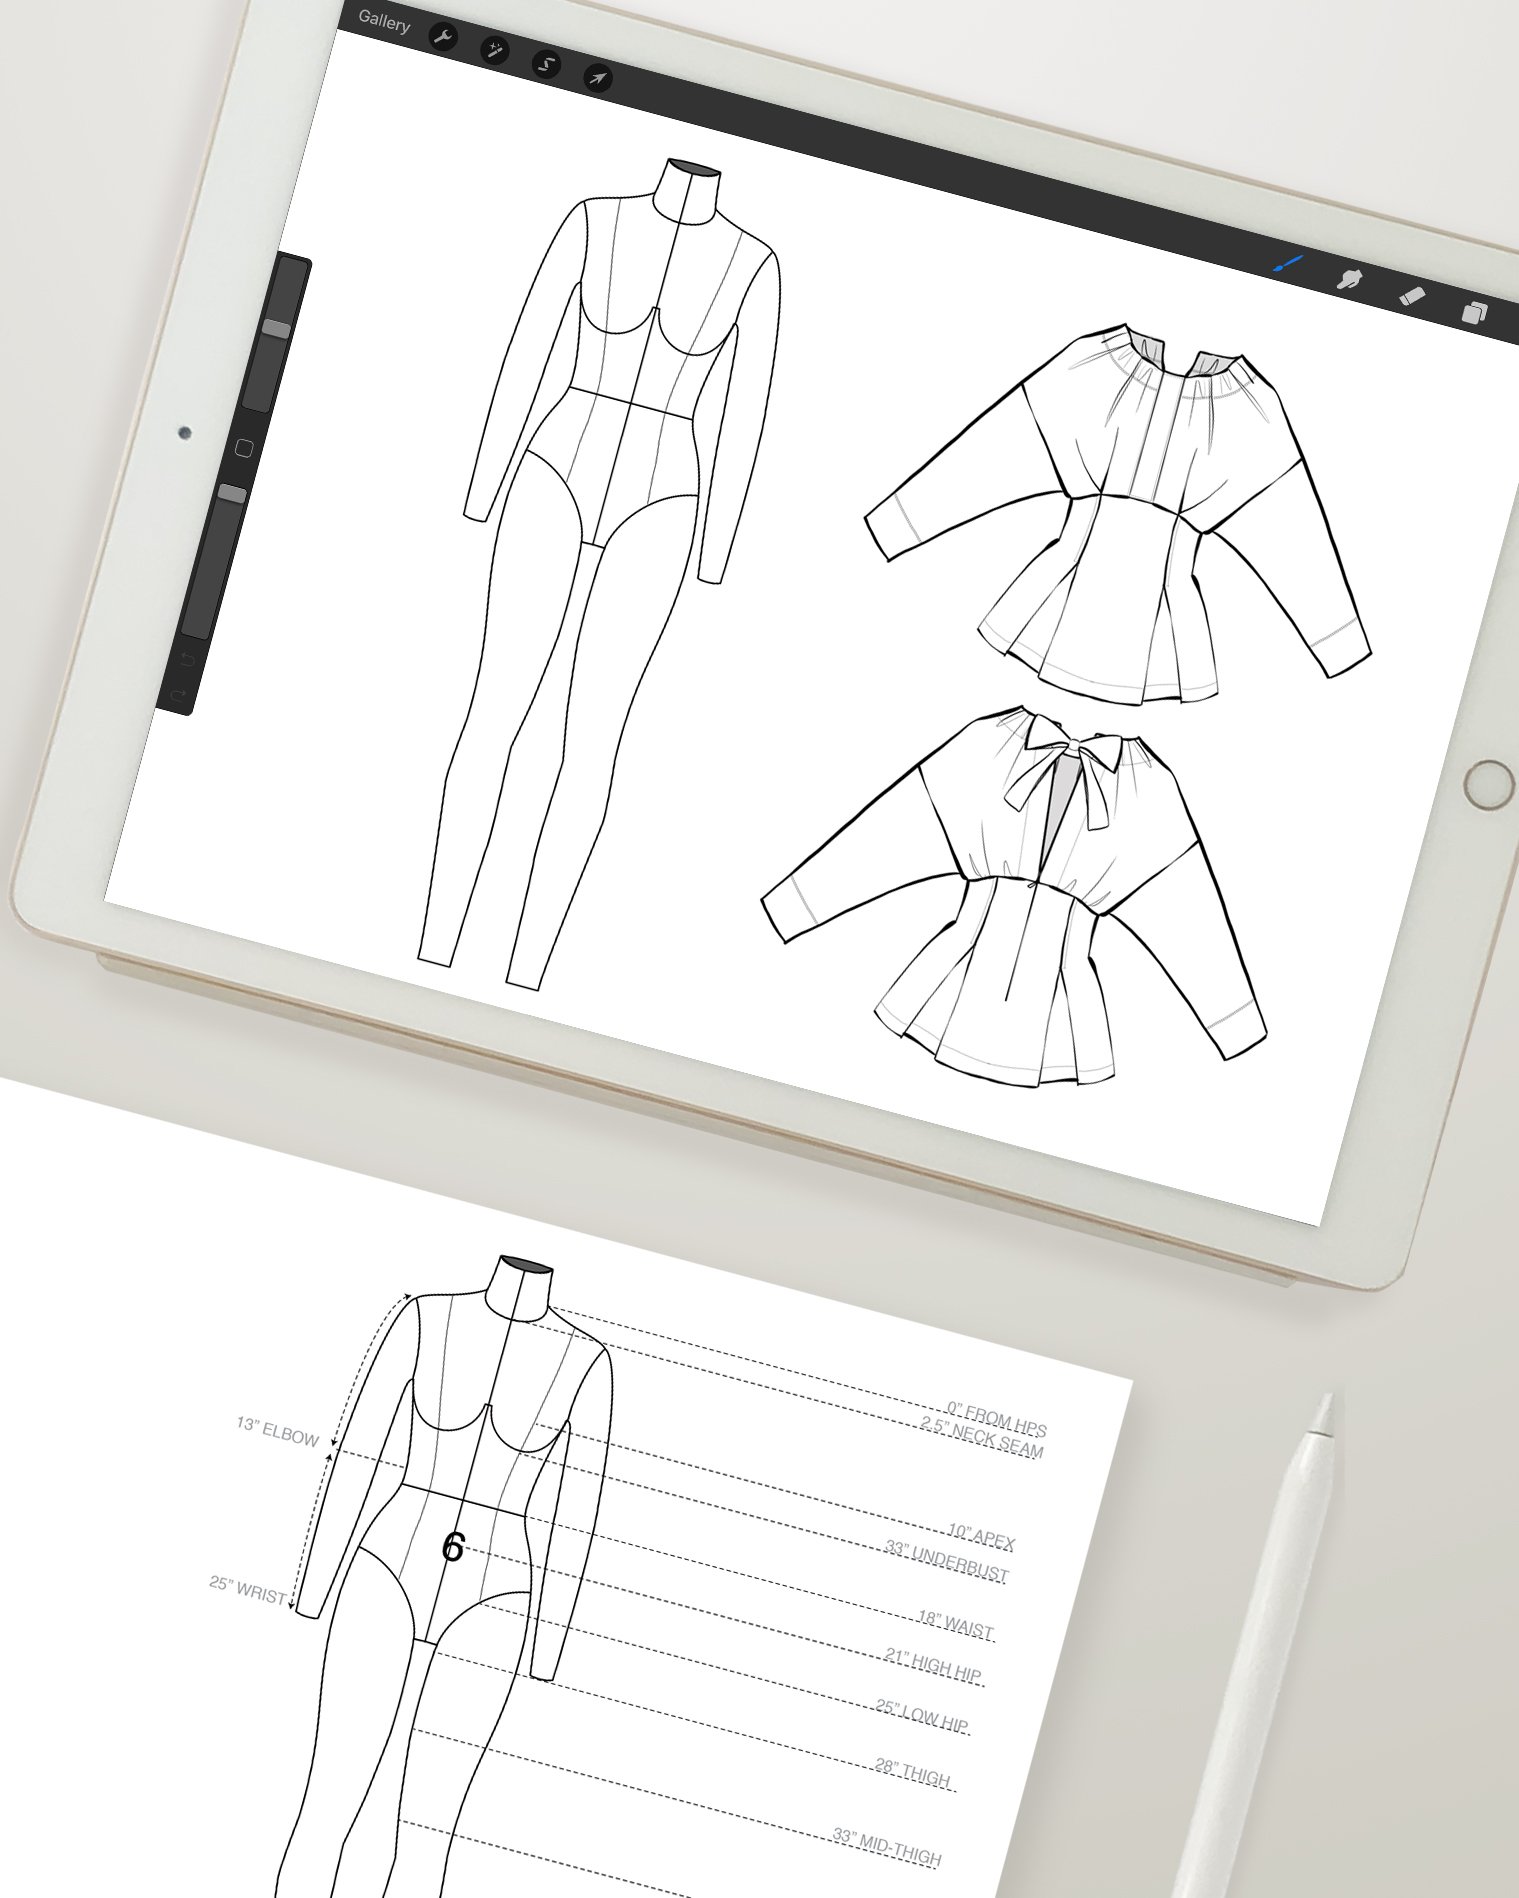
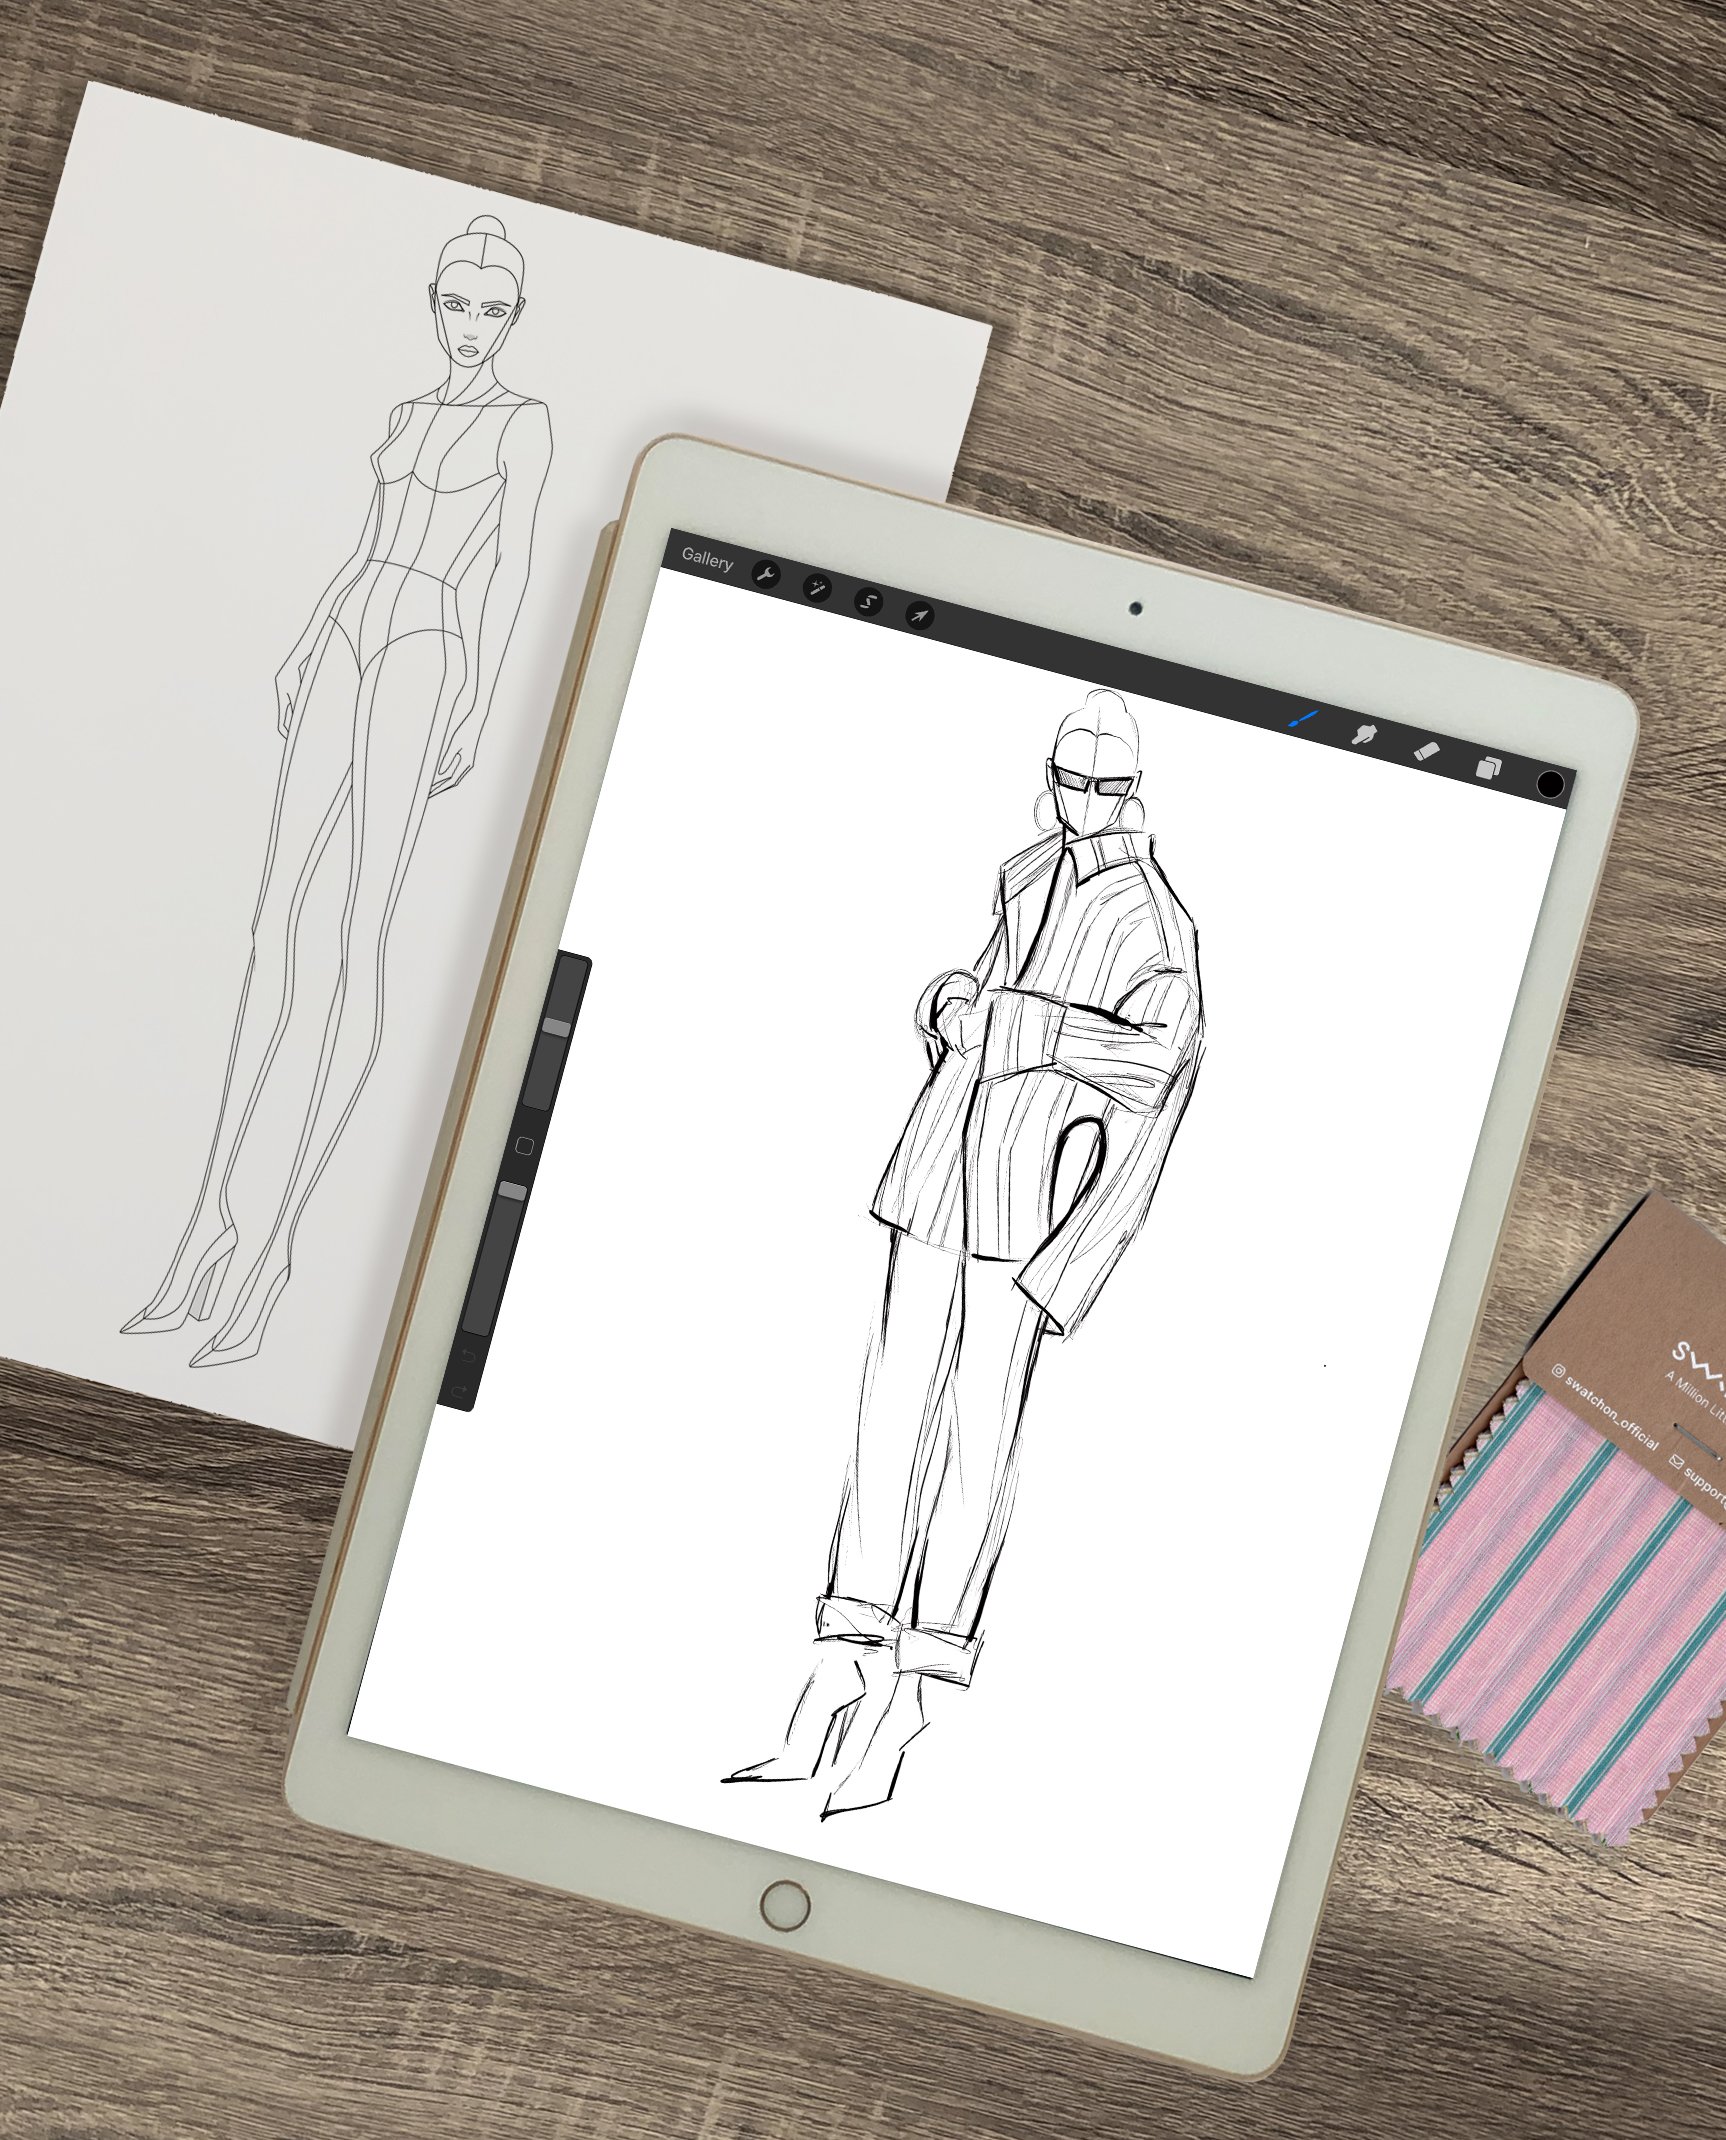
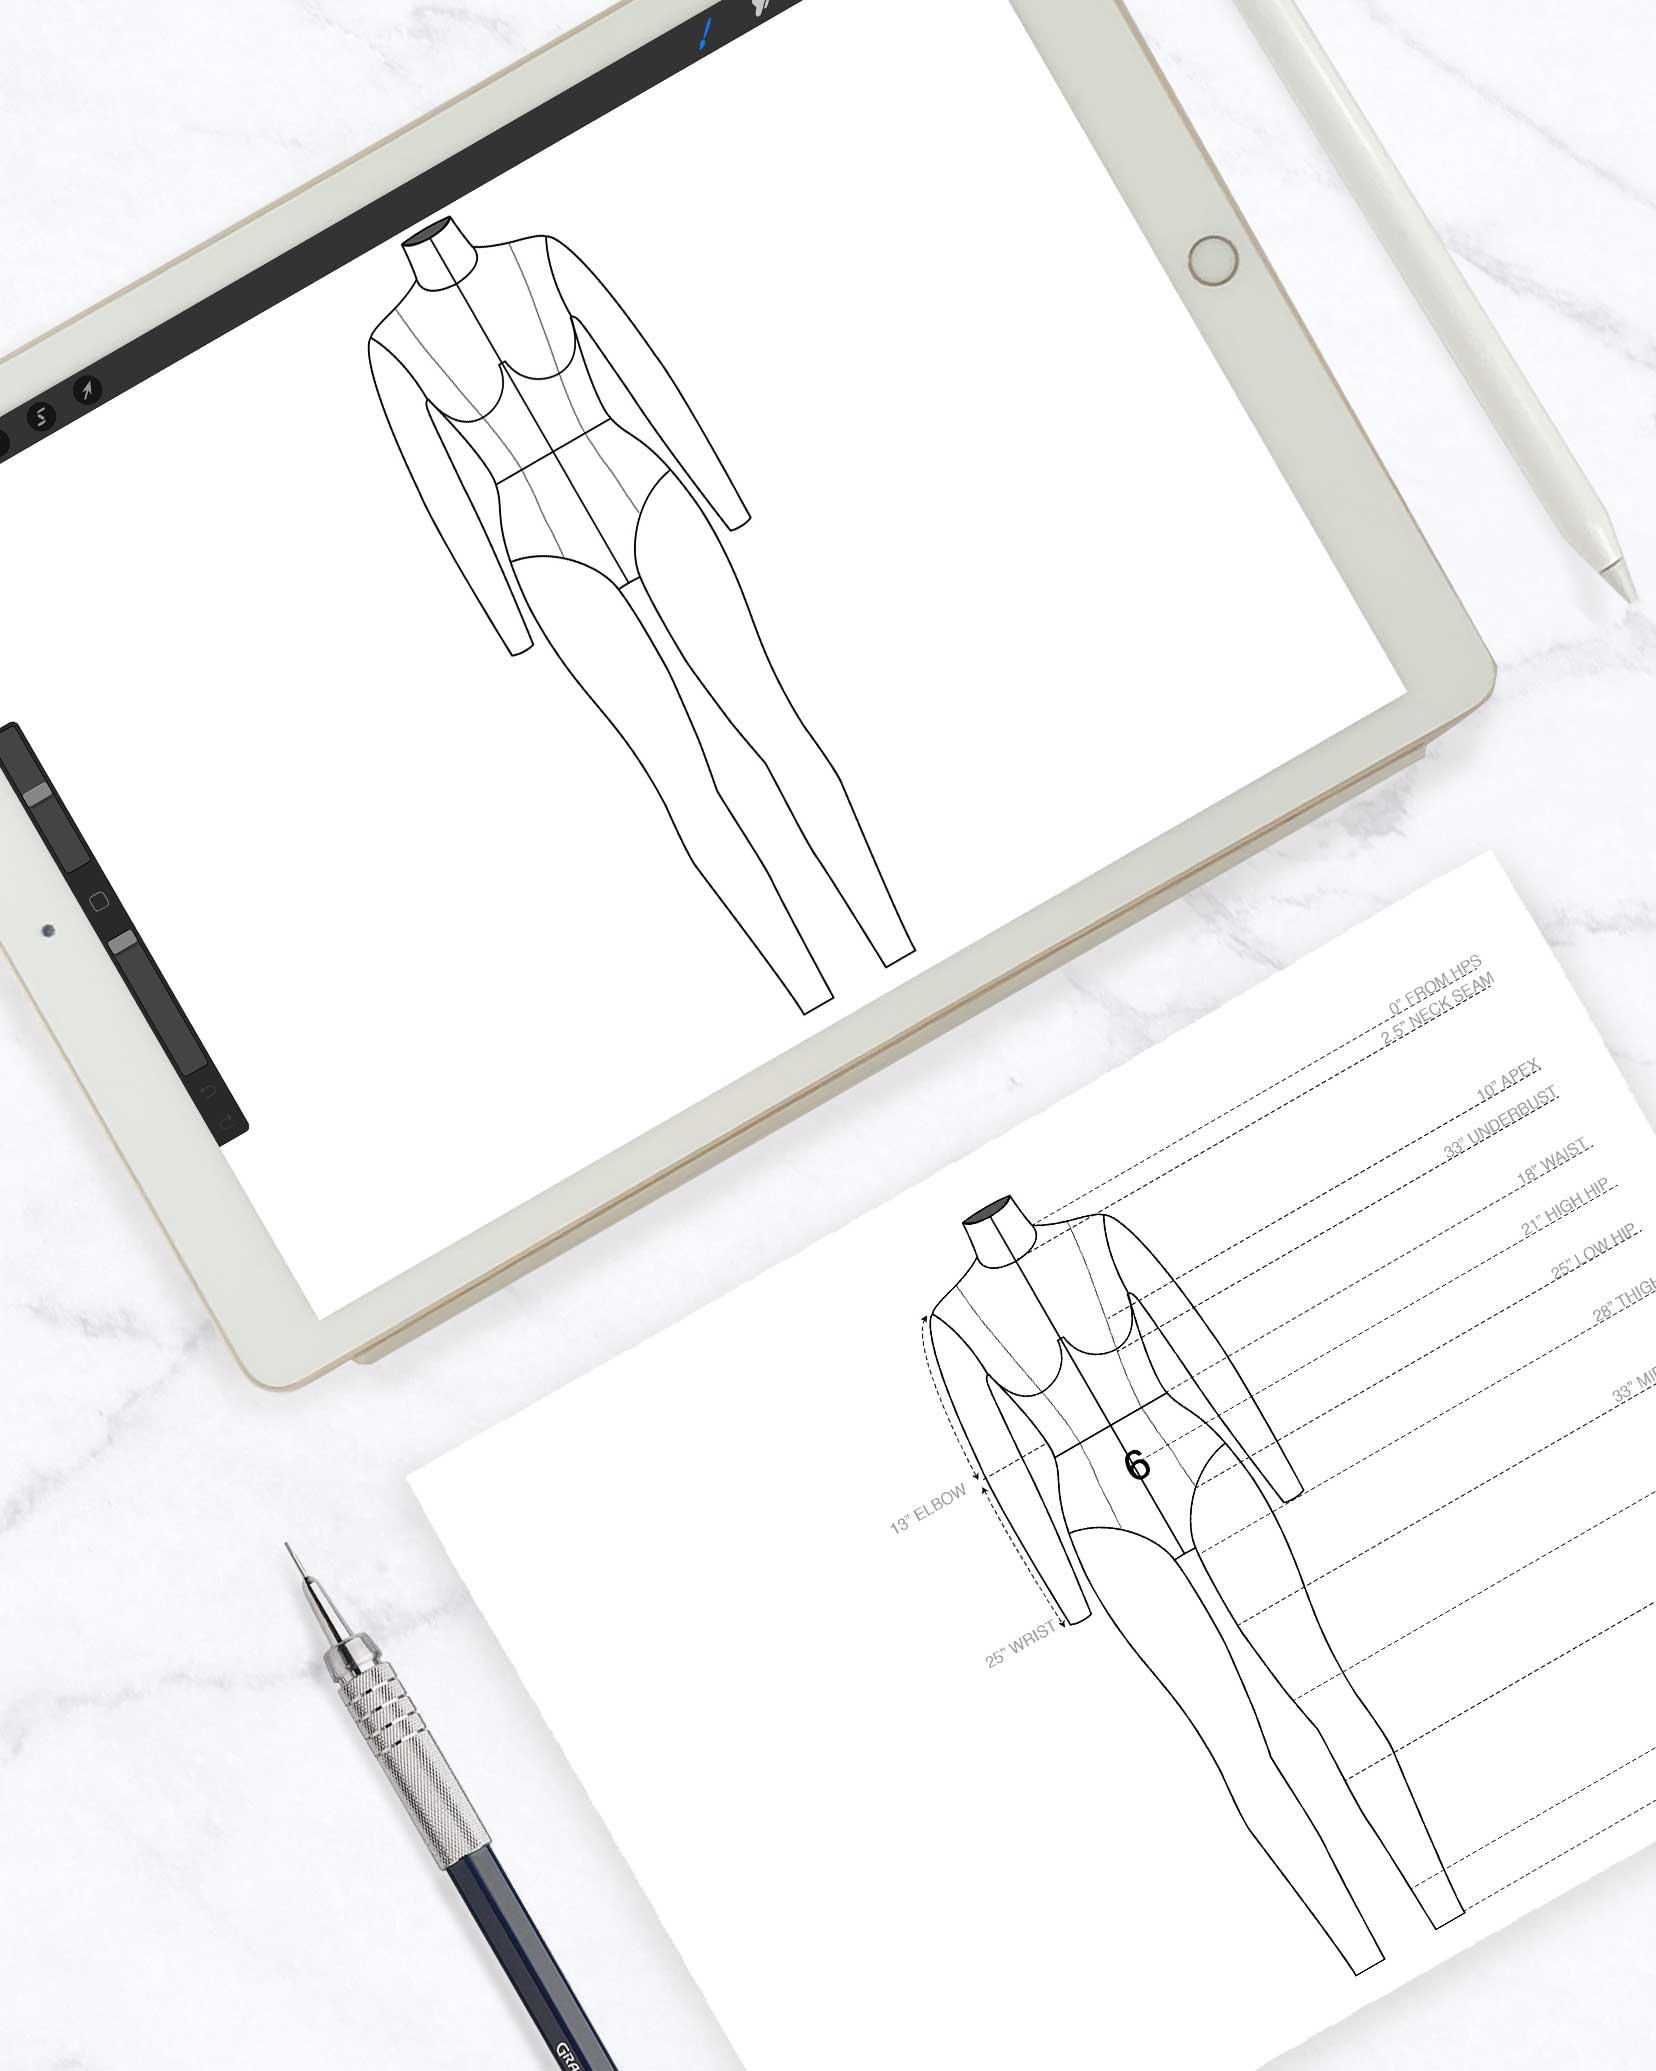
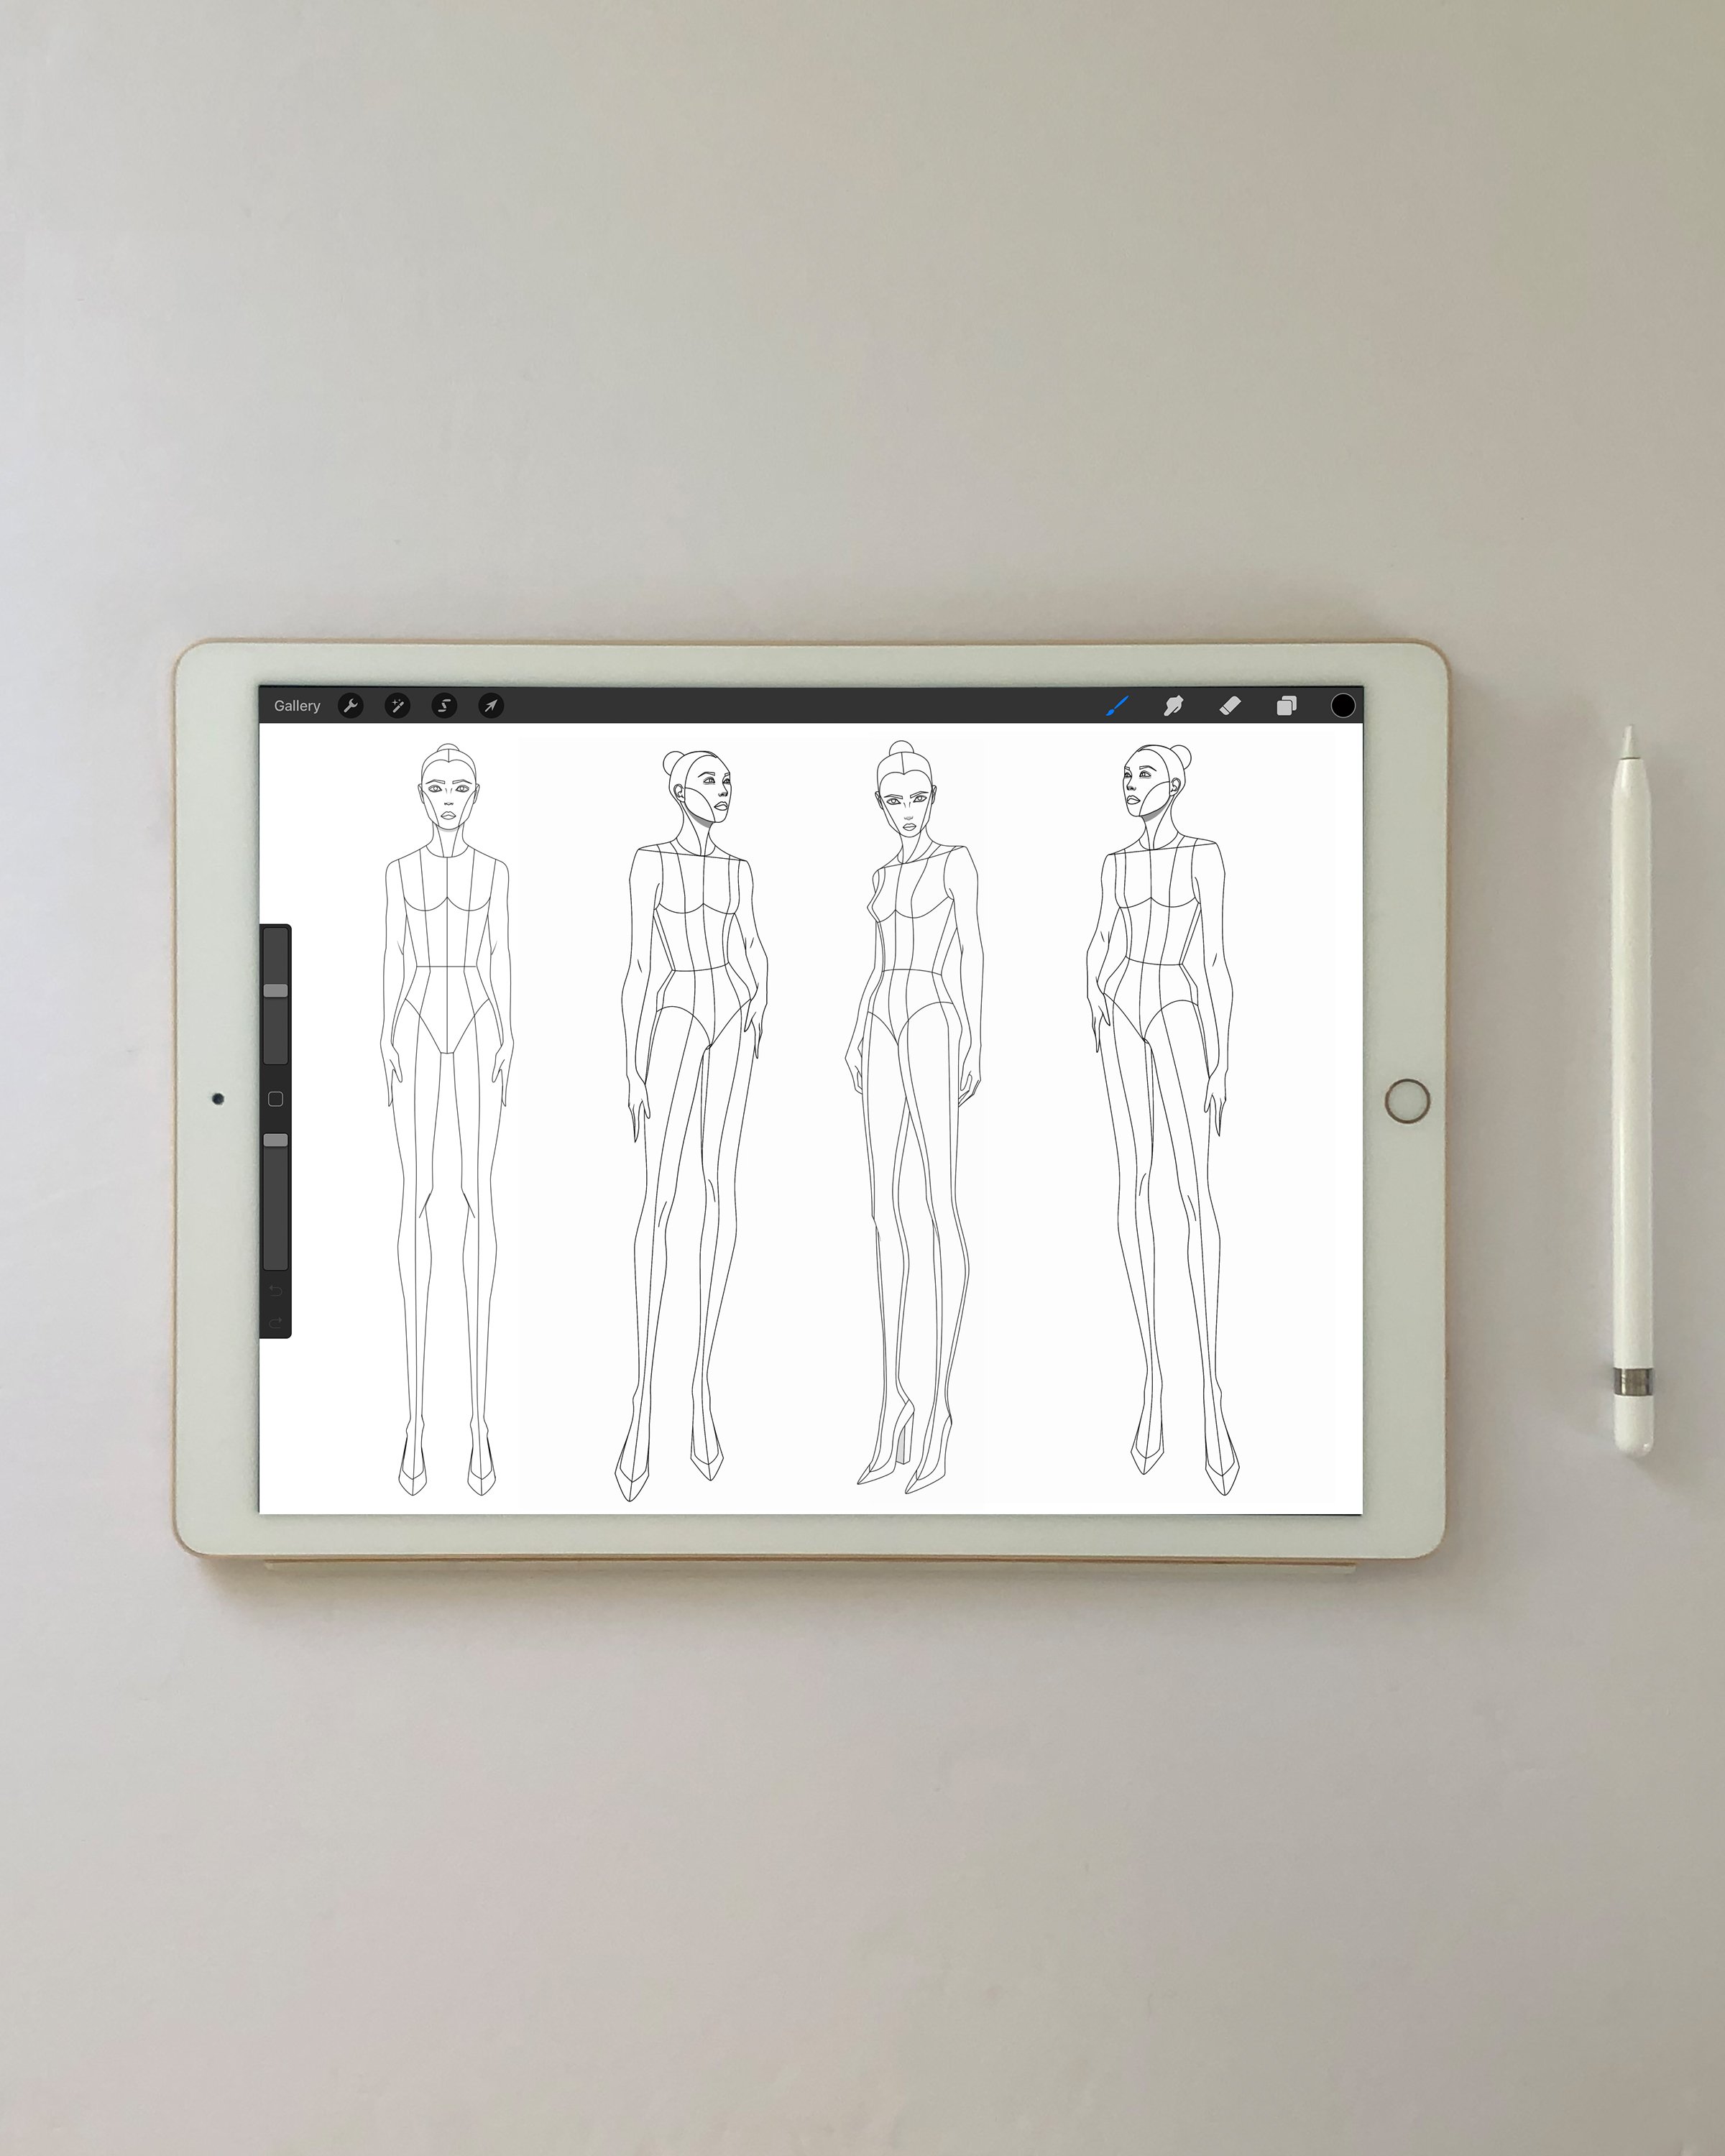
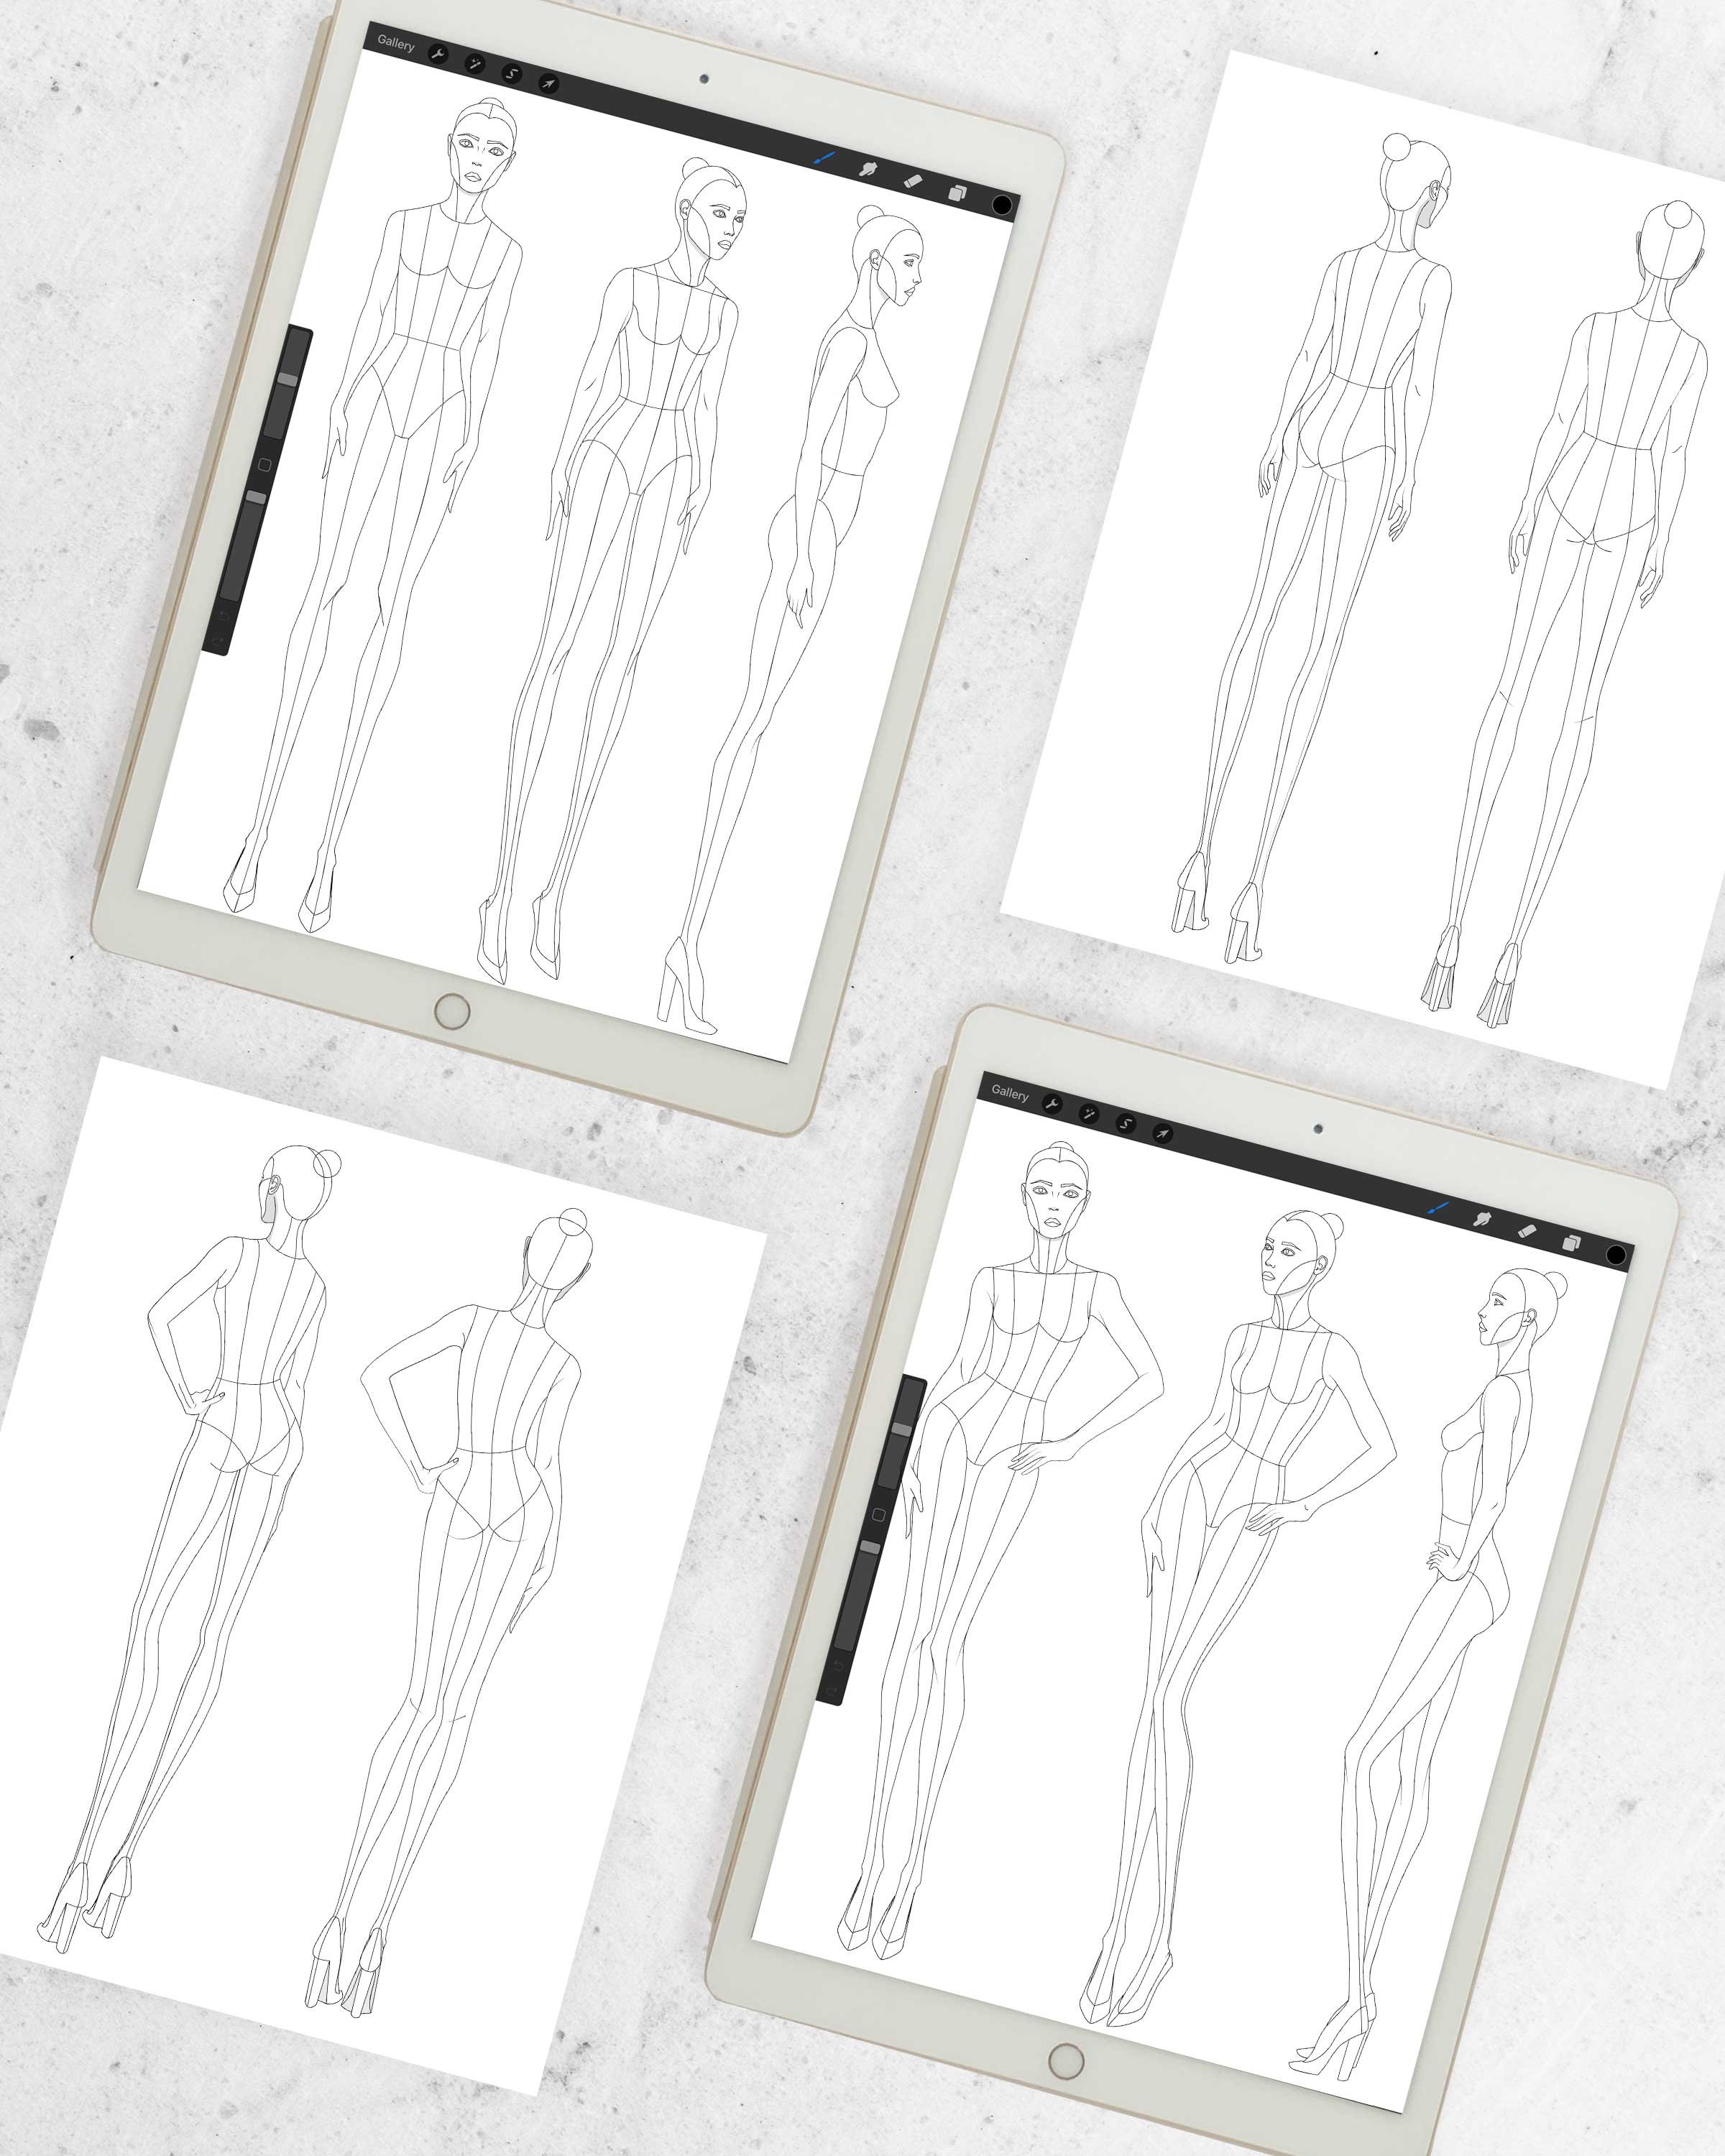
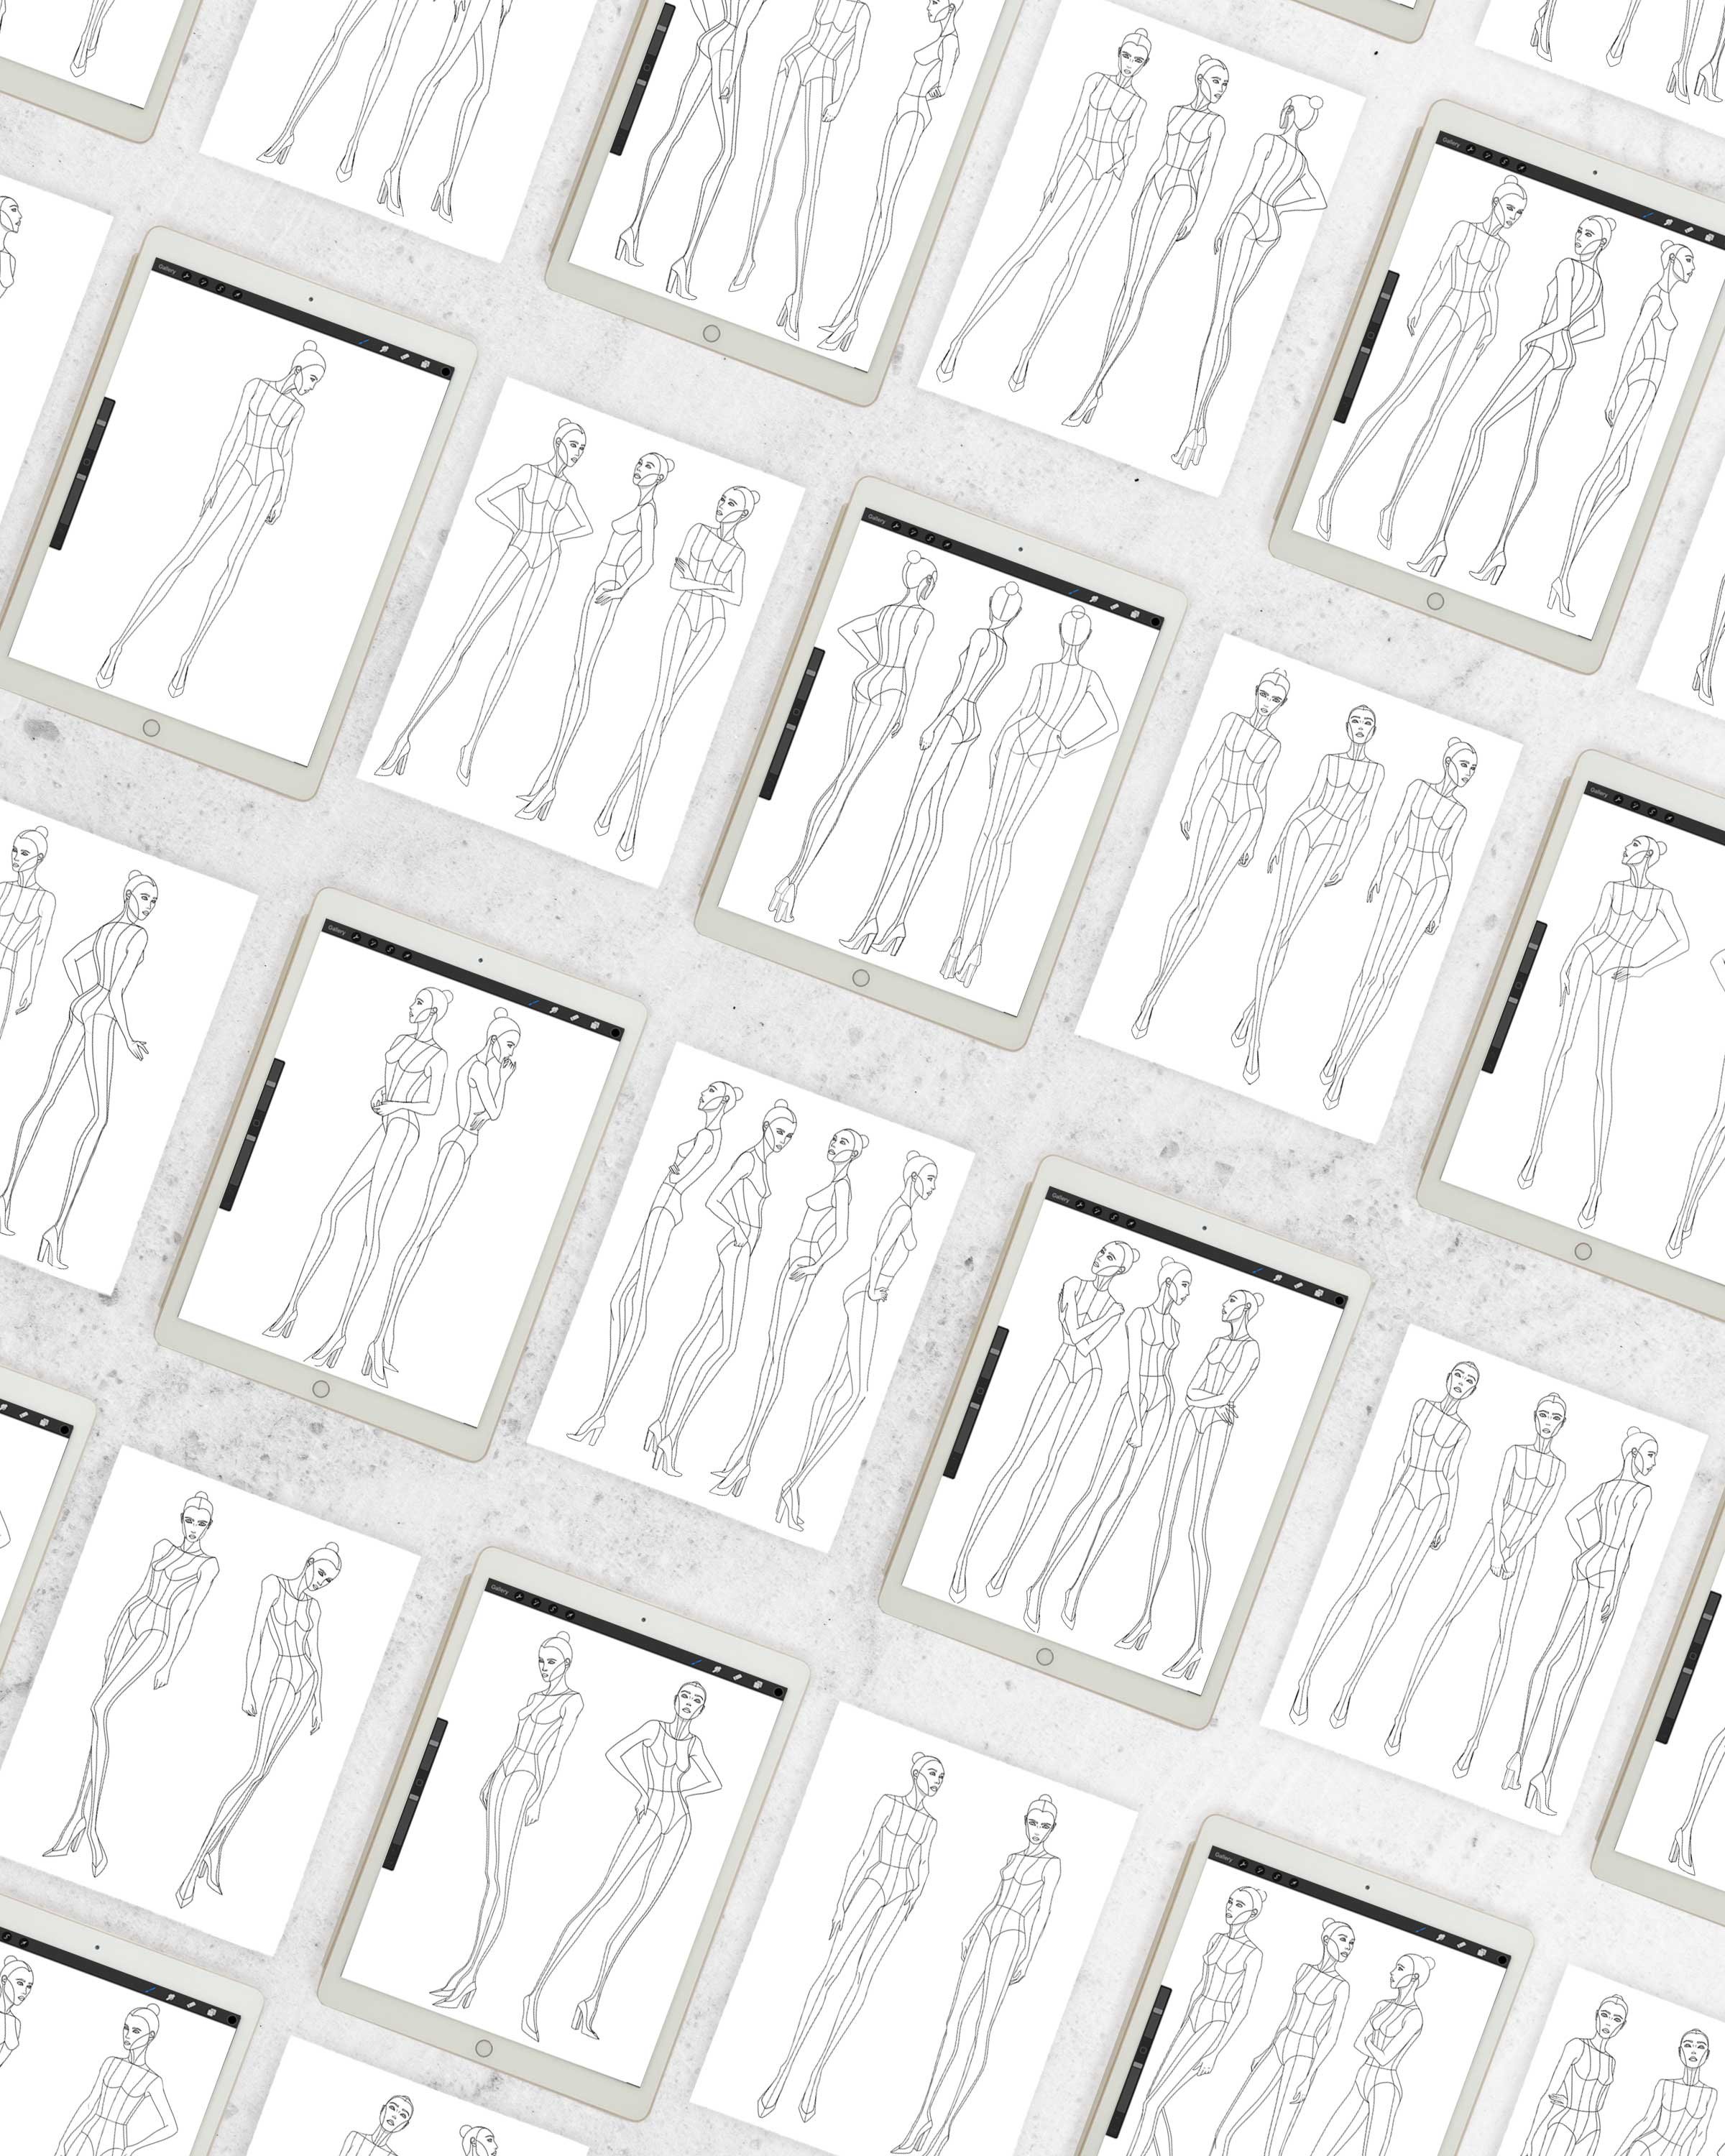
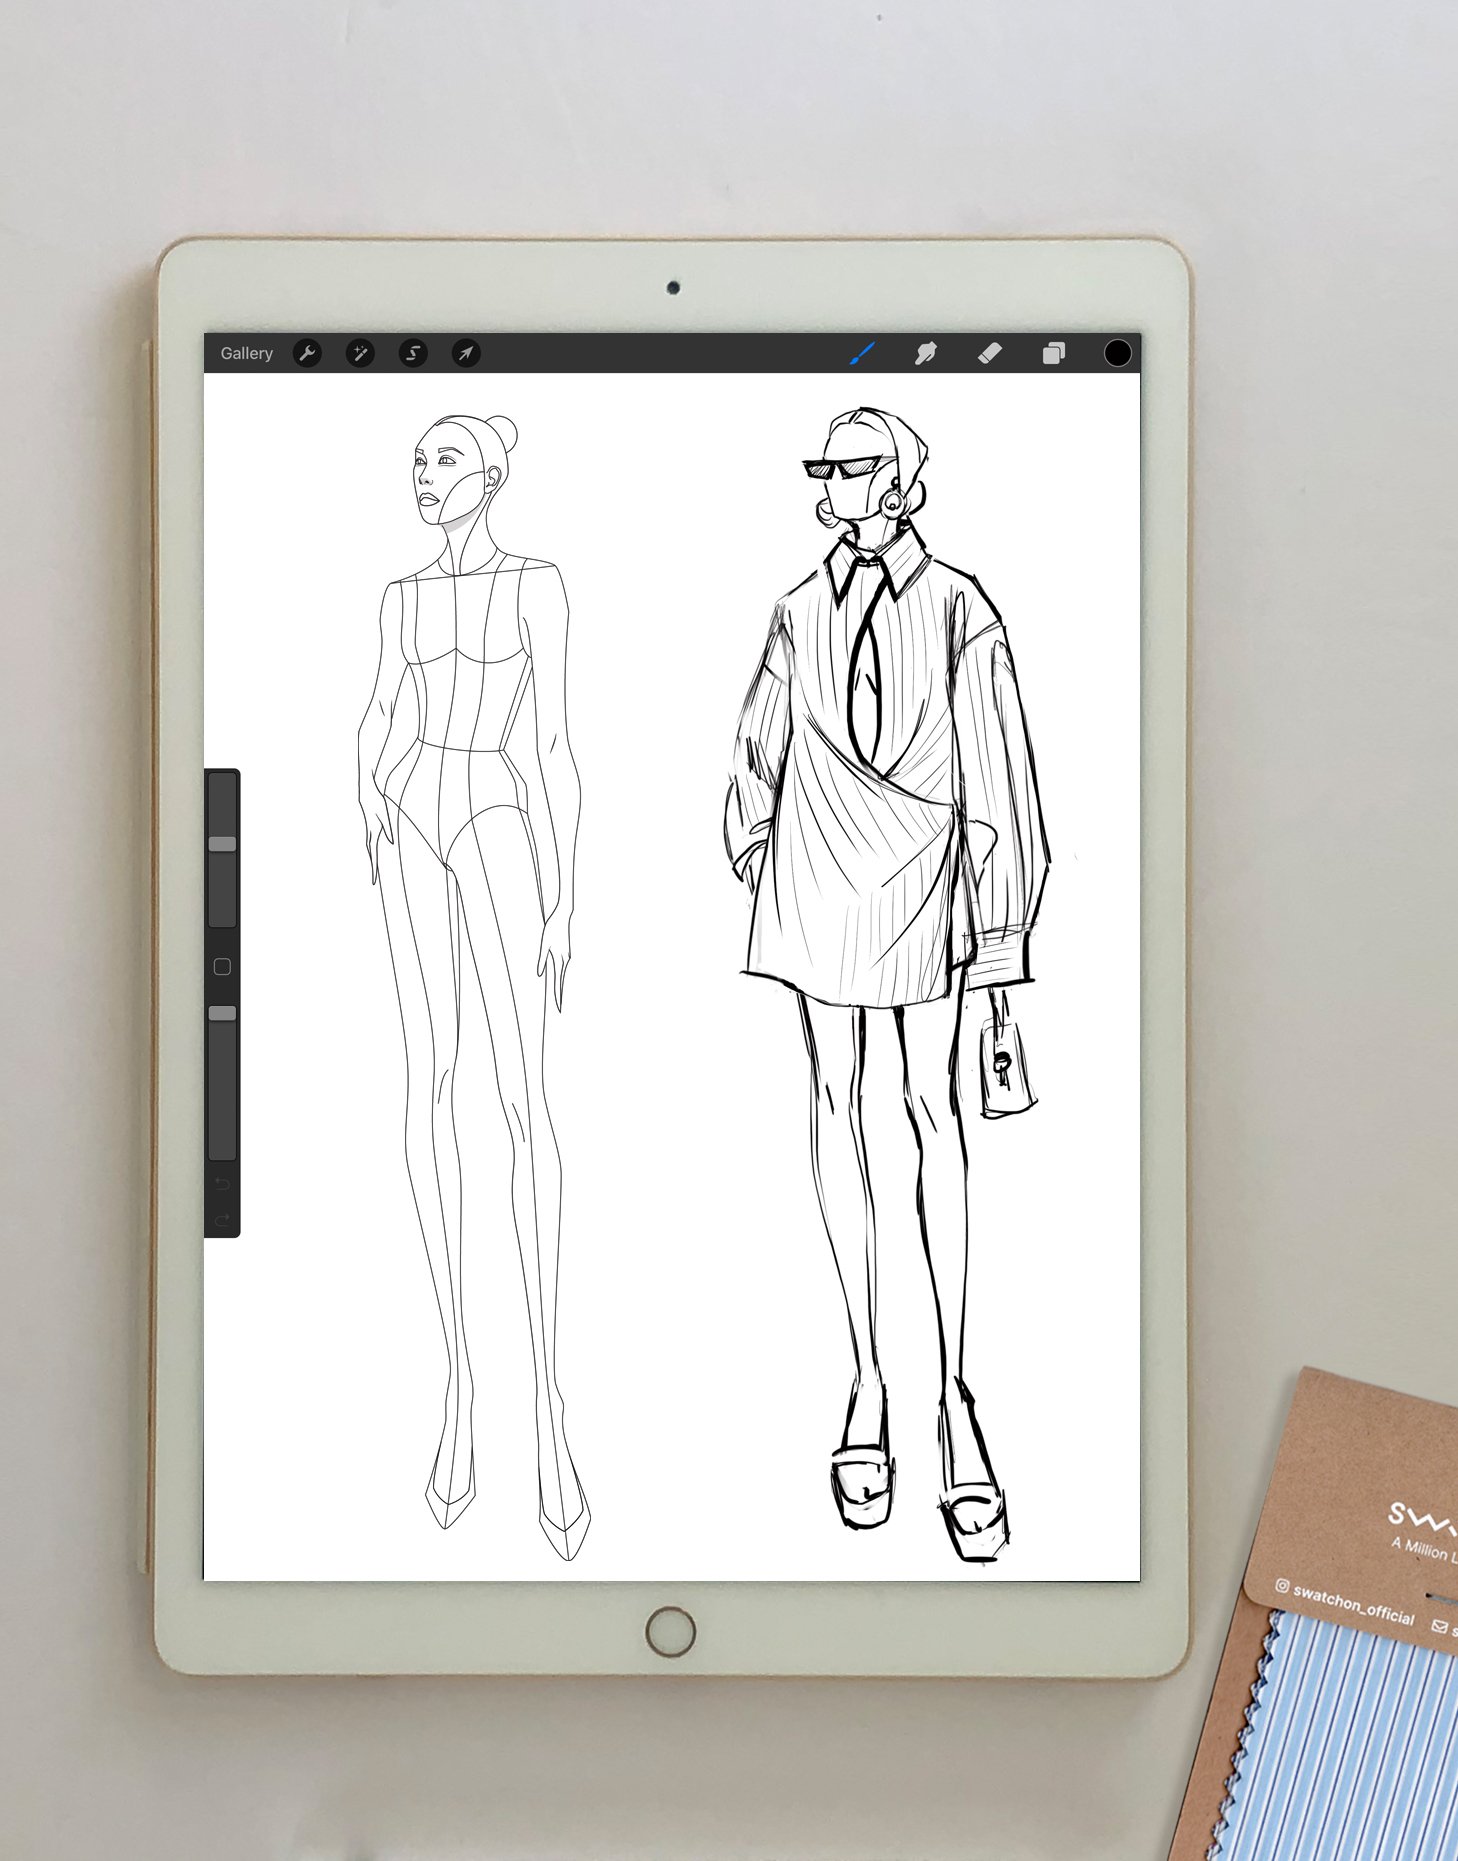
3. Get Professional Results with a Fashion Croquis
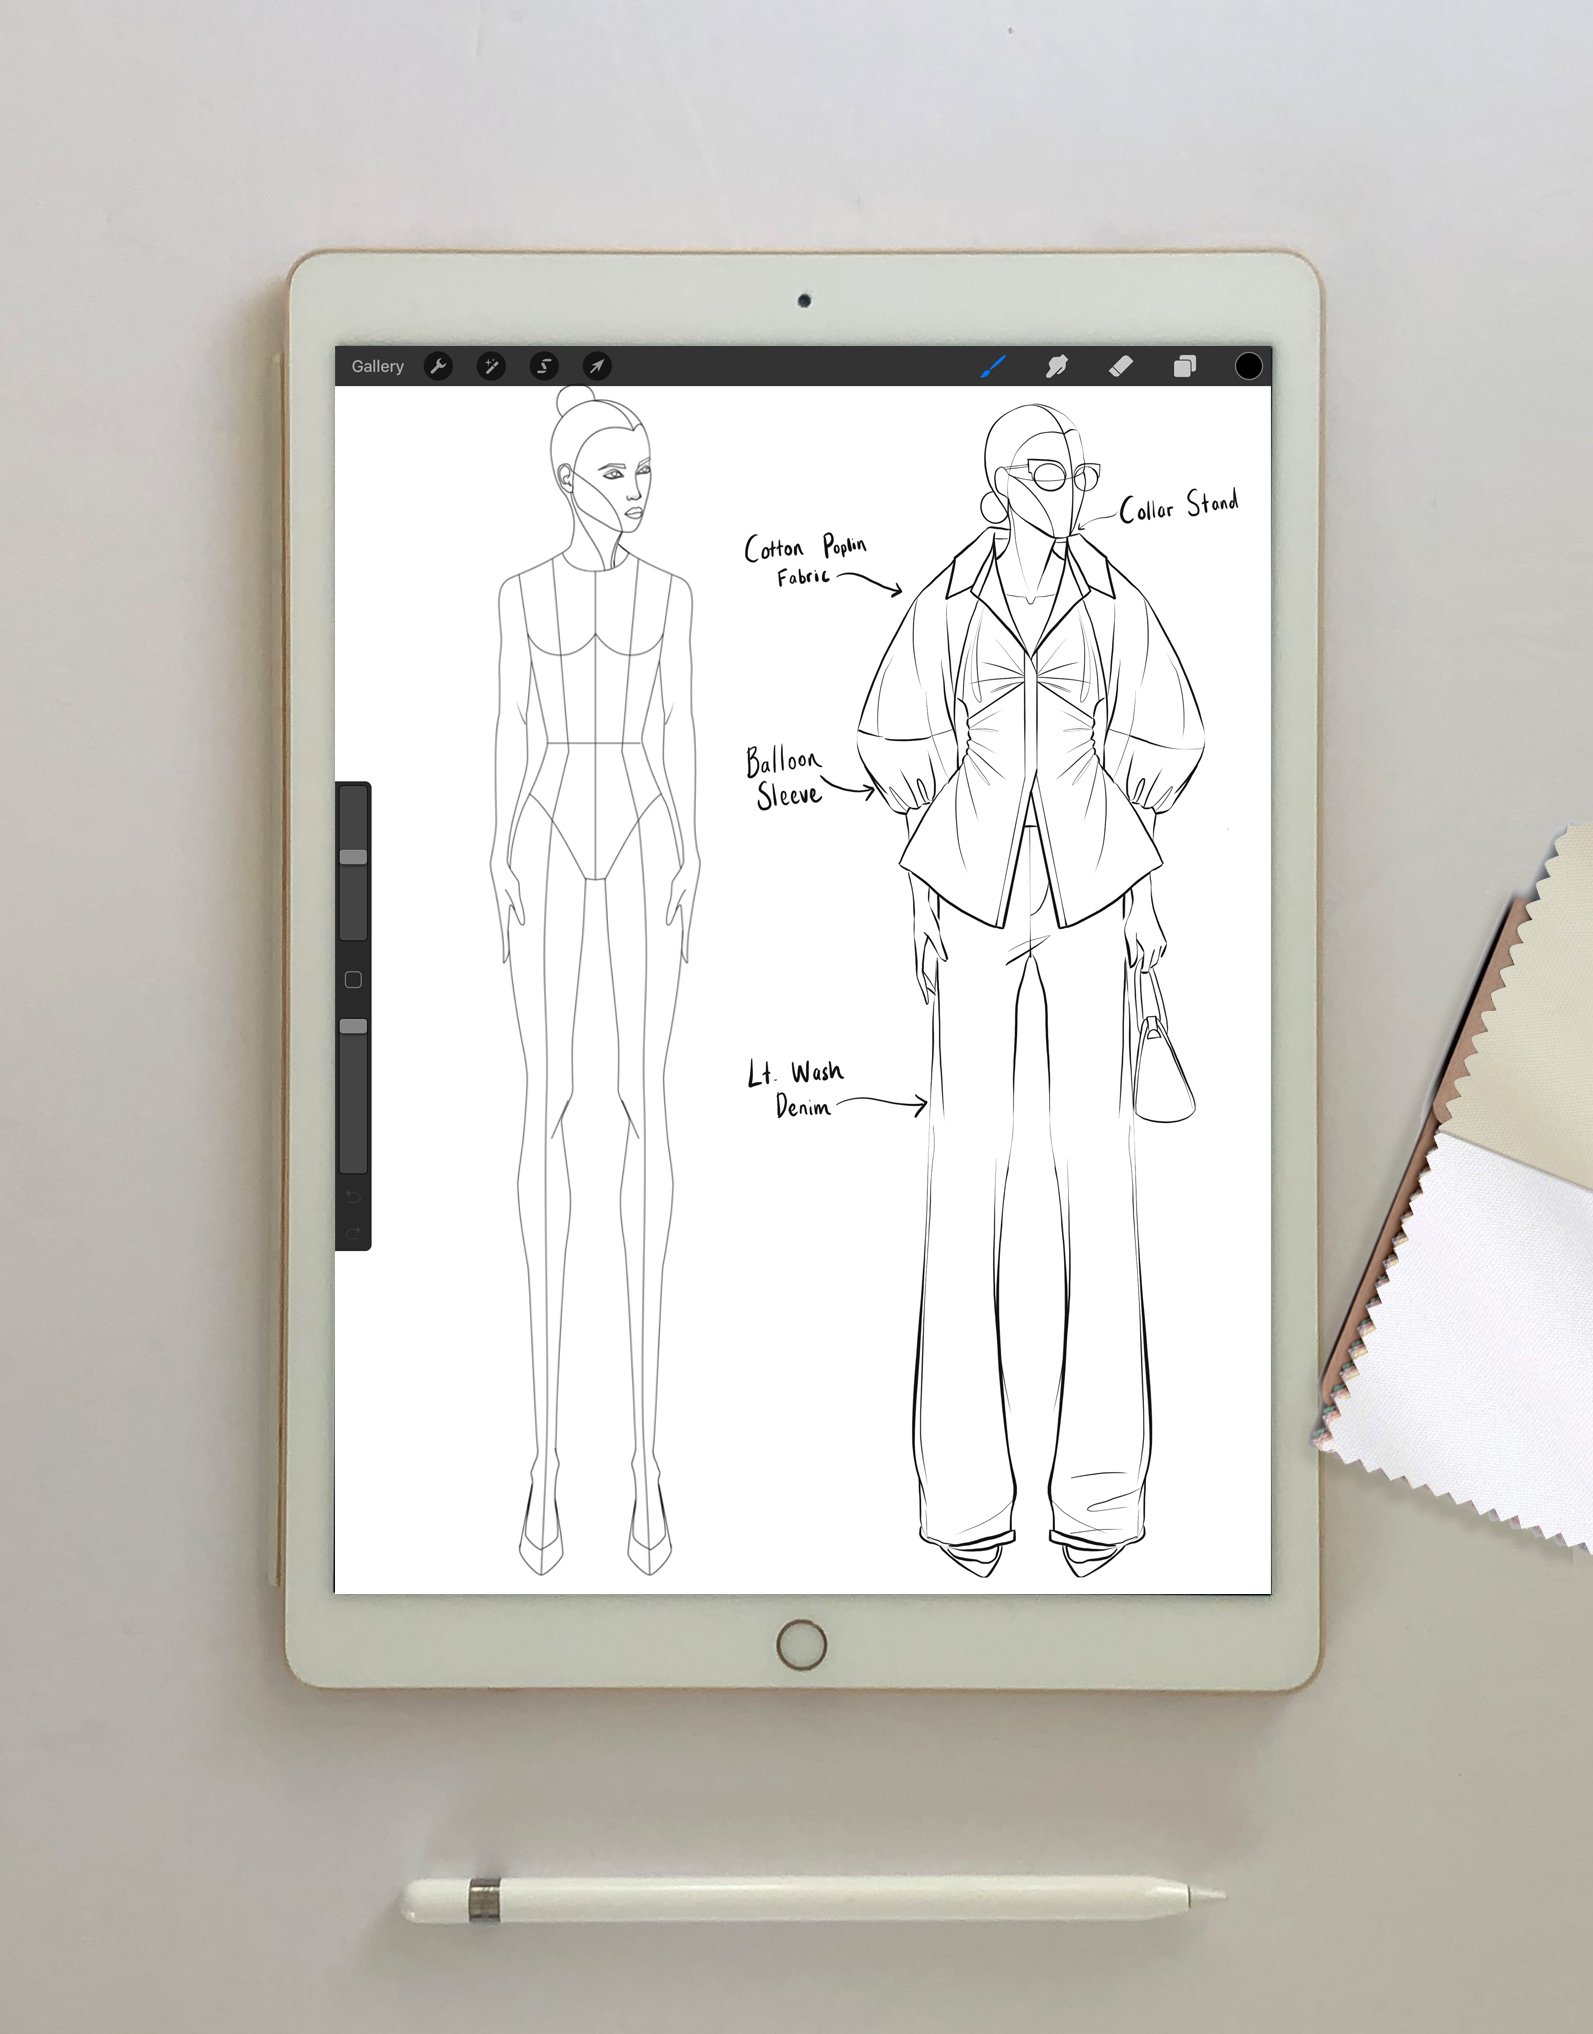
Using a fashion croquis in Procreate is essential to creating proportional, symmetrical, and polished sketches. A croquis is a simple outline drawing of a human figure that is used as a reference when creating fashion designs. It helps designers to maintain realistic proportions and keep sketches consistent.
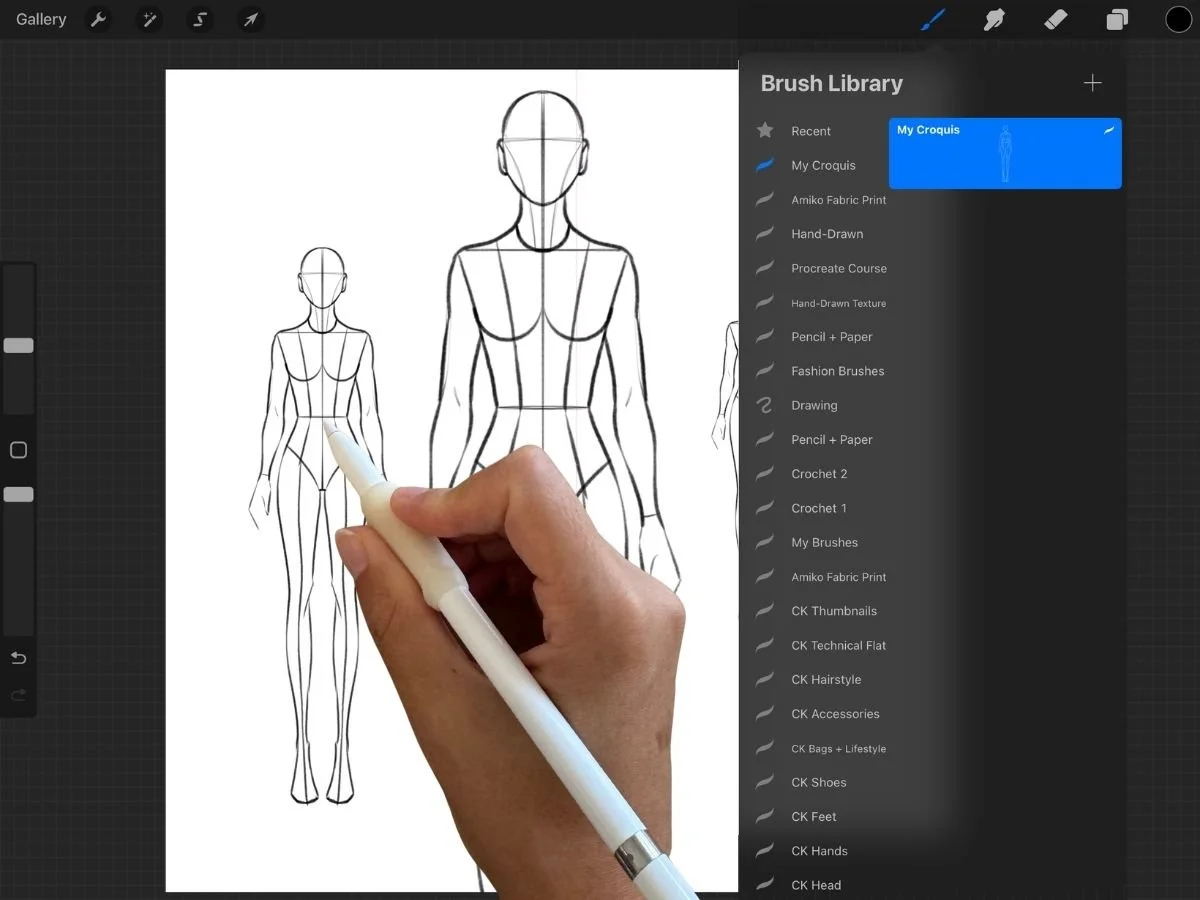
You can create your own Croquis figure stamp in Procreate, or if you're looking for high-quality croquis templates, check out the Croquis Kit. These templates are designed to help you create professional-quality fashion illustrations and come with various features, including .brushet stamp files ready to import into the Brush library in Procreate.
How to import a Croquis to Procreate:
.Brushet stamp brush files: To install new brushes into Procreate, download and import them to your files on your iPad. You can also download the files to your computer and airdrop them to your iPad. Click on the .brushet file and it will automatically import to Procreate.
Another option is to tap the paintbrush icon to open the brush library, tap the + button at the top of the panel, click import (under “stroke path” of the brush studio), select the .brushet file. The brush will appear at the top of the brush library.
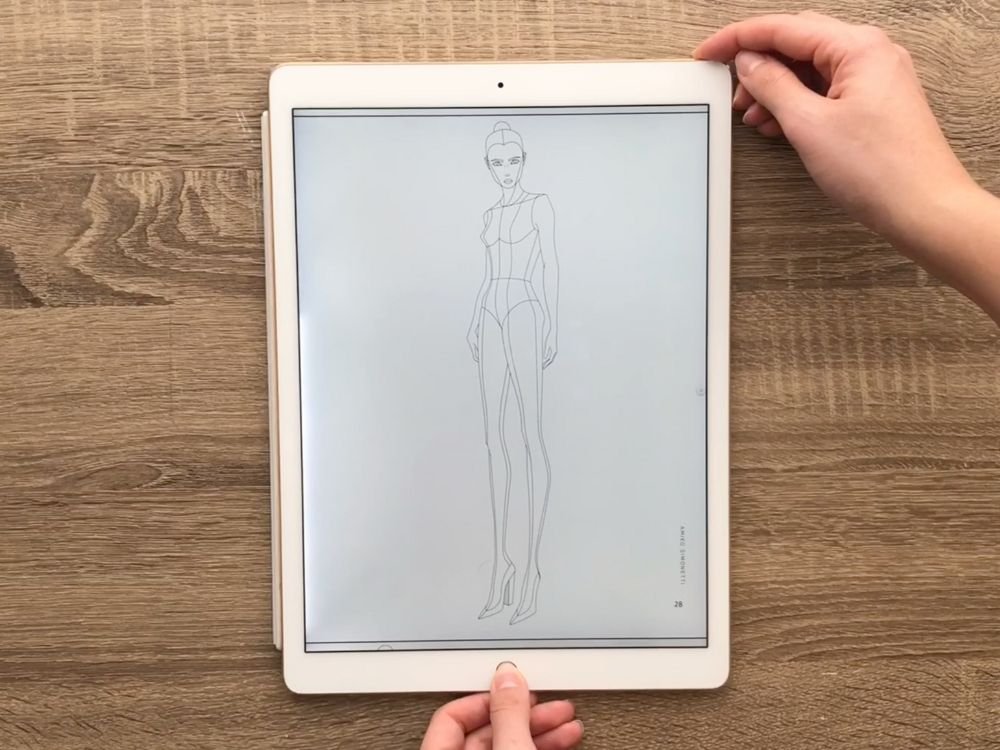
All other files: First, save the croquis to your photos or files. You can save templates to your photo by taking a screenshot by pressing and releasing the iPad’s top and home buttons at the same time.
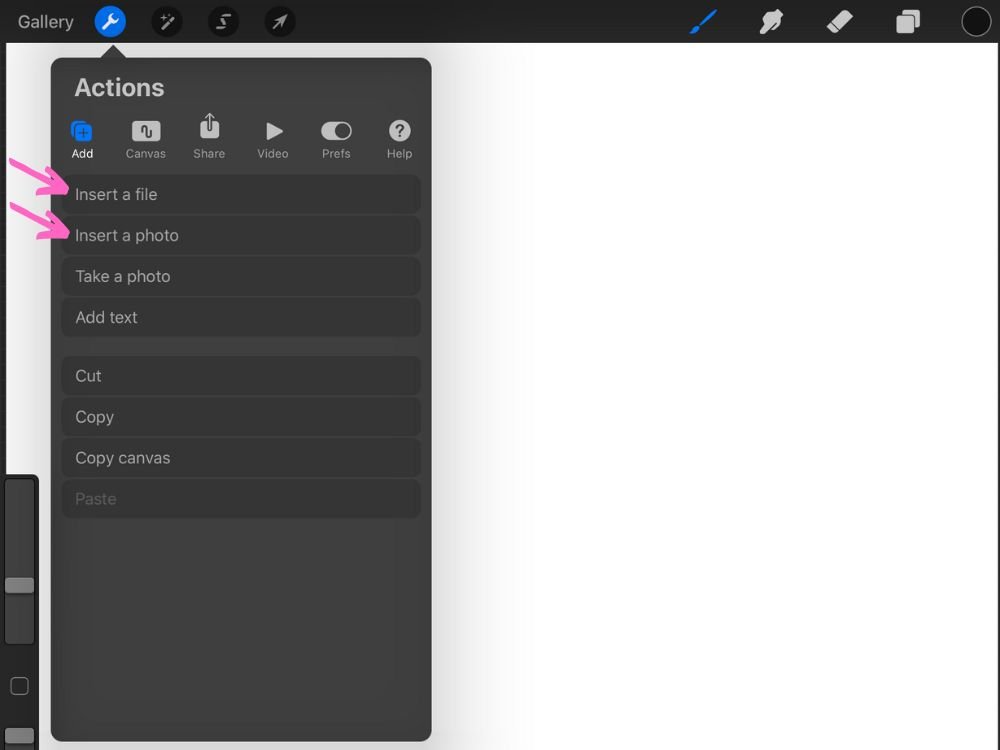
To import a croquis into a new layer in Procreate, tap the Actions button (wrench icon) in the toolbar at the top left of the screen. Tap Add then Insert a Photo or Insert a File. The image will be added to a new layer in your document, which you can then use as a reference or guide for your artwork, or as a starting point for your design.
How to reduce the opacity and lock the Croquis Layer:
I recommend reducing the opacity and locking the layer to prevent accidentally drawing on the croquis layer. To reduce the opacity of a layer in Procreate, open the Layers Panel by tapping the double rectangle symbol in the top right of Procreate's interface, tap the small letter on the right side of the layer, and move the slider under Opacity to your desired level. Swipe the layer to the left and tap Lock. To unlock the layer for editing, swipe the layer to the left again and tap Unlock. Note: the opacity of a layer can’t be edited unless it’s unlocked.


How to create a new Layer:
To add your design on top of the croquis, create a new layer in Procreate. Create a new layer by tapping the create layer button (+) at the top right corner of the layers panel. Now you can draw your sketch in a new layer independent of the croquis. This will allow you to see your illustration while still maintaining the underlying structure and guidelines of the croquis. To toggle the croquis visibility on and off, tap the check mark to the right of each layer.

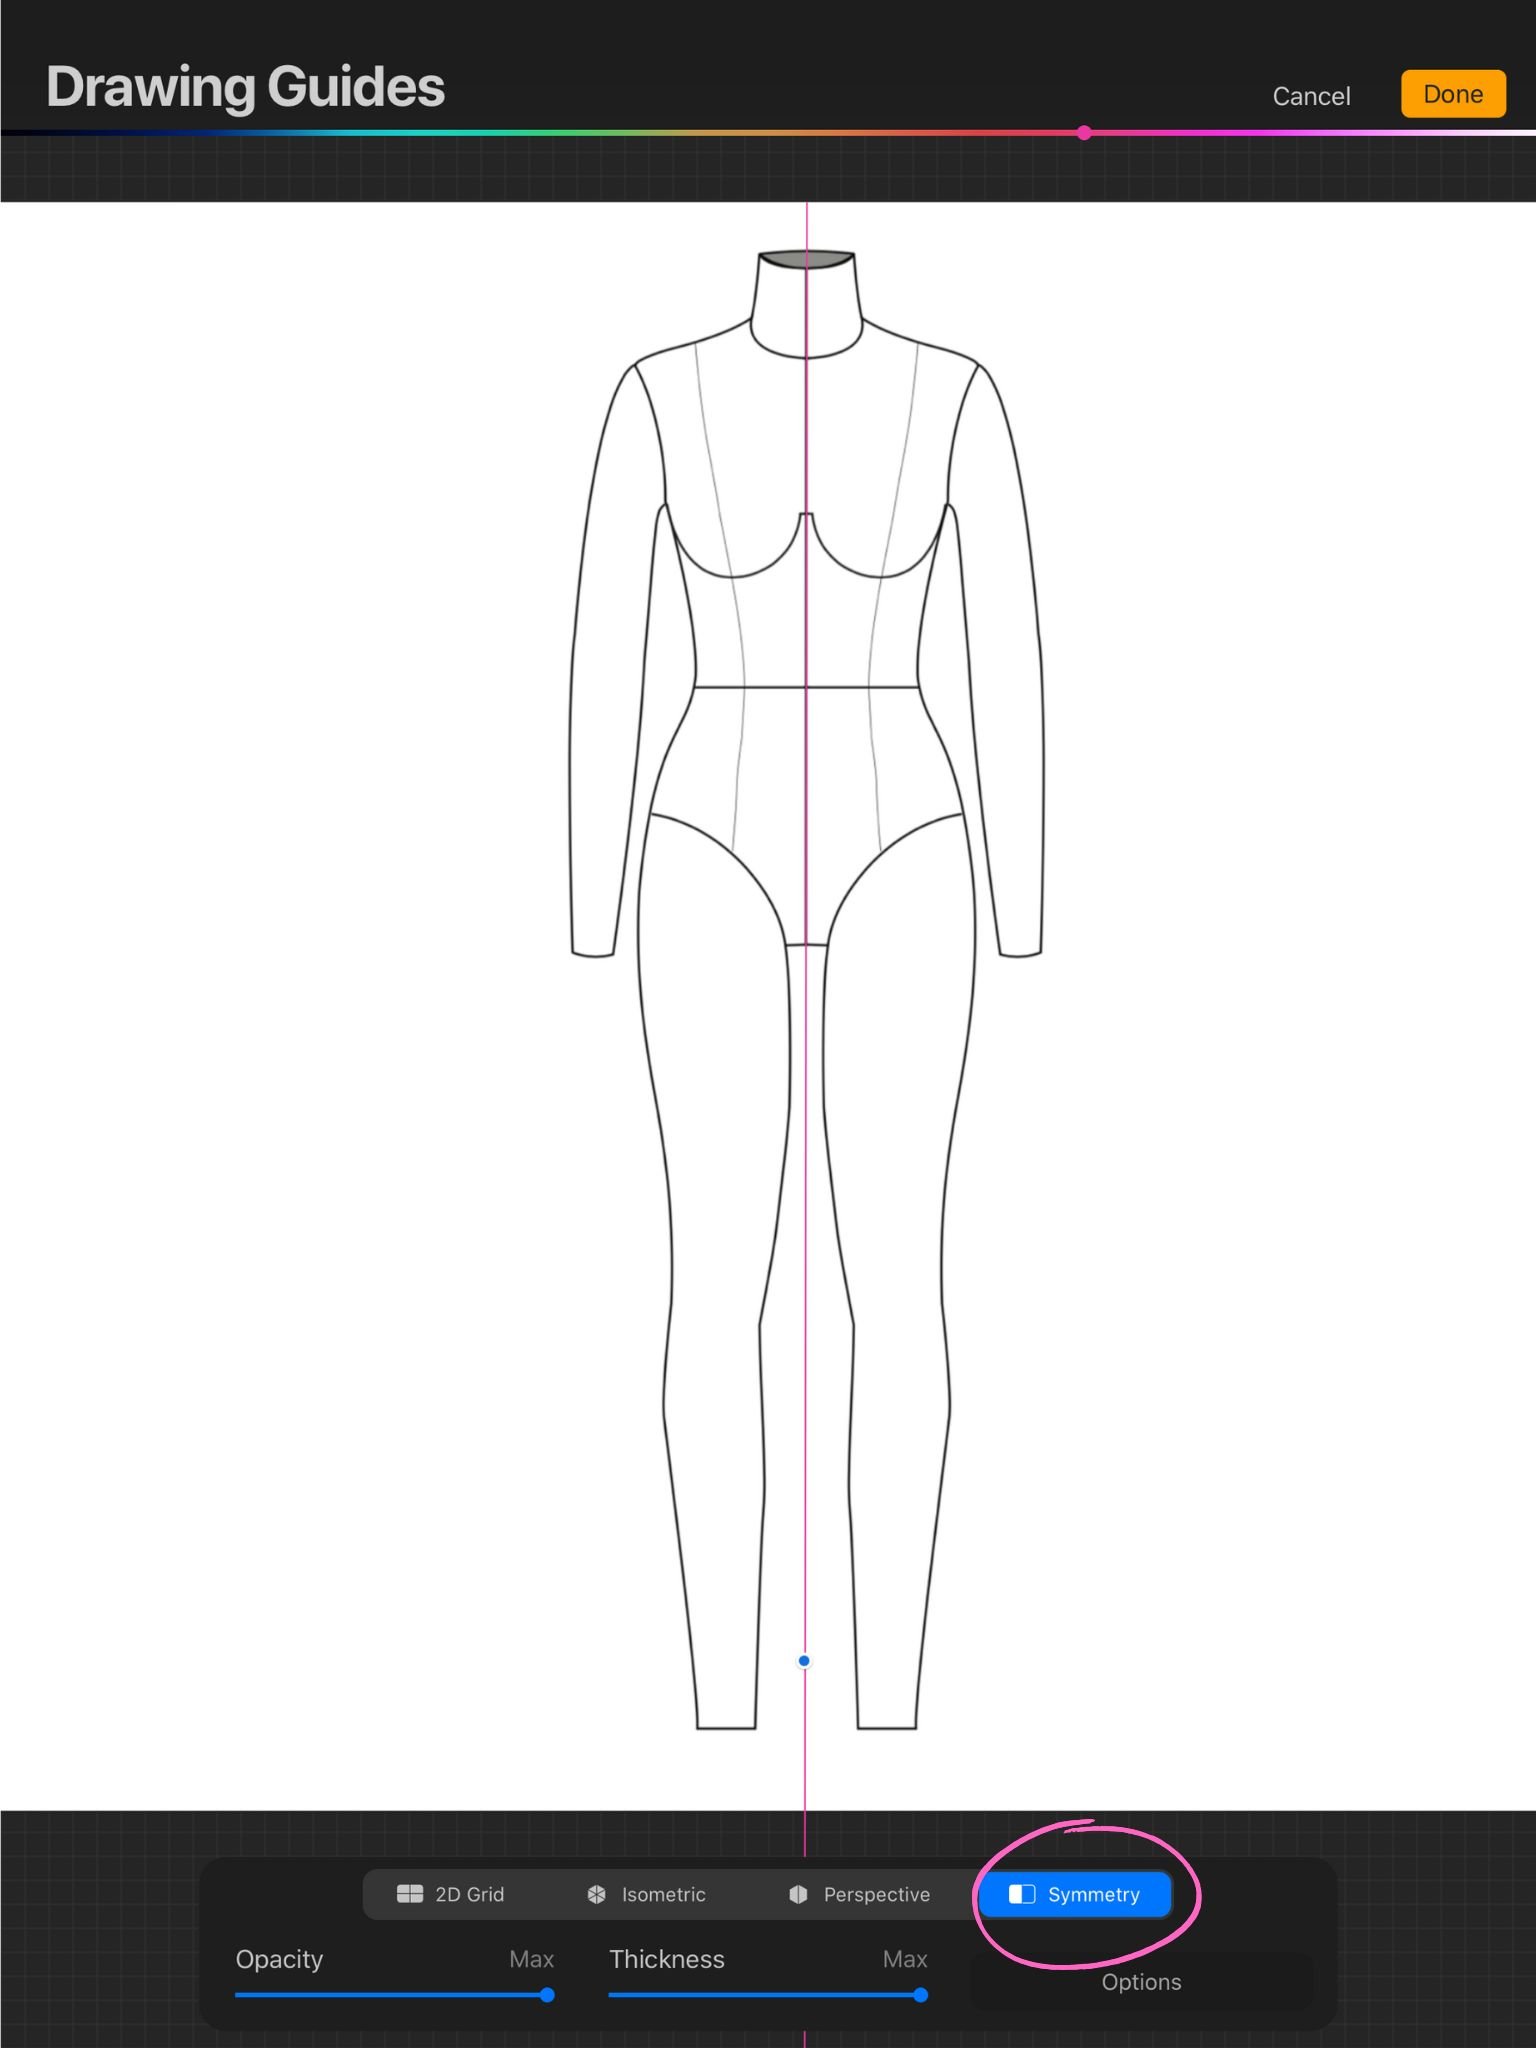
4. Create Symmetrical Garments with Ease
The vertical symmetry guide in Procreate is a powerful tool that allows fashion designers to create symmetrical designs easily. It works by automatically creating a mirror image of the sketch on the other side of the canvas, allowing designers to see how the final garment will look in real-time. This is a valuable feature for fashion designers, as it helps them visualize the final product as they sketch and make any necessary adjustments.
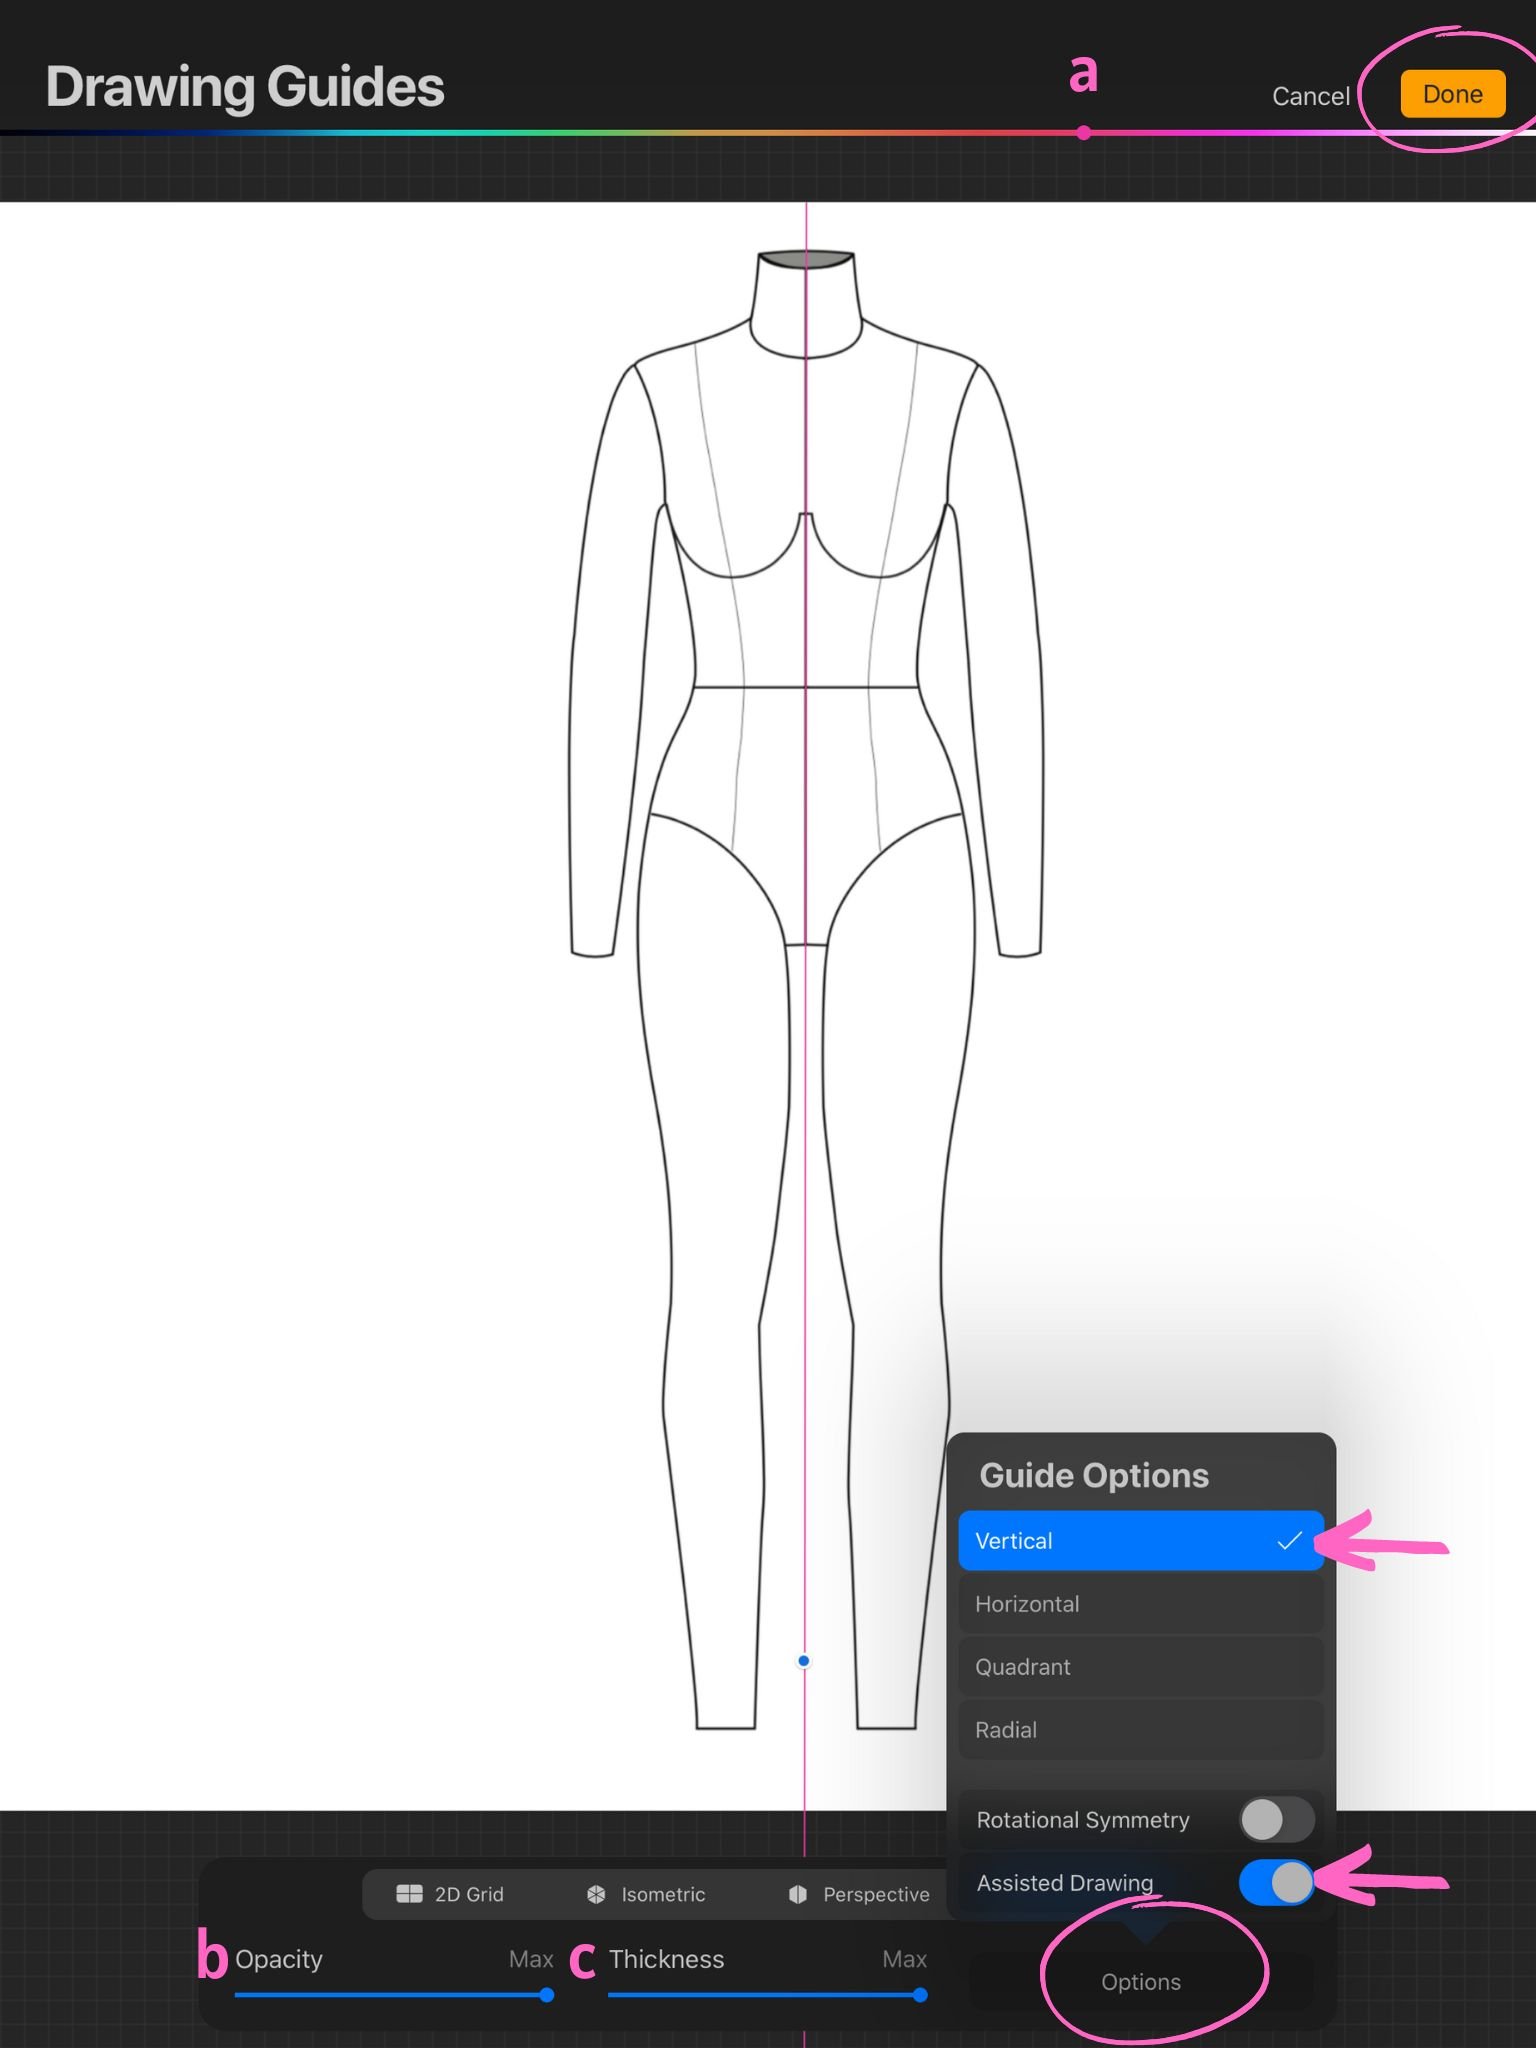
How to set up and adjust the Symmetry Guide:
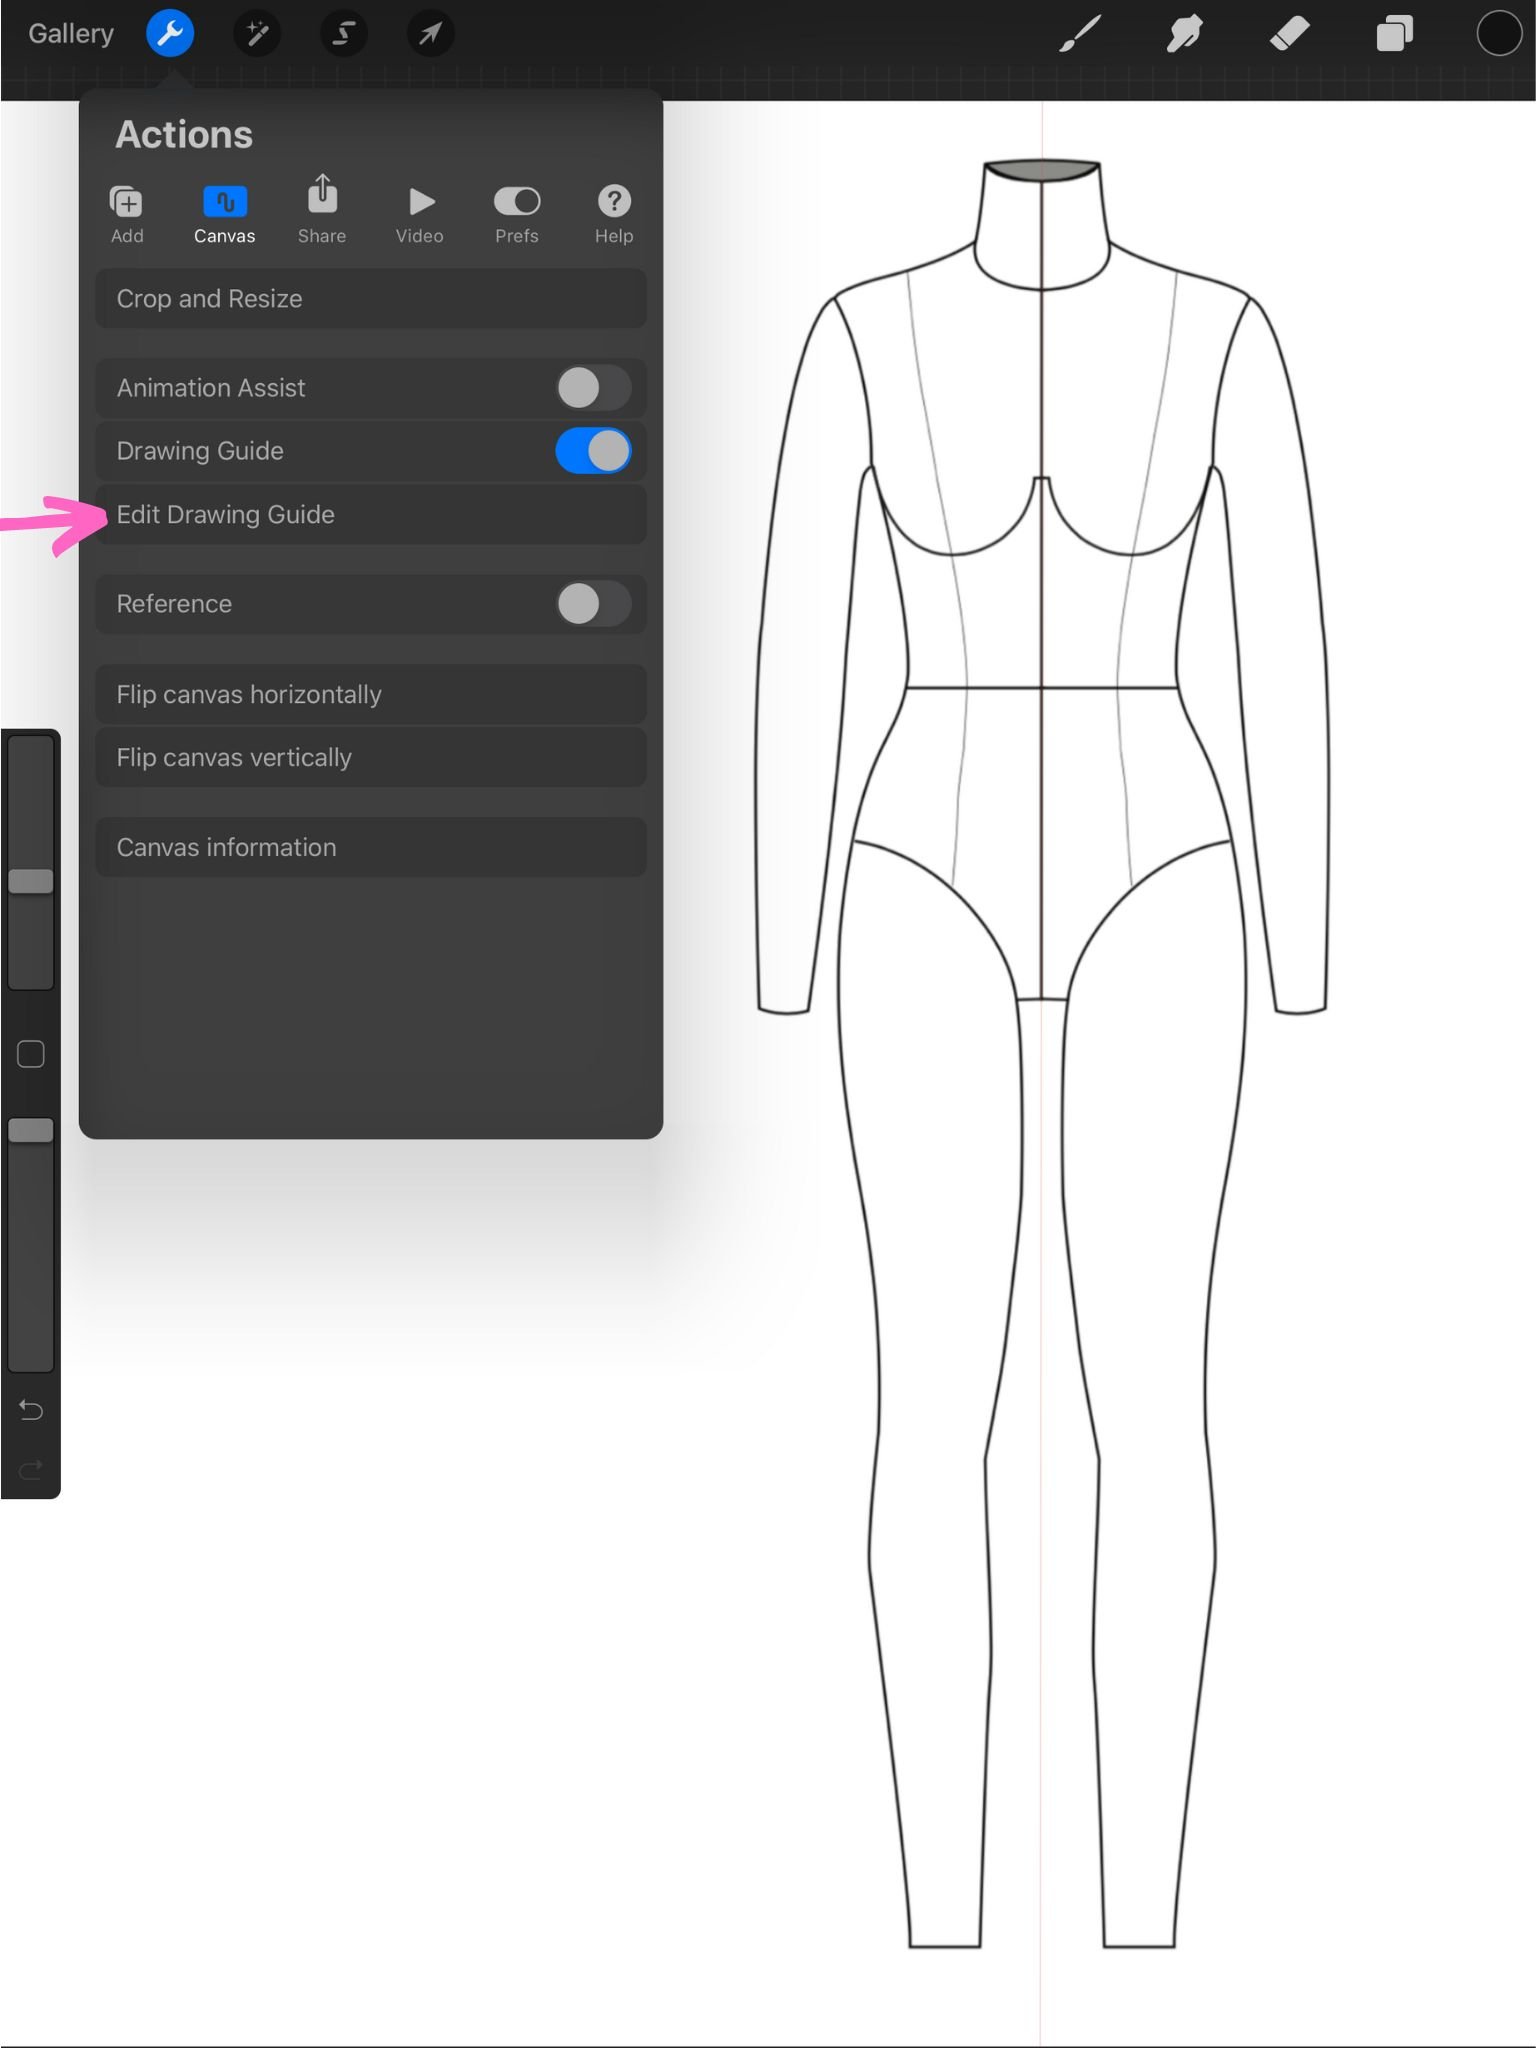
1) Tap the Actions button at the top left of the screen > select the Canvas icon > toggle on the Drawing Guide
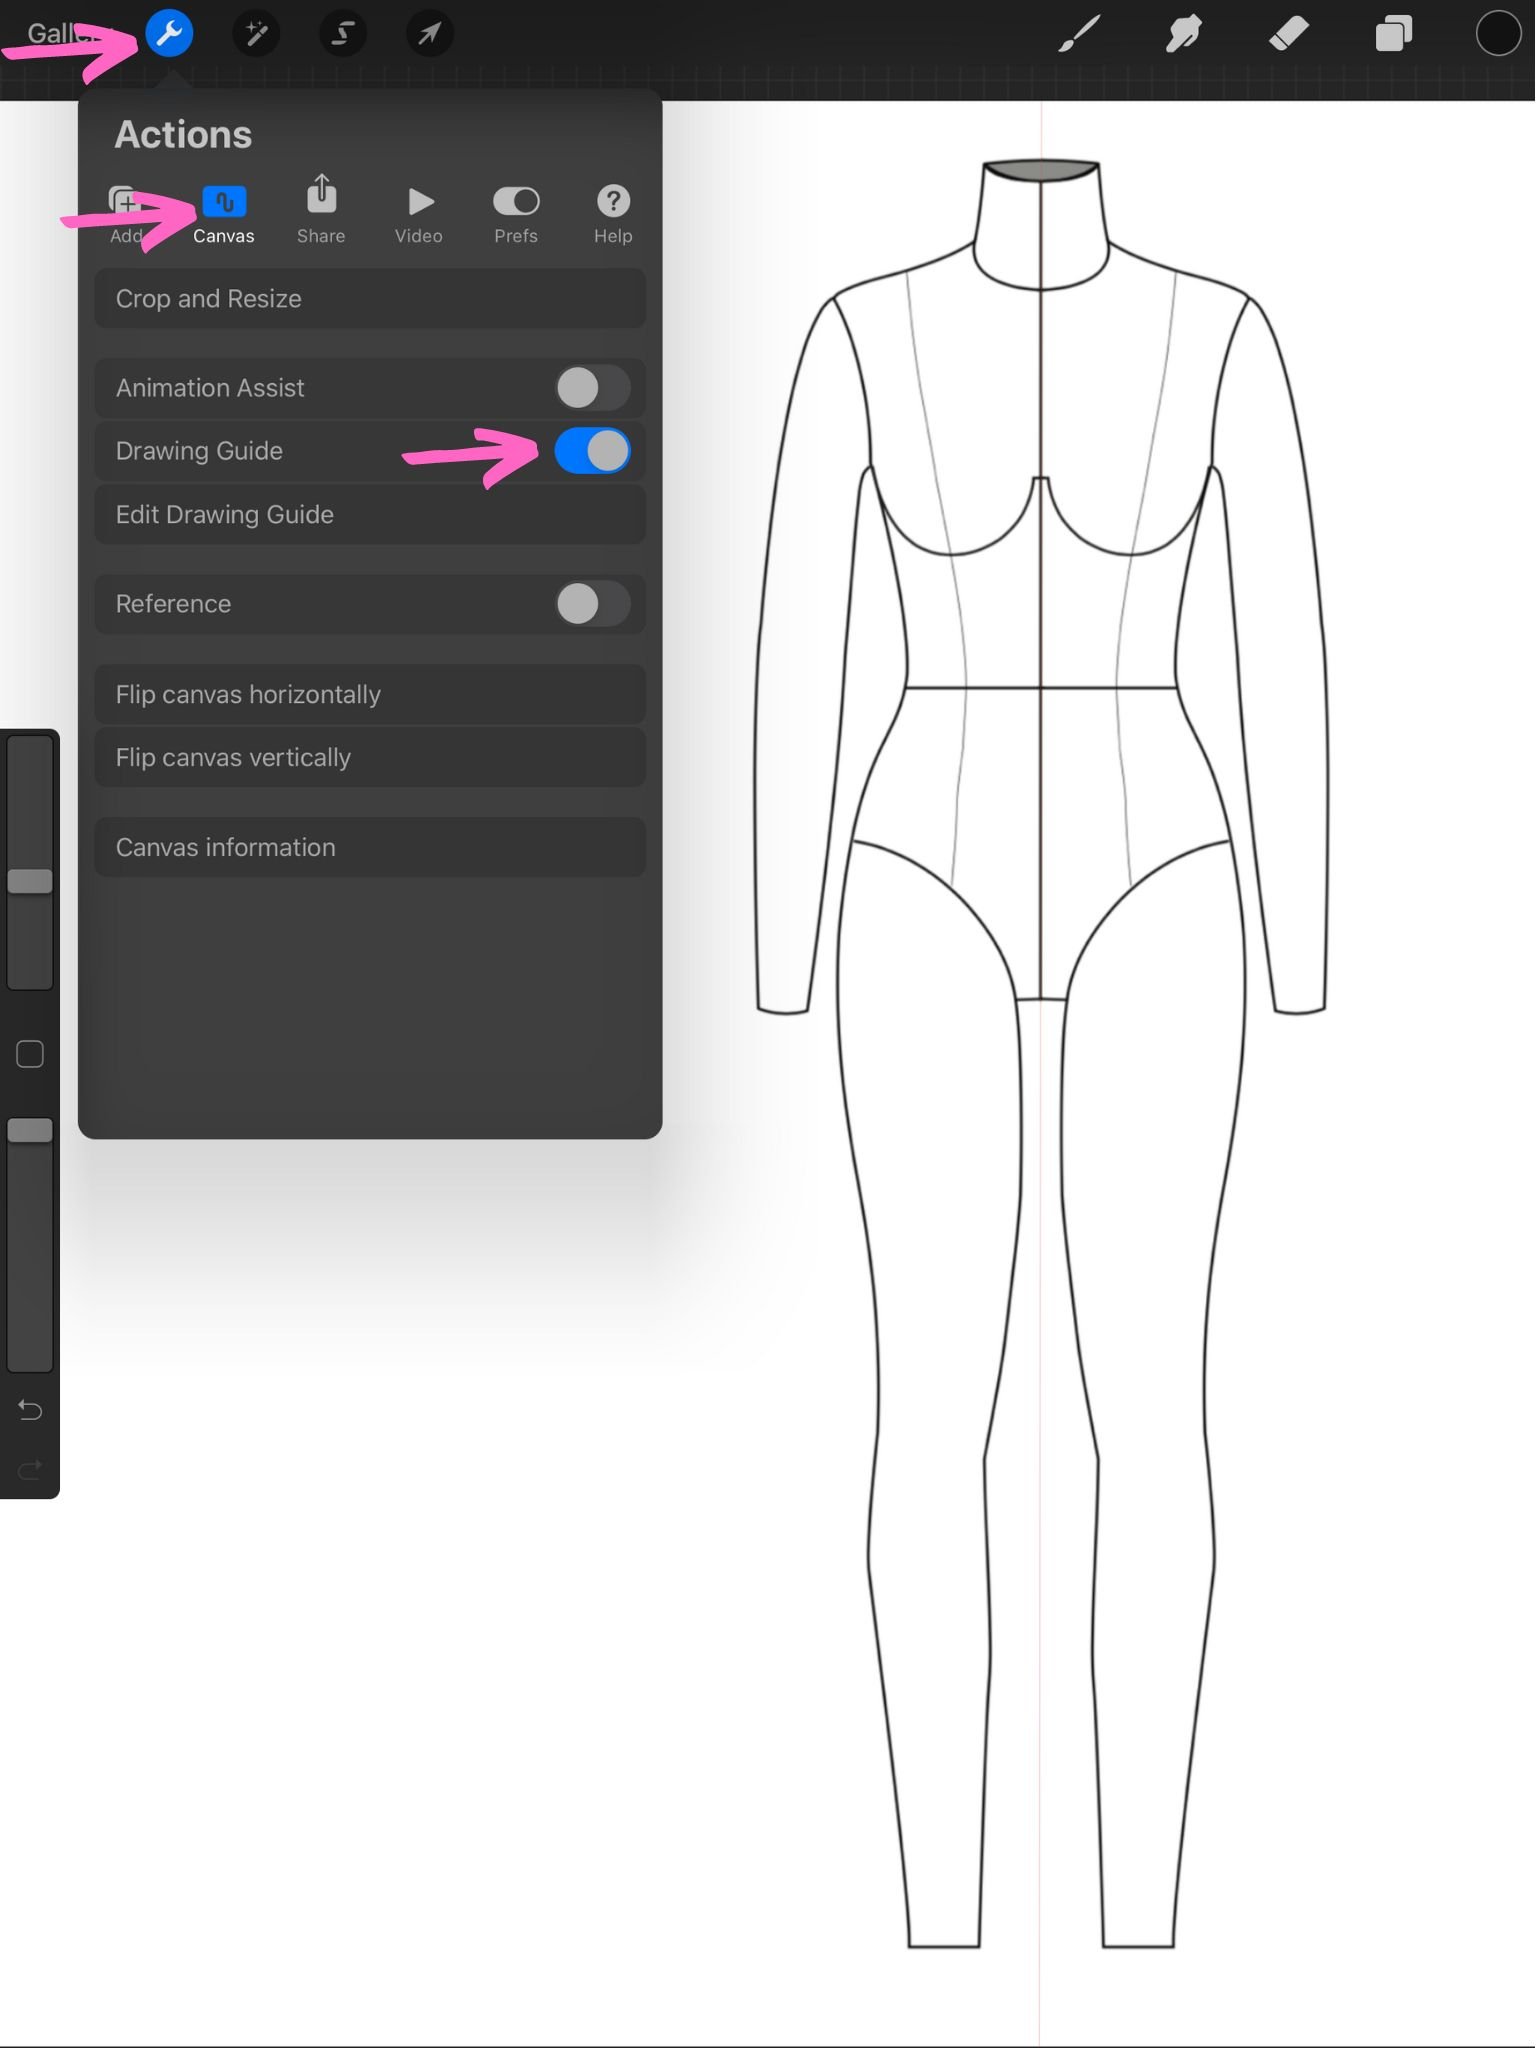
2) Next, tap Edit Drawing Guide. This will take you to the Drawing Guides screen. Tap the Symmetry button on the bottom of the screen. Tap Options, select Vertical, and turn on Assisted Drawing. You can adjust the drawing guide appearance, such as color (a), opacity (b), and thickness (c).
3) Tap Done. The Vertical Symmetry Guide is now set up on your layer.
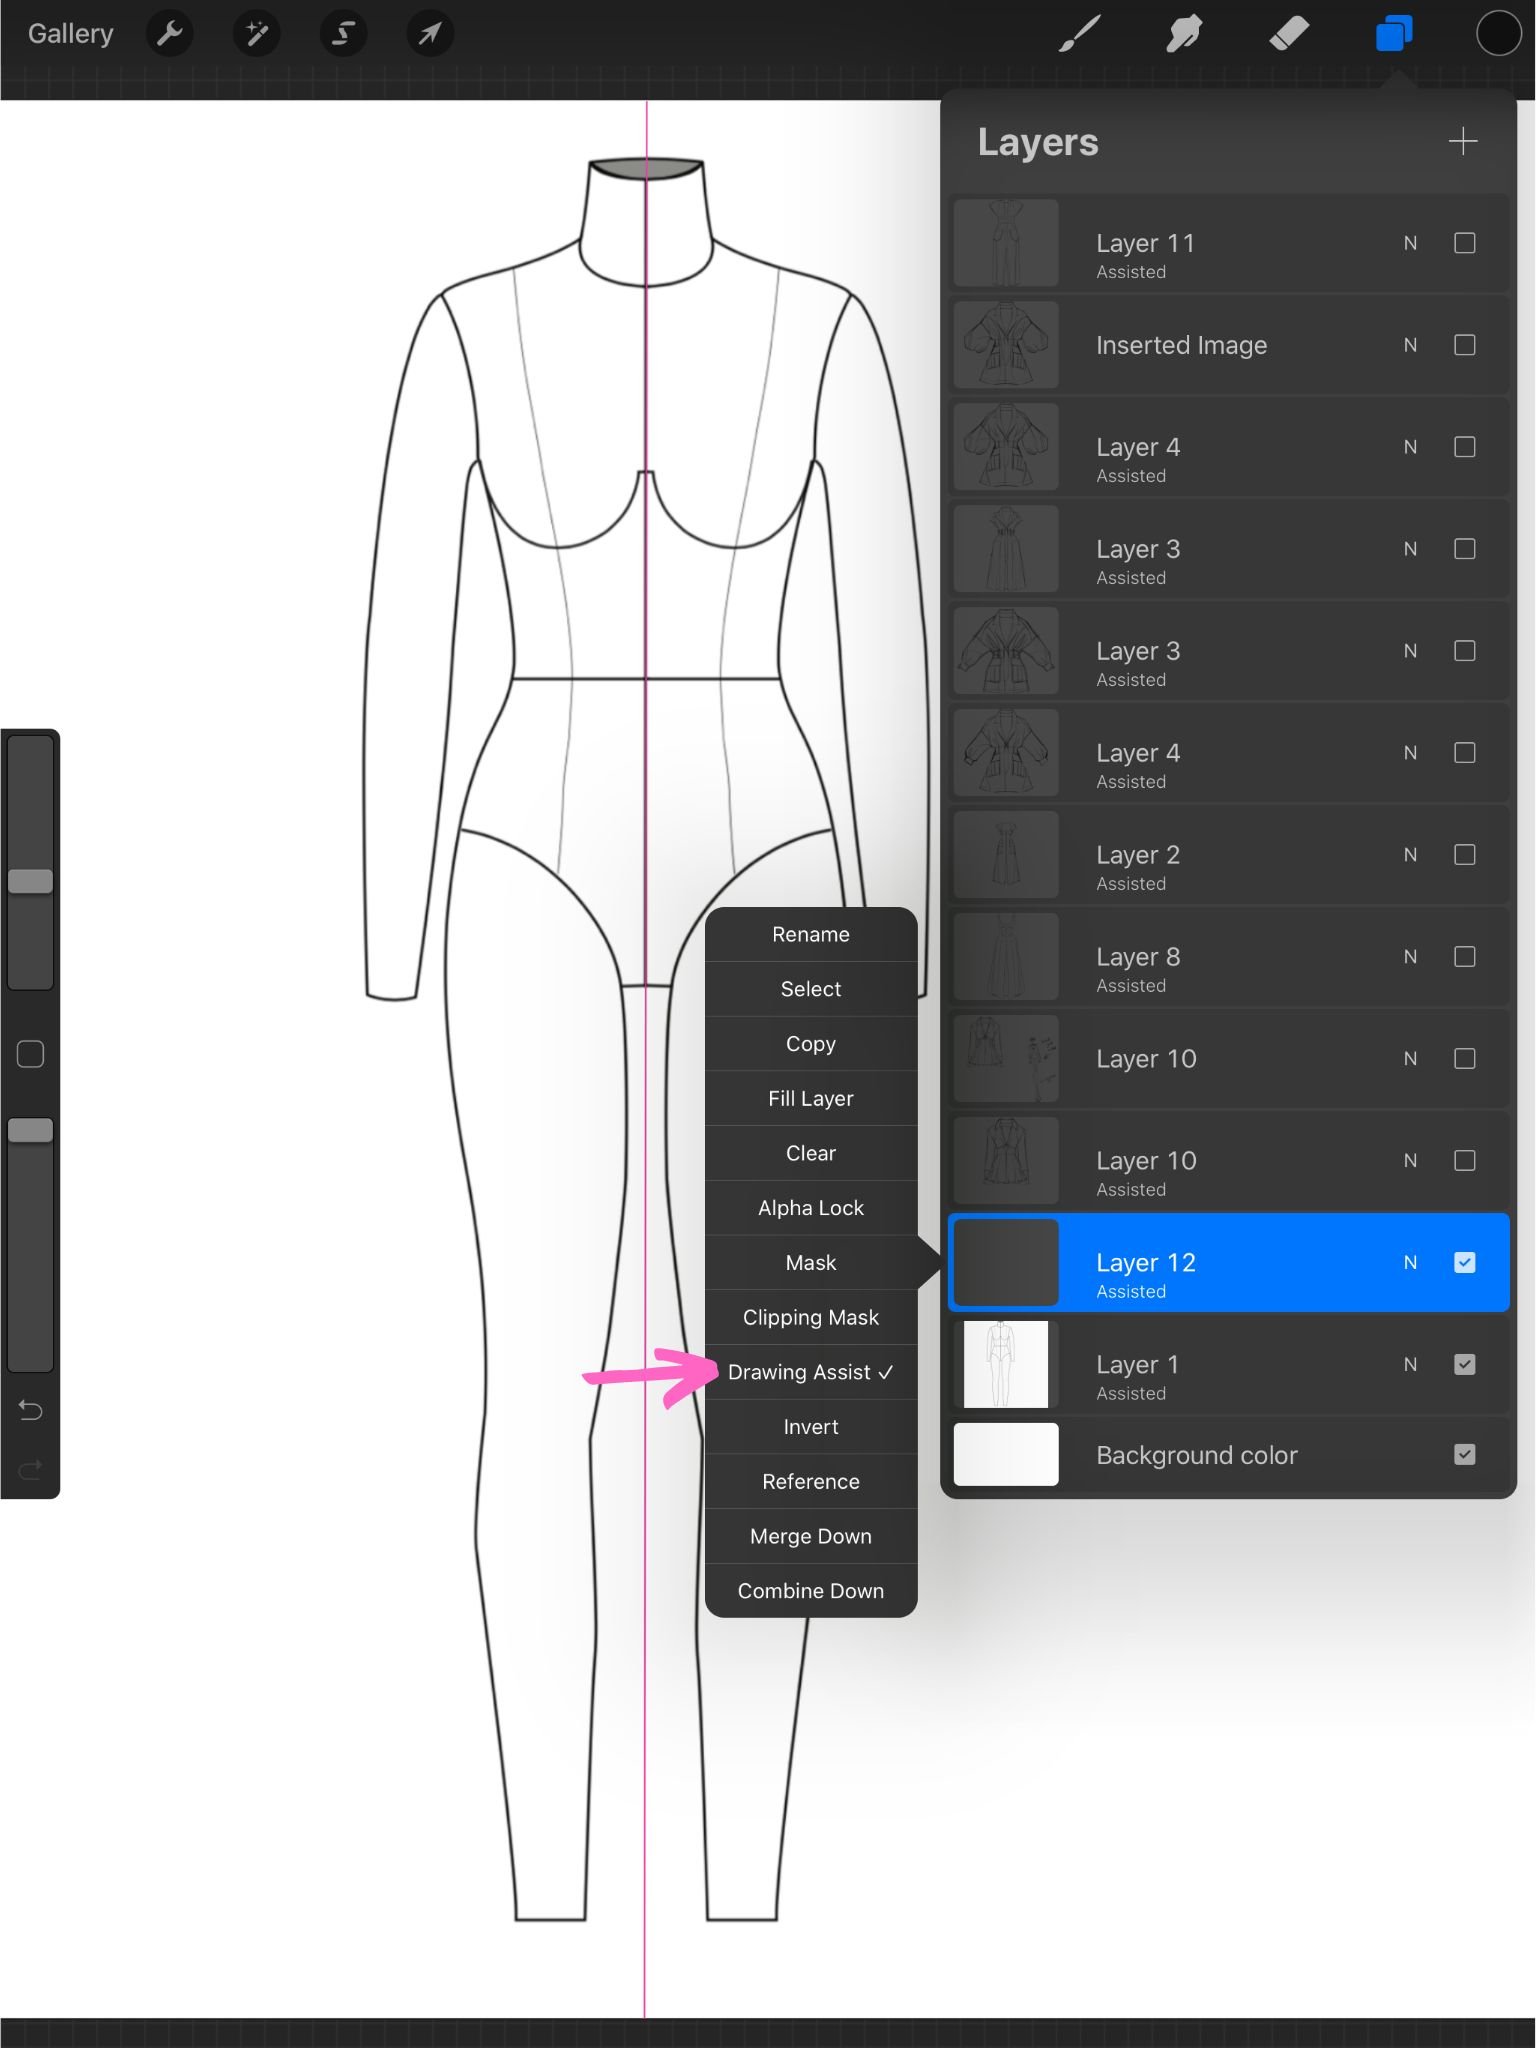
4) To toggle the symmetry guide on and off, open the layers panel at the top right of the screen > double tap on the layer > tap Drawing Assist. Layers with drawing assist note “assisted” under the Layer name.
5. Draw Perfect Shapes with Procreate’s Quickshape Tool
One of the biggest hurdles beginners face in Procreate isn’t the lack of tools—it’s that so many of them—are hidden behind gestures. You can learn more about these gestures in this post.
The QuickShape tool in Procreate is a convenient gesture tool that can help add precision to fashion illustrations by allowing you to draw perfect lines, circles, and other shapes quickly and easily. This is especially useful for drawing straight lines for button plackets and zippers, drawing perfect circles for buttons and beads, or drawing perfect arcs and shapes for necklines, yokes, and hemlines.
How to use the QuickShape tool:
To use the QuickShape tool in Procreate, draw a line or shape on the canvas and keep your pencil on the screen. After a moment, the QuickShape tool will automatically invoke and your stroke will snap into a perfect line, arc, poly-line, ellipse, triangle, or quadrilateral shape.

SOURCE: PROCREATE HANDBOOK
To scale or rotate a shape you've made, keep holding the pencil on the canvas and drag it to adjust the scale and rotation of your shape or line.
If the shape you create is unequal, keep holding your pencil on the screen and place a finger on the canvas to turn a rectangle into a square, an oval into a circle, or an uneven triangle into an equilateral one.
When you release your shape, the Edit Shape button will appear in the notification bar at the top of the canvas. If you'd like to edit your shape further, you can tap the Edit Shape button, choose from the available options and drag the nodes to adjust your shape.
When finished, tap anywhere on the canvas to exit Edit Shape mode.

SOURCE: PROCREATE HANDBOOK

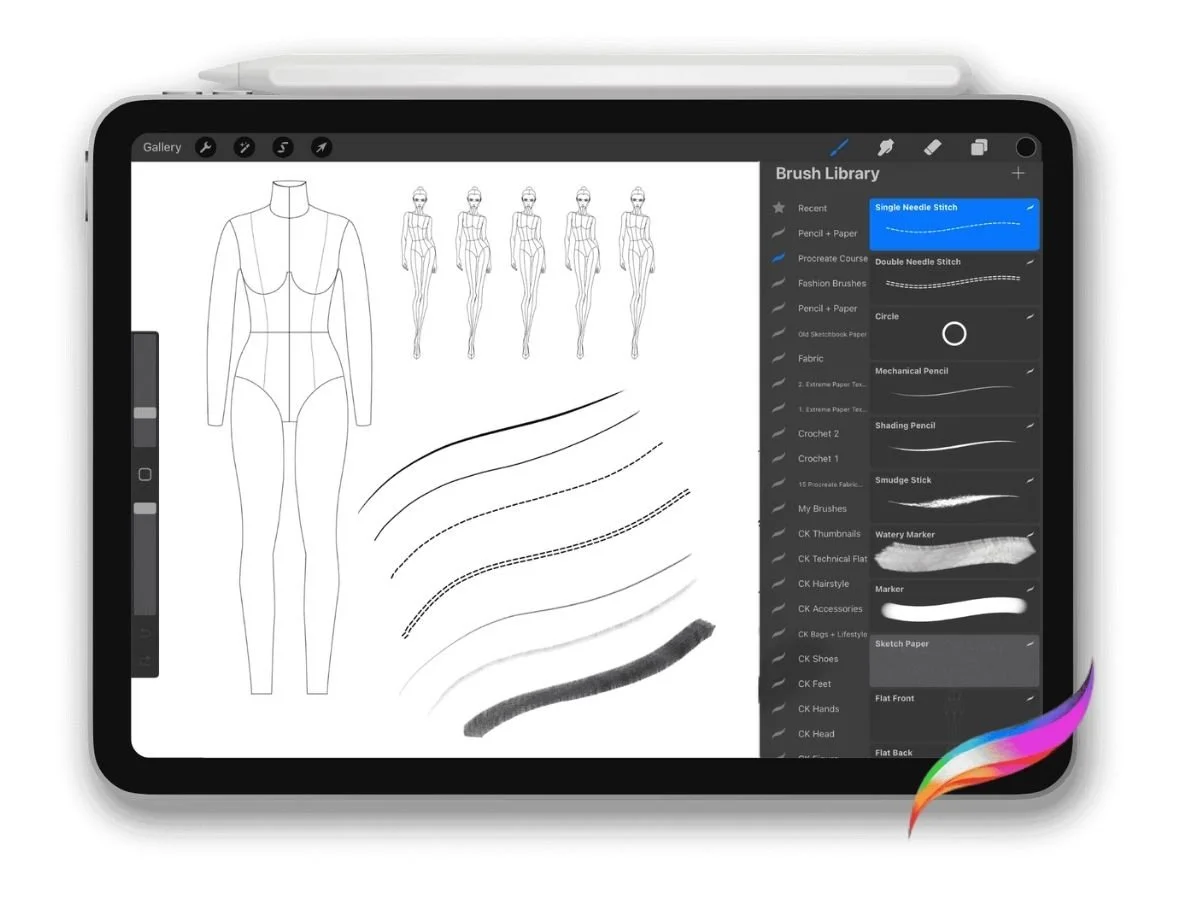
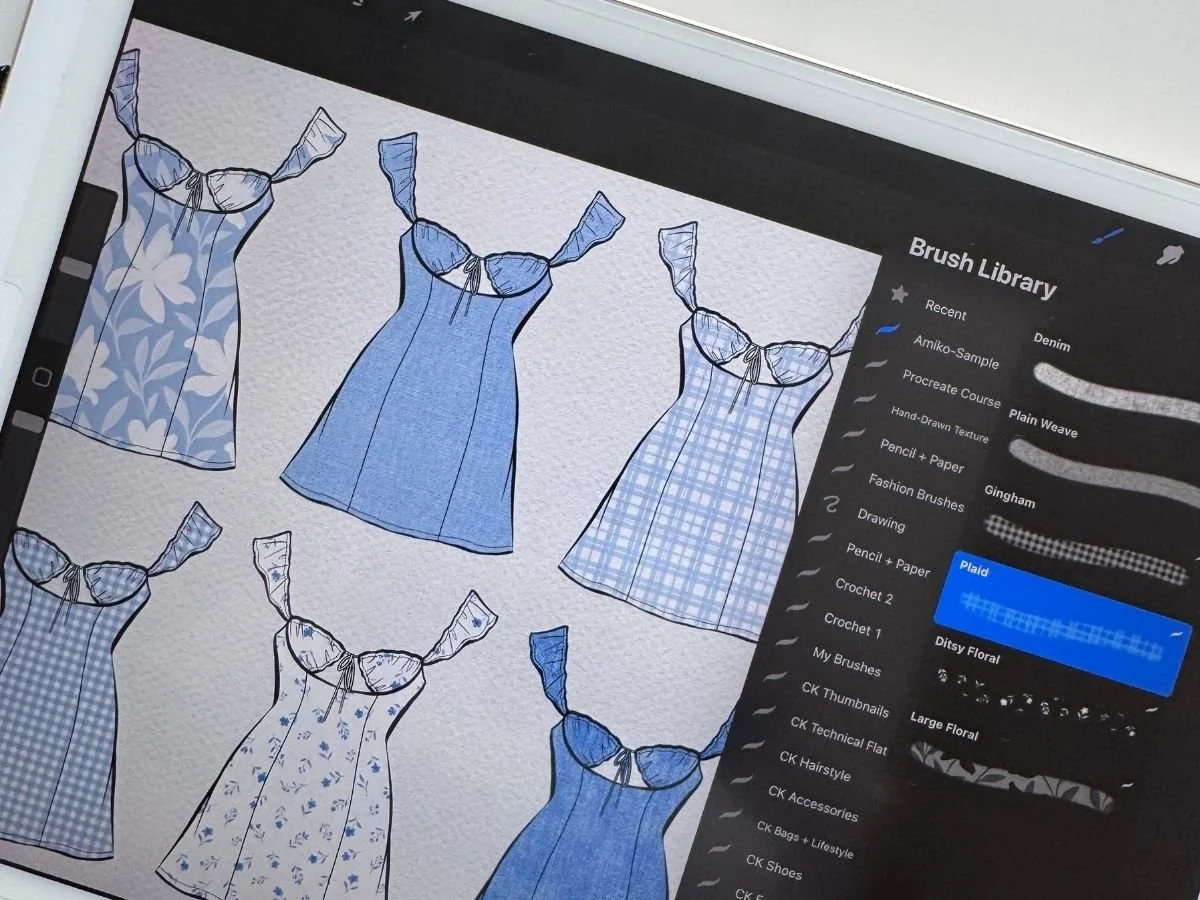
6. Upgrade Your Brush Toolbox for Detailed Sketches
Digital tools don’t have to feel flat. With the right brushes, your fashion sketches can have the textured charm of hand-drawing. This post lists five essential brushes to elevate every fashion designer’s Procreate toolbox—plus where to find them and how to install them.
Procreate has a variety of art brushes that come with the app, including pencil, charcoal, ink, calligraphy, watercolor, acrylic, and oil paints. These brushes provide a range of textural and stylistic options for creating different effects and finishes in your fashion illustrations.
Understanding brush settings will instantly improve your linework, textures, and overall control. Explore Brush Settings in Procreate (Basic + Advanced) will walk you through both the basics and a few advanced options—so you can start customizing your tools to your creative vision.
Procreate also allows you to download and import specialty brushes from various sources to enhance your designs further. Some examples of specialty brushes that could be useful for fashion design in Procreate include brushes for drawing fabric textures, buttons, zippers, fabric textures, and more. These brushes can help you create more realistic and detailed clothing designs with greater precision and speed.
I created this brush library specifically for designing clothes and drawing fashion flats. This library has all the essential elements like stitching, zippers, buttons, and ribs in cohesive style, line weights, and size.

I also create this brush library for drawing realistic pencil sketches. This library offers a range of sketching tools designed for use in Procreate on the iPad. These tools include mechanical and shading pencils, blending sticks, and various paper textures. Every aspect, from brush size to line weight, has been meticulously crafted to replicate the depth and realism found in traditional hand-drawn pencil sketches.
You can find more custom brushes for fashion design on sites like Gumroad, Creative Market, and Etsy.

7. Share Your Creative Process with Time-Lapse
In Procreate, the time-lapse feature allows you to record a video of your creative process as you work on a project. The app automatically captures and records your actions as you draw, paint, or make other changes to your artwork. When finished, Procreate creates a time-lapse video that condenses your work into a shorter, sped-up video that you can watch, share, or export.
Time-lapse is a useful feature for fashion designers in several ways.
Sharing time-lapse videos on social media can be a great way to engage with your audience, particularly if you're looking to showcase your design process or inspire others with your work. For inspiration, check out this video, where I demonstrate the process of designing a Spring collection.
For personal use, it can help designers review and reflect upon their work, track their progress and techniques, identify areas for improvement, and see how their designs have evolved.
As an added deliverable to a client, it can provide a behind-the-scenes look at the design process and give clients a better understanding of the work that went into their project. This helps to build trust and confidence in your abilities and is also a valuable way to communicate your design vision and approach.
For those interested in teaching or creating drawing tutorials and courses, time-lapse can be a helpful tool for demonstrating techniques and sharing design strategies with students.
How to create Time Lapse videos in Procreate:
Time-lapse video is enabled by default when creating a new Canvas. To export a time-lapse video: tap the Actions button (wrench symbol) at the top right corner of the canvas, tap the video icon, select Export Time-Lapse Video, choose from video length options, and select location to save the video.

More ways to elevate your fashion sketches in Procreate include understanding layer options like clipping masks for prints, using tools and settings to auto smooth lines, and adding finishing touches like textured backgrounds and mood images/ fabric swatches.
The Limitations of Procreate: What You Need to Know
Procreate is a highly capable drawing and illustration app with features and tools for many types of design work. However, like any software, it also has some disadvantages. Here are a few examples:
Device and File Format Limitations
One limitation of Procreate is that it is only available on iPads and is not compatible with Android devices. Designers who do not use an iPad cannot access Procreate. Additionally, Procreate does not have a web-based version and is accessible only through the app on an iOS device. This can be inconvenient for designers who prefer to work on a larger screen or do not own an iPad.
Another limitation of Procreate is its limited file compatibility. Procreate is a proprietary app that can only handle certain types of files. It does not support some common file formats, such as .pdf, .ai, or .eps, so designers may need to convert these files to other formats before using them in Procreate. Procreate supports many other file formats, including PSD, JPEG, PNG, TIFF, and GIF, but designers may still need to be mindful of the file types they use with the app.
Working Around Procreate's Raster-Based Format
Another limitation to consider is that Procreate is a raster-based program. The images it creates are made up of pixels, which are tiny dots of color that form an image when viewed from a distance. Raster images are limited in their ability to be significantly scaled up or down without losing quality, as they can become pixelated or blurry when resized. This can be a limitation for designers who need to resize their images for different purposes or want to create images that can be enlarged without losing quality. If you’re struggling with blurry sketches, learn How to Fix Pixelated Lines in Procreate
Contrary to raster graphics, vector graphics from software like Adobe Illustrator are digital images created using points, lines, and curves based on mathematical equations rather than pixels. They can be scaled up or down without losing quality and tend to have smaller file sizes than raster graphics. Additionally, vector sketches can be adjusted easily by editing points and curves rather than redrawing entire design elements. The ability to edit drawings easily is advantageous since designs are typically updated numerous times through the sampling and fitting process.
One effective strategy for achieving crisp lines is to establish your canvas with a high resolution, ideally at least 300 DPI, and dimensions that are appropriately proportioned. To ensure optimal results, it is recommended to create a custom canvas rather than relying on pre-existing templates. By doing so, you will have the ability to precisely control the dimensions, resolution, color profile, and time-lapse settings, which can greatly enhance the overall quality of your work.
A solution for dealing with the limitations of editing raster images in Procreate is to draw design elements on separate layers. This way, designers can edit each piece without affecting the rest of the sketch. For example, suppose a designer wanted to change the sleeves on a garment. In that case, they could draw the sleeves on a separate layer and make changes to that layer without affecting the rest of the design. Learn How to Color Your Fashion Sketches in Procreate (Without Messing Up Your Line Art).
Another option for designers who want the benefits of both raster and vector graphics is to sketch in Procreate and then convert the raster sketch to a vector format in a program like Adobe Illustrator. This way, designers can take advantage of Procreate's intuitive sketching experience while still being able to manipulate and edit their designs in a vector program.
Going Beyond Procreate's Photo Editing Limits
Procreate is a powerful digital art app designed for use on iPads, making it a great tool for creating detailed and expressive illustrations and designs. However, compared to other design tools such as Adobe Photoshop or Canva, Procreate does have some limitations, especially if creating mood boards or presentations with complex image layouts and text.
One disadvantage of Procreate compared to Adobe Photoshop is that it offers fewer advanced photo editing features. While Procreate does have some basic image editing capabilities, such as cropping, rotating, and adjusting the color balance and contrast of images, it has a limited range of photo editing tools and effects that Photoshop offers. Suppose you need more advanced photo editing, such as removing blemishes, adjusting the lighting, or adding special effects to images. In that case, you may need to use another tool, such as Photoshop.
Another disadvantage of Procreate compared to Canva is that it could be more user-friendly for those new to digital art or design. Canva is specifically designed for non-designers. It has a simple and intuitive interface that makes it easy to create professional-looking mood boards and layouts for your freelance work or portfolio.
One approach is first to sketch out your ideas in Procreate, taking advantage of its natural feel and drawing tools. From there, you can bring your illustrations into programs like Canva or Photoshop to create more advanced presentations and mood boards. This workflow allows you to combine the benefits of Procreate's intuitive interface with the advanced features of these other platforms.
Conclusion and Next Steps
In conclusion, Procreate is a powerful digital art app that has revolutionized the fashion design industry by providing a more natural and intuitive drawing experience. There are many features and benefits of Procreate, including its ability to accommodate different creative processes, a range of digital workflow tools, and its remote working capabilities.
To get the most out of the app, designers can customize their canvas, use accessories to maximize comfort, draw designs on a croquis, and use tools like vertical symmetry, QuickShape, and specialty brushes. Additionally, designers can capture and share their design process with the Time-Lapse feature.
Limitations to consider include device and file format limitations, the fact that it is a raster-based program, and basic image layout tools. Despite these limitations, fashion designers can still find ways to work around them and enhance their portfolio by using layers in Procreate to make adjustments, converting sketches to vector format in a program like Adobe Illustrator, and combining the benefits of Procreate's intuitive interface with the advanced graphic design features of other platforms like Photoshop and Canva.
Despite these limitations, Procreate is a powerful and feature-rich app that offers a range of tools and capabilities for designers. Its intuitive interface, diverse brush styles and options, and robust layer options make it a popular choice for fashion designers to create various designs, including rough sketches, expressive illustrations, and accurate technical flat drawings. Whether working on rough concepts, final production illustrations, or anything in between, Procreate has the tools designers need to create professional-quality designs easily.
If you're interested in trying out Procreate for your fashion design work, download the app on your iPad and familiarize yourself with the interface and tools. Be sure to reference Procreate's official user handbook and explore the various brush tools and settings available to find the ones that work best for your style and needs. Consider experimenting with features like the Layers panel, exporting Time-lapse videos, and using the Symmetry and QuickShape tools to see how they can enhance your design process and improve your workflow in Procreate. For a steamlined 7 day course, check out my Procreate for Fashion Design Course. Finally, don't be afraid to experiment and try new things with Procreate. The more you use the app, the more comfortable and familiar you'll become with its features and capabilities.