
The Hidden Copy + Paste Menu (Your New Favorite Procreate Shortcut)
Hi,
Procreate is sneaky.
We all love how clean and minimal the interface looks, but the downside is that some of the best features are tucked away behind gestures instead of buttons. Beautiful… but sneaky!
Today’s email is about a hidden gem: the Copy & Paste Menu — a tiny tool that can seriously speed up your fashion sketching workflow.
Our goal is to understand:
How to open the menu
The six different options (cut, copy, copy all, duplicate, cut & paste, paste)
Examples of how to use each option for fashion sketching like duplicating details and brainstorming
Lastly, we’ll finish with 5 more sneaky Procreate features—so you can go to bed tonight feeling like your Procreate skills are refreshed.
🚀 For a complete, fashion-focused workflow with all the essentials tools and tricks—check out the Procreate for Fashion Design Course
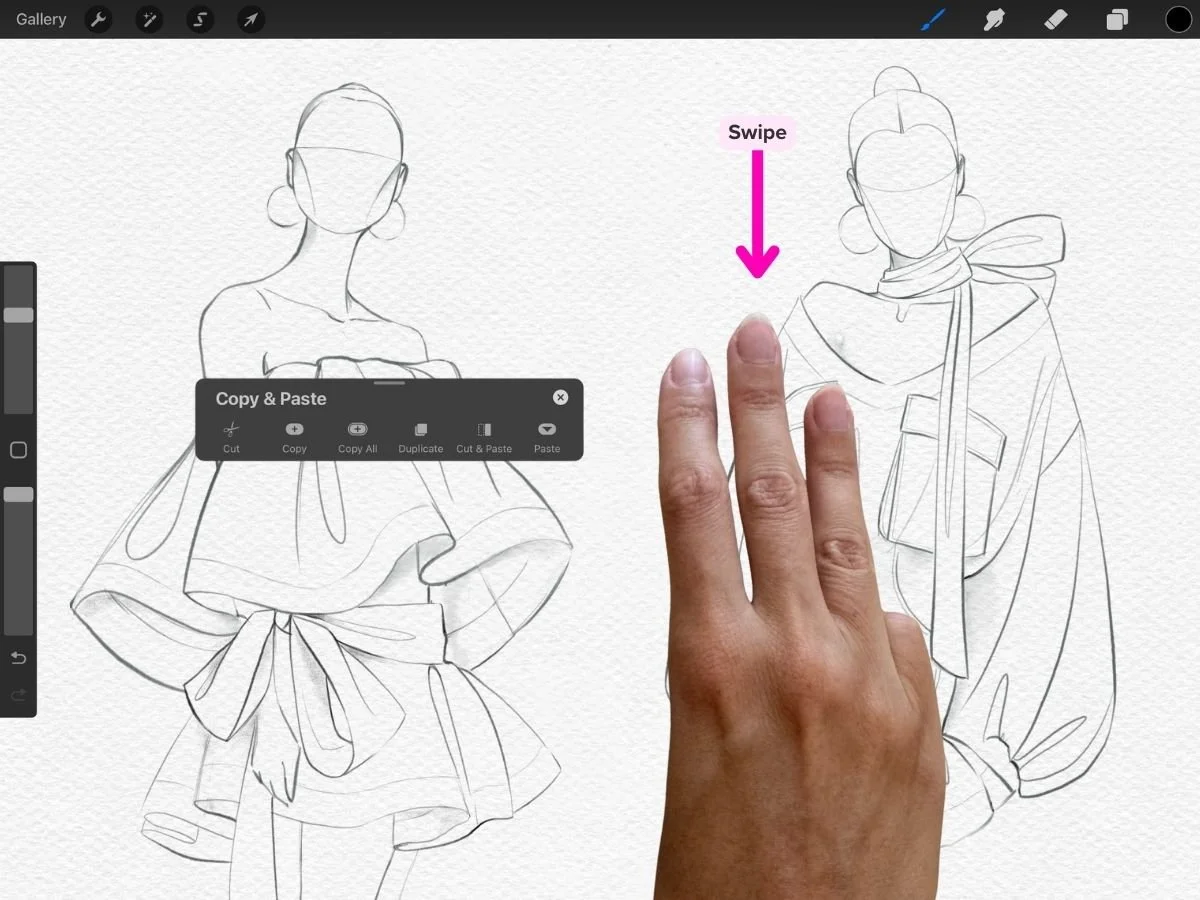
1) How to Open The Copy & Paste Menu
Open with a simple gesture:
⬇️ ⬇️ ⬇️ Swipe down with three fingers
2) The Six Options Explained
The Copy & Paste Menu lets you:
Cut: Copies and removes from the canvas
Copy: Copies without removing it
Copy All: Copies all visible layers as one flattened image
Duplicate: Creates an identical copy
Cut + Paste: Cuts and instantly pastes it (useful for repositioning)
Paste: Inserts the last item you copied or cut
⭐️ Key Things to Note:
Cut/Copy will apply to the contents of the layer or your active selection
Cut/Copy stores to the iPadOS clipboard and can be pasted within the same canvas, to another canvas, or even into other apps like email
3) How to Use the Copy & Paste Menu for Fashion Sketching
In short, the copy & paste menu is great for:
Testing and swapping design details
Repeating design details (pockets, pleats, trims)
Brainstorming ideas quickly without redrawing
Creating multiple versions of the same silhouette
Grabbing the entire canvases without managing dozens of layers
Here’s are specific examples of how I would use the Copy & Paste Menu in my fashion sketching workflow:
Swapping design details: If I draw a sleeve for one design and realize it doesn’t belong there, but could work on another look, I’ll:
Select and Cut the sleeve (this removes it from the canvas but stores it on the clipboard)
Paste it into a different sketch
This keeps my workflow clean and avoids redrawing anything.
Creating Multiple Design Versions
When brainstorming variations:
Duplicate the original sketch
Drag it to the side
Adjust details, explore alternatives, or try new silhouettes
Perfect for fast iteration without redoing the base sketch.
Moodboards or Moving Work Between Canvases
If a canvas has tons of layers and I want to bring it into another file:
Use Copy All to grab all visible layers as one flattened image
Then Paste it directly into my moodboard or new canvas
It saves you from merging or reorganizing layers just to transfer something.
Duplicating Pleats, Panels, or Style Lines
For repeating elements (pleats, trims, stitching):
Draw elements in own layer, or select the element
Duplicate
Re-position the copied element
This keeps everything consistent and avoids opening the Layers panel over and over.
This one gesture makes your workflow feel more seamless, especially during fast idea-generation sessions.
As promised, before we go…let’s review 5 more gestures to enhance your sketching sessions:
5 More Sneaky Features
1) Reset the canvas instantly
If you’ve pinched and rotated yourself into confusion, just do a quick pinch gesture. This snaps the canvas back to “fit to screen.” Very useful when working zoomed in on details.
2) Hide the interface
Tap four fingers to enter full-screen mode. Bye, menus. Hello, clean workspace.
3) Undo / Redo / Clear
This lets you sketch confidently without fear of mistakes.
Two-finger tap: Undo
Three-finger tap: Redo
Hold for a series of actions
Three-finger scrub: Clear the entire layer
4) QuickShape for clean lines
Draw a line or shape, then keep your pencil on the screen. Procreate will snap it into a cleaner version. Tap Edit Shape to refine it further by adjusting the blue nodes.
🚀 In the Procreate for Fashion Design Course, we practice using QuickShape to get smooth strokes, perfect necklines, and sharp details.
5) Save your brush settings
You can actually bookmark your favorite brush size or opacity. This works for any brush in your library, including figure and template brushes. Great for consistent line weights and technical flats.
Open the slider → tap +

Hope you enjoyed this tutorial. Love that we’re learning Procreate together :)
Best,
Amiko