
How to Elevate Your Fashion Sketches in Procreate
If you're using Procreate for fashion design, you’ve probably realized something: the app gives you endless tools—but not always a clear path.
This guide pulls everything into one place. Whether you're sketching flats, experimenting with prints, or rendering garments with realistic texture, these foundational techniques will help your work look cleaner, sharper, and more intentional—without the overwhelm.
I’ll introduce how to:
Master the Core Gestures + Shortcuts
Start With the Right Canvas Settings
Understand Layers Like a Pro
Use Symmetry (But Know When to Break It)
Use Croquis Stamps to Speed Up Sketching
Choose the Right Brushes for the Job
Get Smooth, Confident Linework
Finishing Touches
I’ll also link to in-depth tutorials so you can go deeper at your own pace.
1. 👌🏼 Master the Core Gestures + Shortcuts
Procreate is packed with hidden gestures that can dramatically speed up your workflow.
Here are a few favorites:
Pinch to zoom = Zoom in + out
Quick pinch = Reset canvas to full view
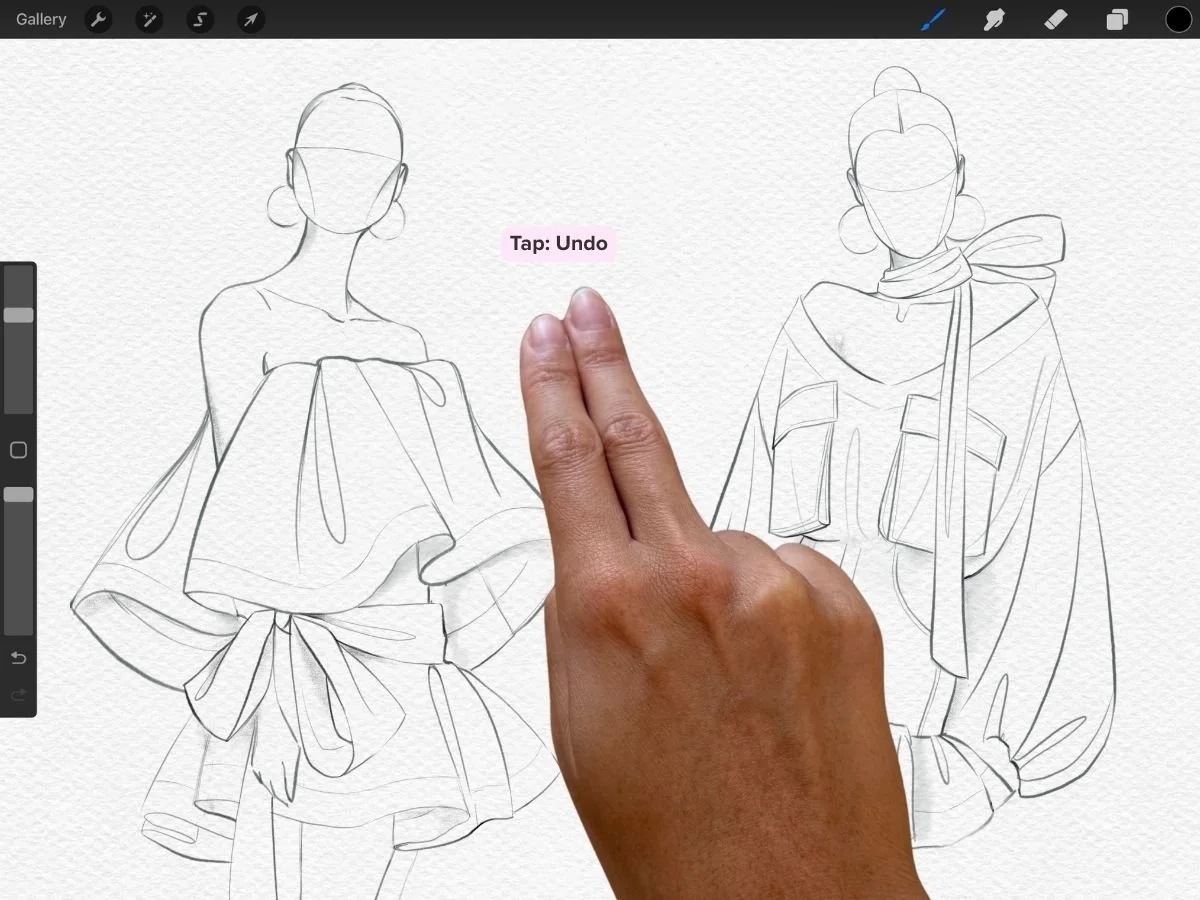
Two-finger tap = Undo
Three-finger tap = Redo
Three-finger scrub= Clear the layer
Draw + hold a line or shape = Activates QuickShape (great for technical flats)
▶ See an illustrated guide: Best Procreate Shortcuts for Fashion Designers
2. 📋 Start With the Right Canvas Settings
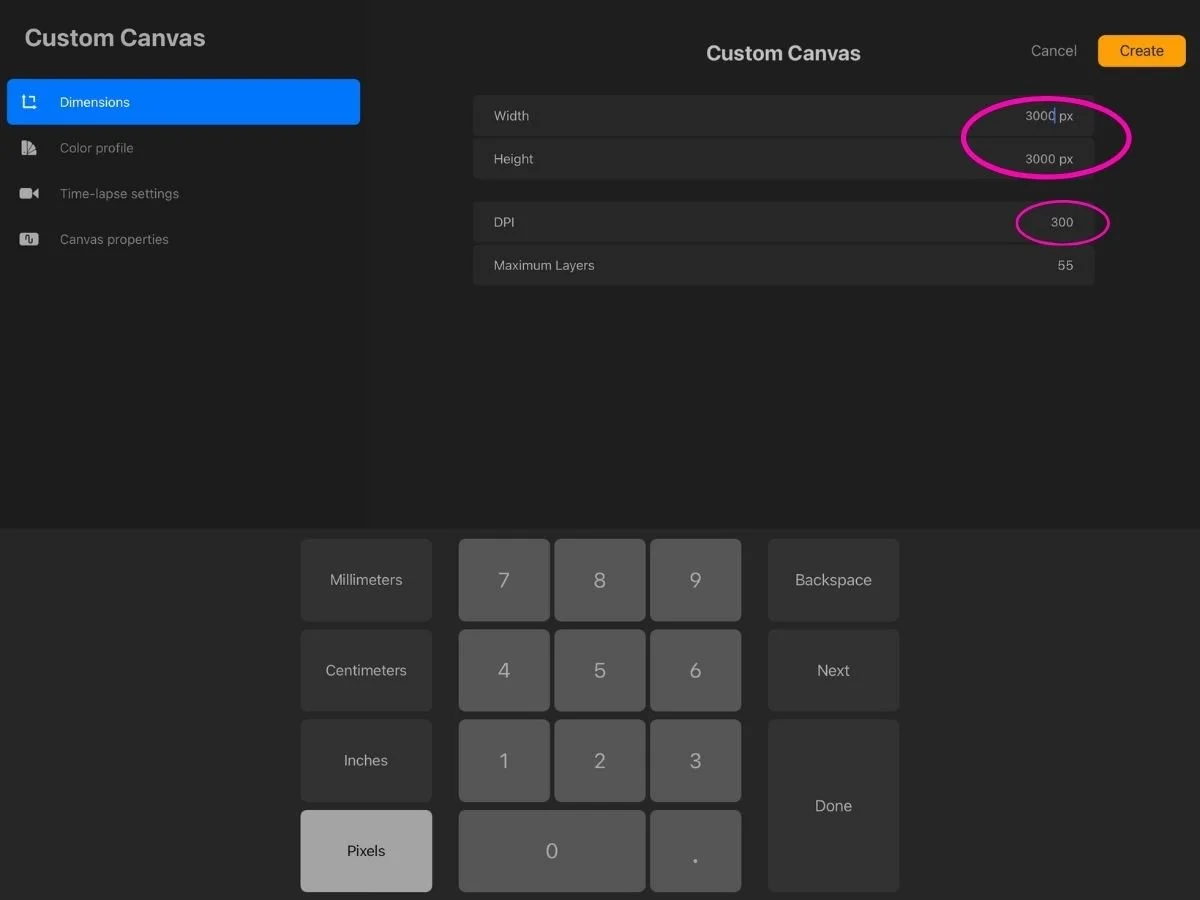
Blurry lines are one of the top complaints from new Procreate users—and it almost always comes down to starting with too small a canvas.
For fashion sketches, I recommend:
Canvas size: At least 3000 x 3000 pixels
DPI: 300 (important for print, but pixels are what matter for clarity)
Color profile: RGB for digital, CMYK if you plan to print
▶ Step-by-step in Canvas Settings for Crisp Sketches in Procreate
▶ For common pixelation problems, see Why Are My Procreate Sketches Blurry?
3. 🪟 Understand Layers Like a Pro
Layers in Procreate are like transparent sheets stacked on your canvas. They let you sketch, color, and experiment without affecting other parts of your design.
Here are four key tools and features that fashion designers will love:
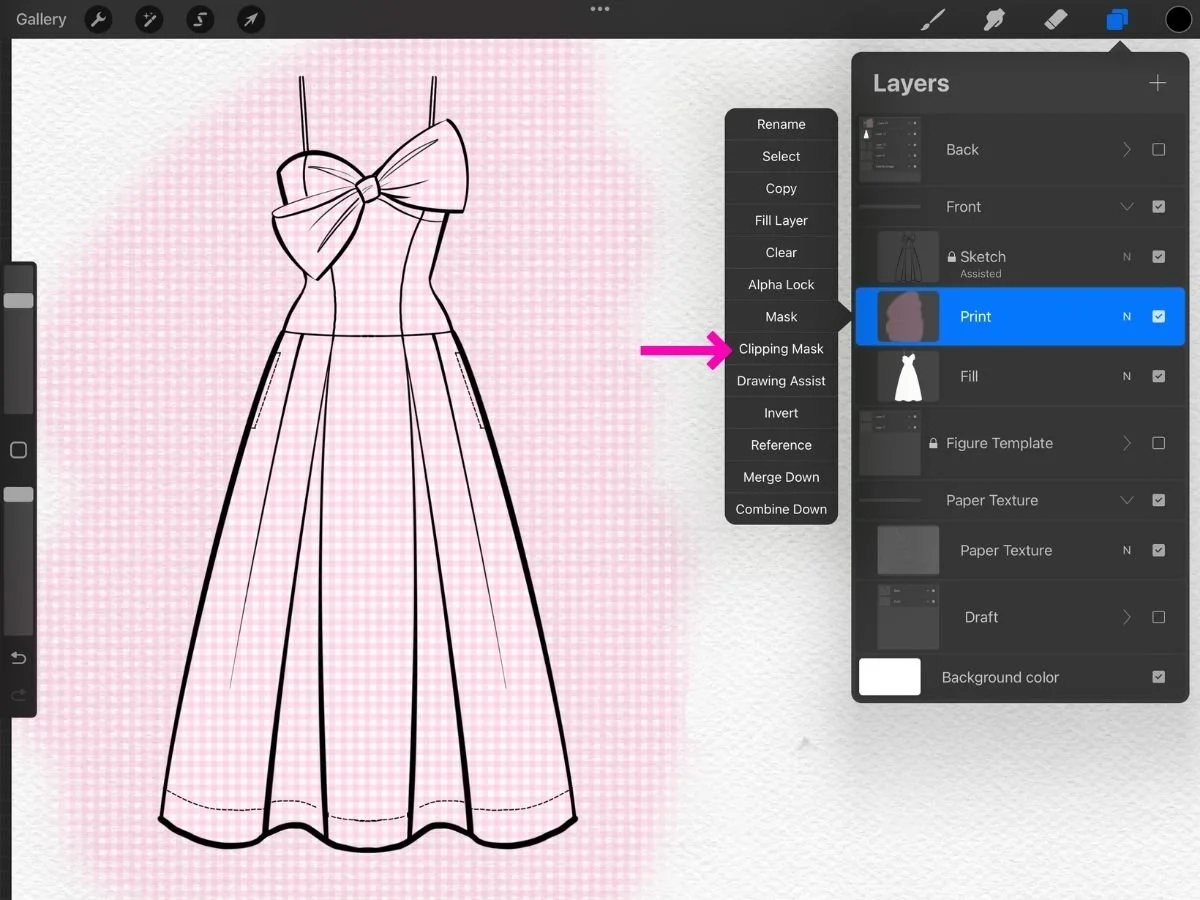
Clipping Mask: Applies texture or color only within the shape of the layer directly below—like stenciling inside a clean silhouette. Great for prints, shading, or fabric texture.
To create a clipping mask, create a new layer above your active layer.
Open the Layer Options Menu > Select Clipping Mask

Groups: Group related layers (e.g. figure, outline, fill, texture) to keep your file tidy. This is especially helpful when working with multi-view sketches or garment variations.
Visibility Toggle: Every layer has a small checkbox you can tap to turn visibility on or off. This is useful when comparing different design versions, trying out colorways, or hiding construction layers before export.
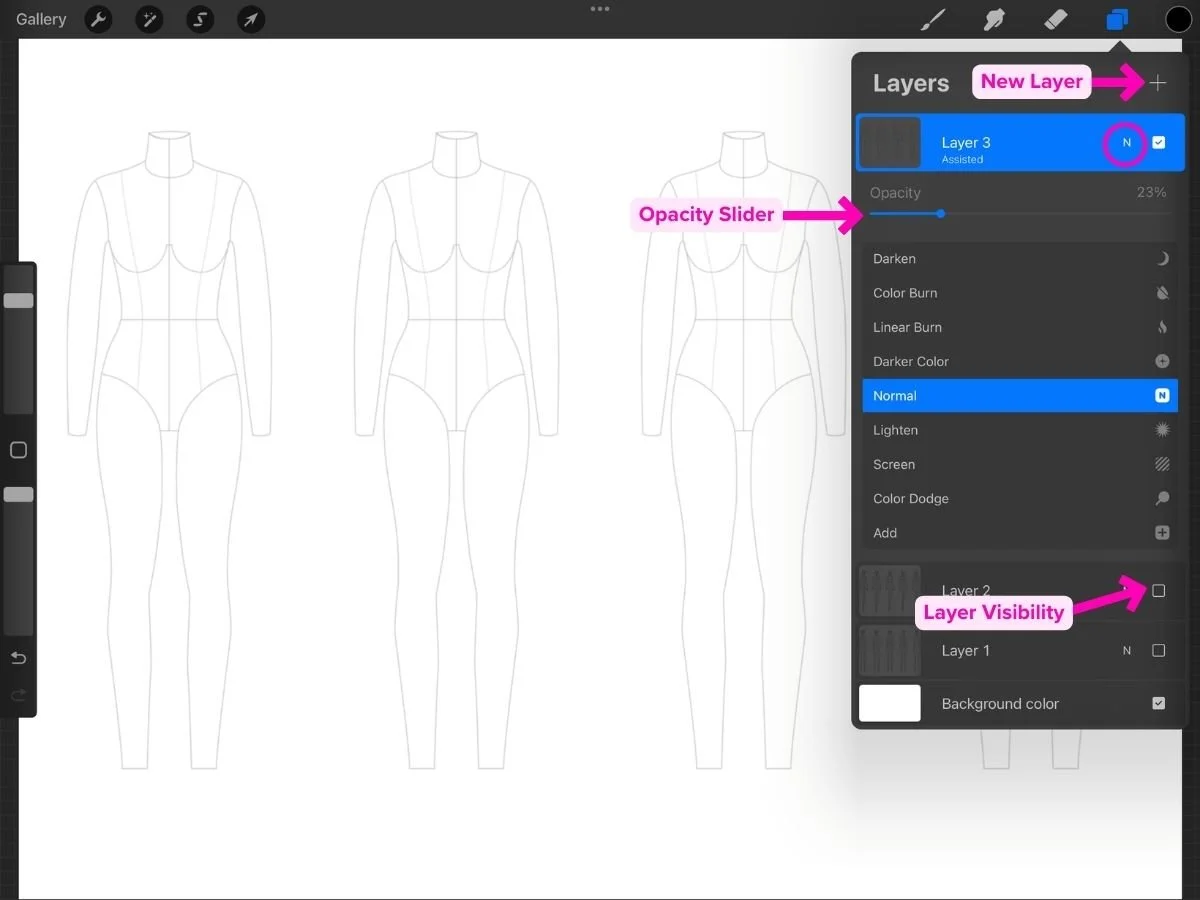
Blend Mode (Multiply, Screen, etc.):
Blend modes control how a layer interacts with the layers beneath it.
Use Multiply to add shadows or texture—it makes the layer semi-transparent and lets the base colors show through.
Use Screen for adding highlights or soft light—it brightens without covering details.
To open blend modes: tap the “N” on the active layer. That brings up a list of blend modes and an opacity slider you can adjust to control intensity.
▶ Learn more about Procreate Layers for Fashion Design for tips on organizing layers. Includes bonus section on keeping layers private for time-lapse replay videos.

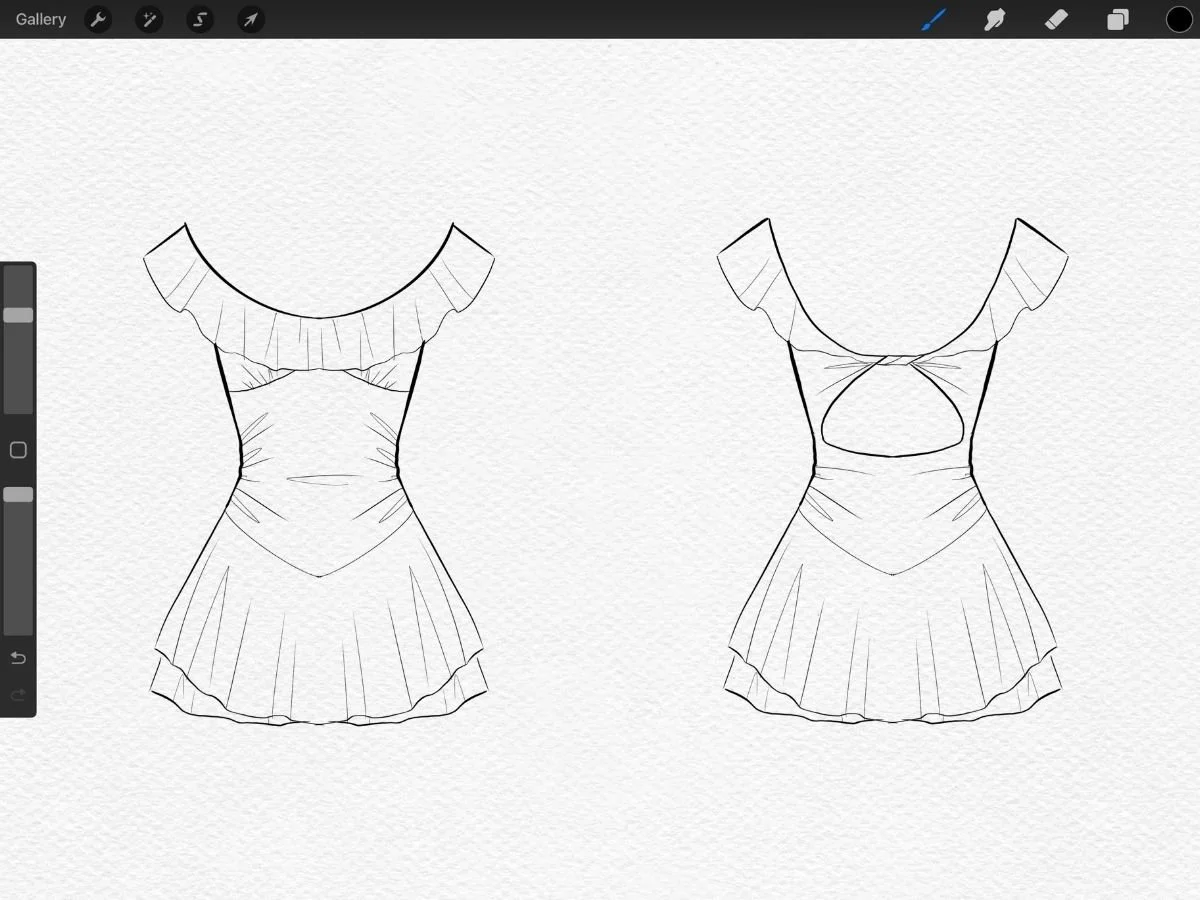
4. ⚖️ Use Symmetry (But Know When to Break It)
Vertical symmetry is a powerful feature in Procreate—it lets you sketch clean, mirrored designs like front-view flats or centered gowns with ease.
To turn it on:
Tap Actions (wrench icon) > Canvas > toggle on Drawing Guide > Edit Drawing Guide
Choose Symmetry and tap on Options > select Vertical > Toggle on Assisted Drawing.
n the Layers panel, make sure the layer you want to mirror says “Assisted.” If it doesn’t, tap the layer and choose Drawing Assist to turn it on.
But not everything in fashion is symmetrical. A skirt hem with a hand-drawn wobble or a draped sleeve that falls unevenly can look more lifelike and expressive. Toggle symmetry off for those moments.
▶ Watch the steps to turn on the Vertical Symmetry Guide: Procreate for Clothing Design - Beginner’s Tutorial

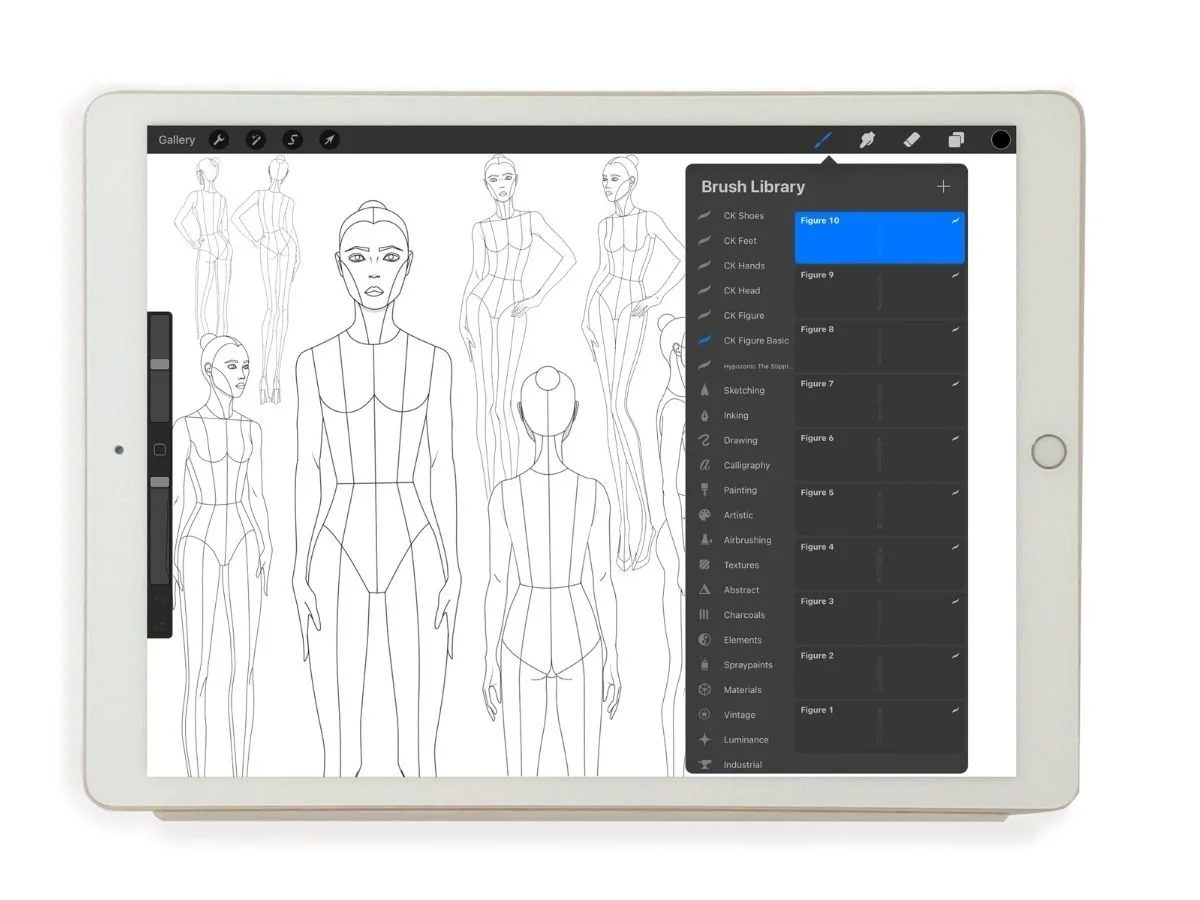
5. 👯♀️ Use Croquis Stamps to Speed Up Sketching
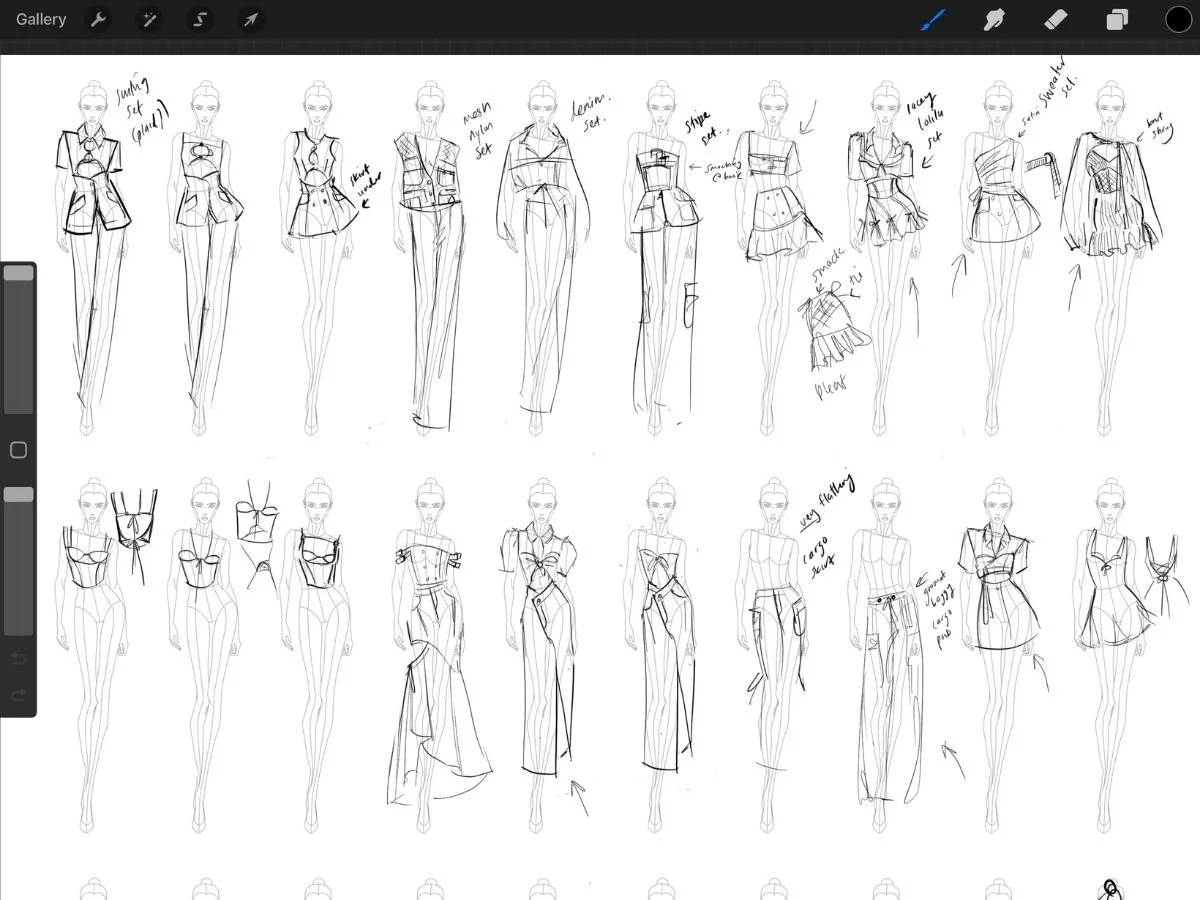
A “croquis” is a pre-drawn figure used as a base for sketching clothing. In Procreate, you can create a croquis stamp brush—so you don’t have to copy/paste or import a figure every time.
To use one:
Tap the brush tool and choose your croquis stamp
Tap once on the canvas to place the figure
Adjust with the Transform tool if needed
You can then sketch your outfit on layers above, using the croquis as your base.
▶ Make your own: How to Make a Croquis Stamp in Procreate
▶ Or try the Croquis Kit, a comprehensive library of figure templates for fashion sketching
▶ The full Procreate for Fashion Design Course includes built-in croquis and sketch templates
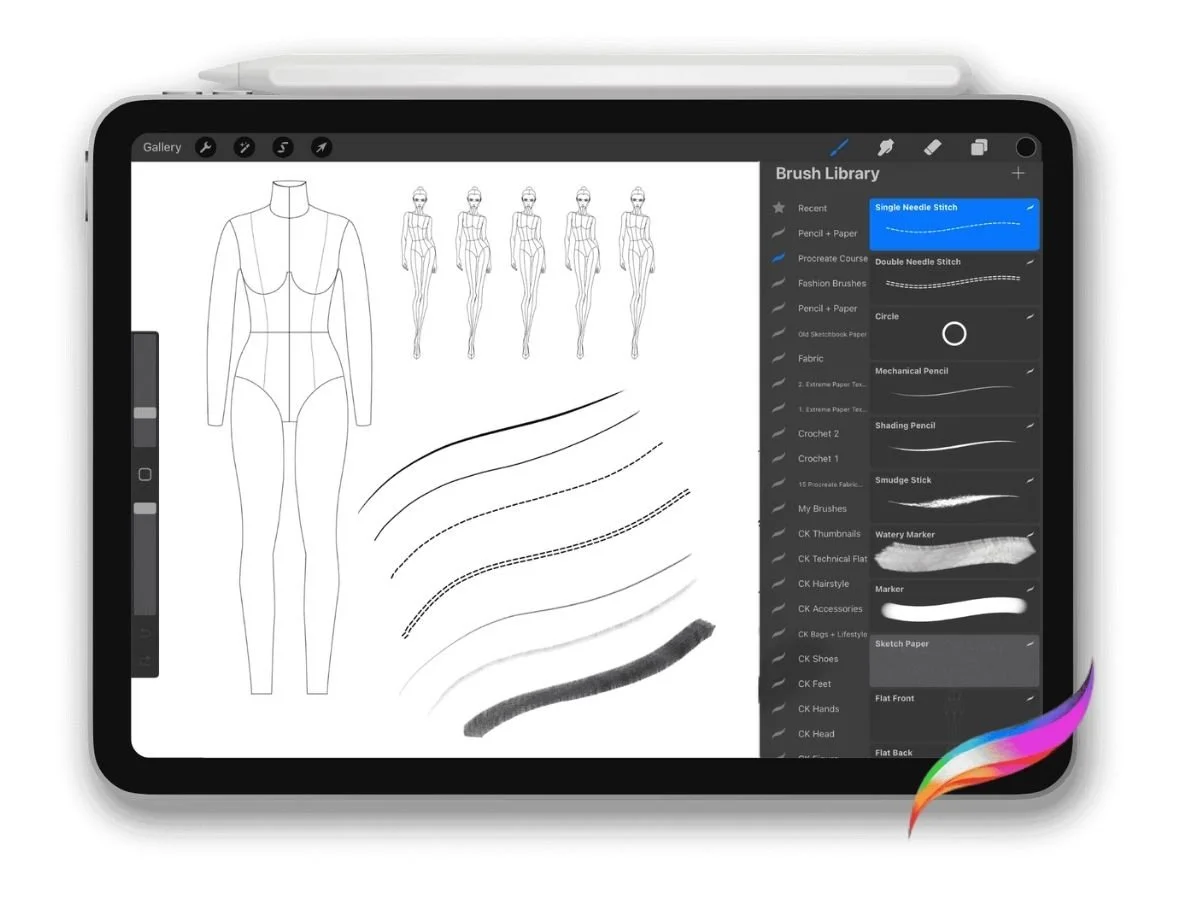
6. ✍🏻 Choose the Right Brushes for the Job
The brush you use can completely change the feel of your sketch. Crisp outlines, soft pencil shading, textured fills—it all starts with the right tools.
Here are the 5 essential brush categories for fashion designers:
✏️ Sketching + Inking Brushes
For clean outlines, dynamic line weight, and expressive concept sketches. Look for pressure-sensitive brushes that respond well to your Apple Pencil.📄 Paper Texture Brushes
Add warmth and subtle grain beneath your sketch—great for portfolio pages, digital moodboards, or mimicking real paper.🧍♀️ Croquis Stamps
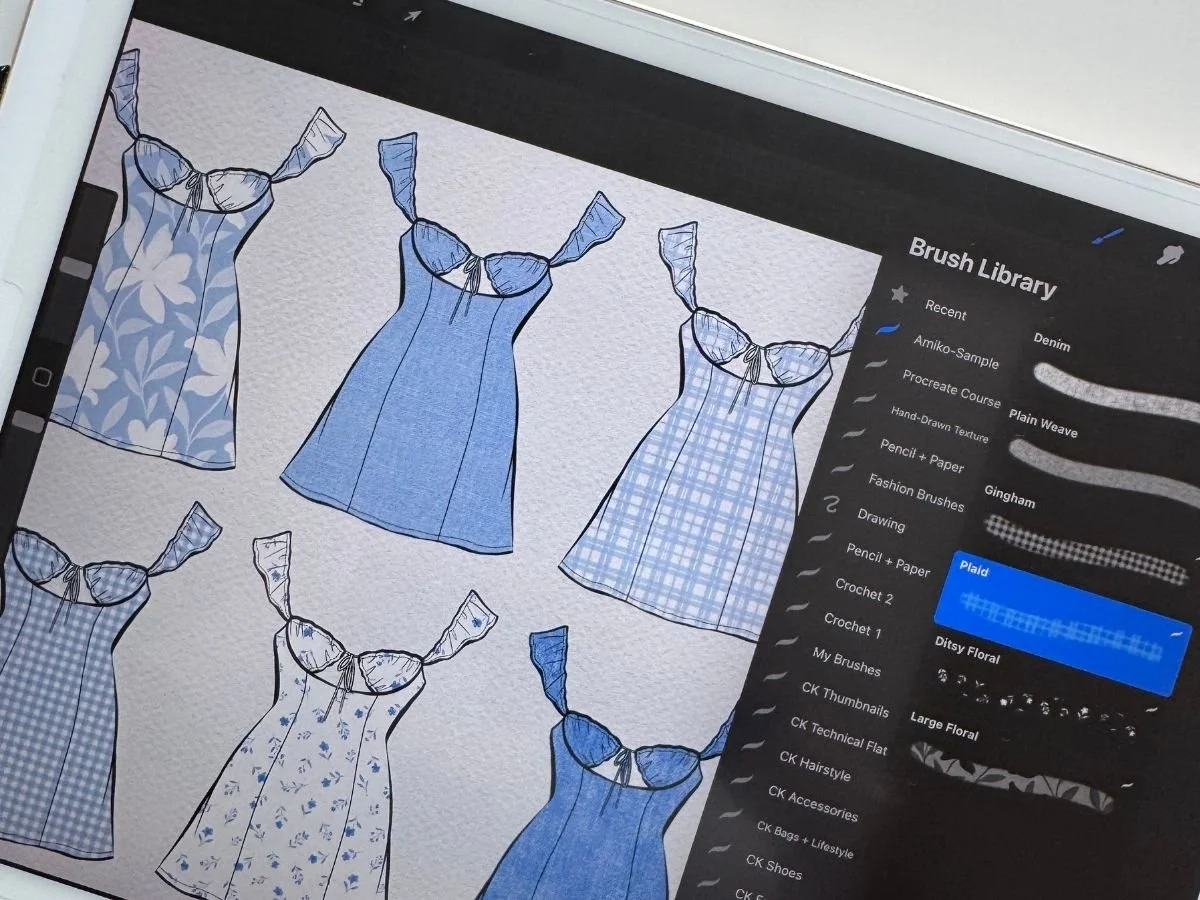
Pre-drawn fashion figures you can stamp and sketch over. Perfect for speeding up your workflow and keeping proportions consistent across looks.🧶 Fabric + Print Brushes
Paint seamless textile textures directly onto your sketch—without having to import swatches. Ideal for testing colorways or communicating your fabric ideas.▶Subscribe to my email list to download Free Fabric + Print Brushes
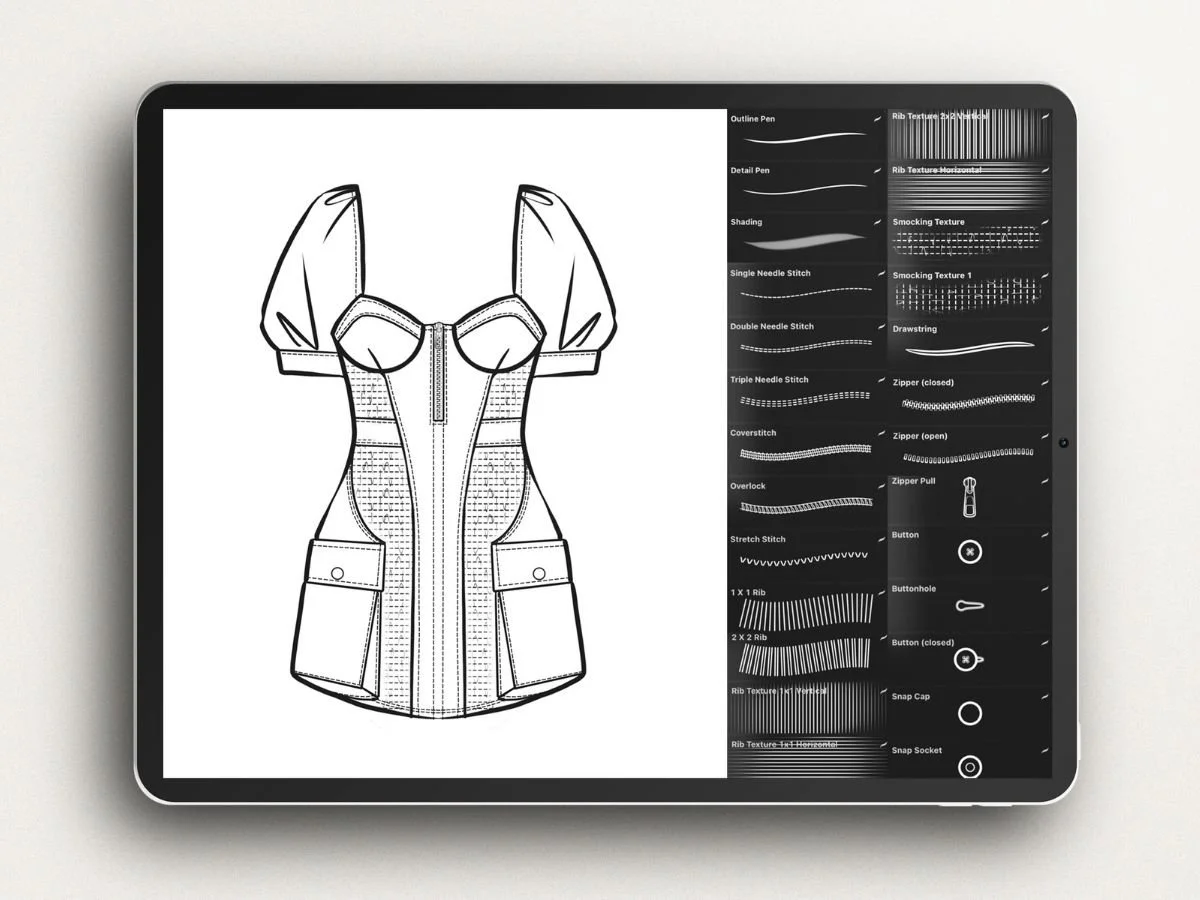
✂️ Trim + Detail Brushes
Add zippers, buttons, stitching, ribbing, or smocking in seconds—no need to draw every detail by hand.
▶ For more detailed brush recommendations and where to find them, check out the guide: Best Procreate Brushes for Fashion Design
You don’t need dozens of brushes to get started—just a focused, fashion-friendly set that supports your sketching flow and design clarity.
7. 〰️ Get Smooth, Confident Linework
Beautiful fashion sketches are built on clean, intentional strokes. Procreate gives you three smart tools to help you draw with ease:
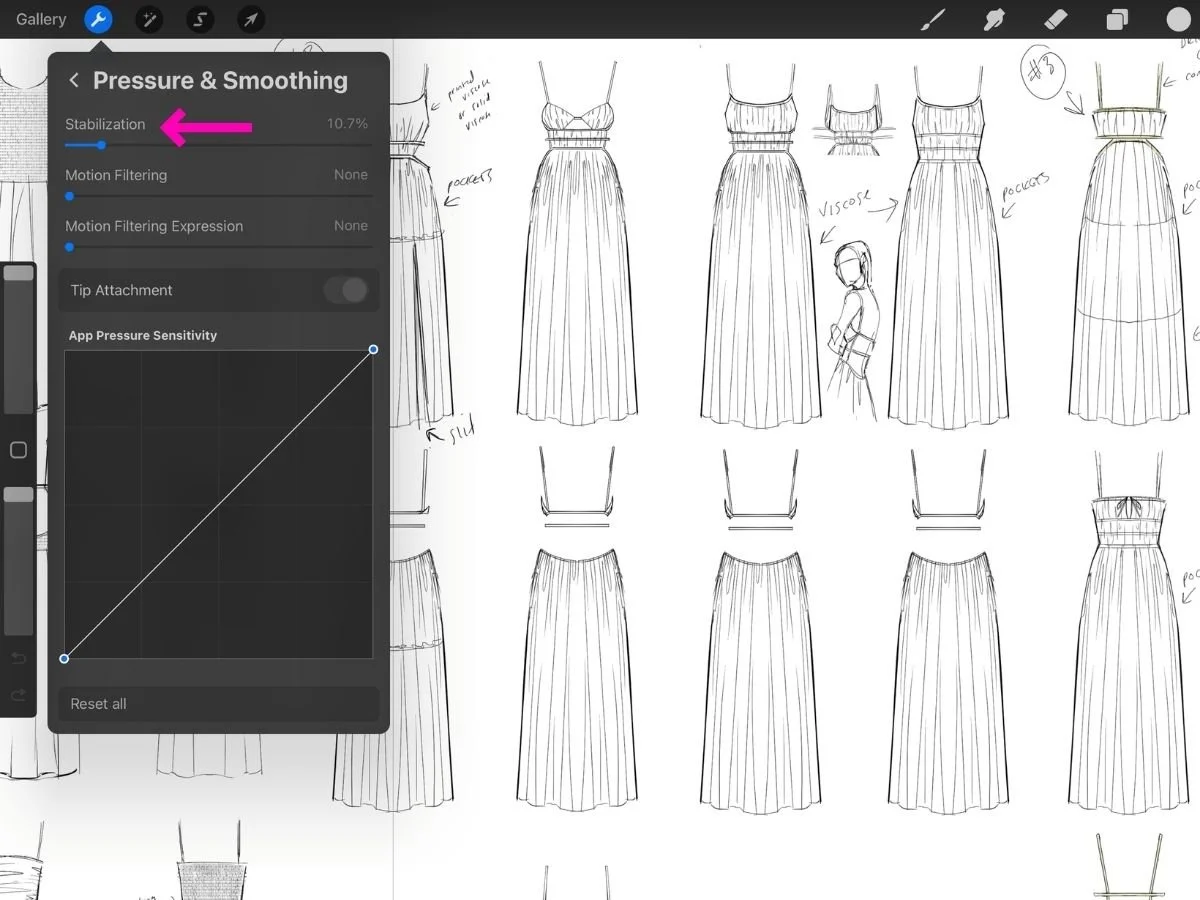
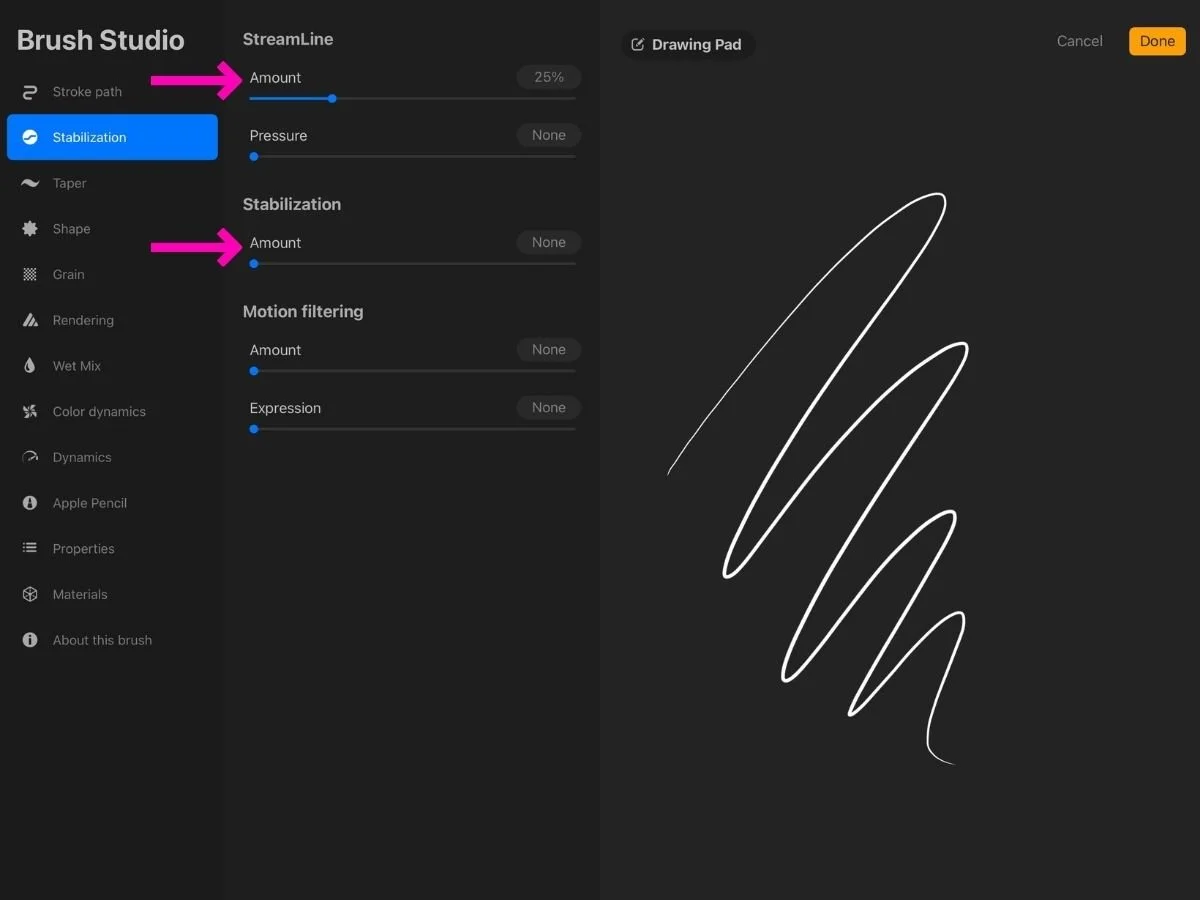
Stabilization — Smooth as You Draw
Global Stabilization applies across all brushes and helps lines flow smoothly. Adjust it via Actions > Prefs > Pressure & Smoothing—a light touch (around 10–15%) is often enough. Remember to lower it later—left too high, your Apple Pencil may feel sluggish.
Brush-Specific Stabilization lets you dial in smoothing per brush. In Brush Studio, under “Stabilization” and “StreamLine,” you fine-tune how much wobble is reduced.
When to turn it off: Organic sketches, textured details (like frayed hems or denim), technical features (like seams or pockets), and writing benefit from more direct control—so lower or disable smoothing then.
Adjusting Global Stabilization in Procreate
Adjusting Brush Stabilization in Procreate
Liquify — Nudge, Don’t Redraw
Use Liquify (via the Adjustments wand) to gently reshape or shift curves using Push mode. Keep Distortion and Momentum at 0 for precise edits.
Bonus tip: Combine with Vertical Symmetry to tweak both sides at once—perfect for sleeves, pant legs, and neckline adjustments.

QuickShape — Snap Clean Shapes Instantly
Draw any shape—line, arc, rectangle, or circle—then hold your finger or pencil to let Procreate snap it into a polished form.
Refine the shape on the spot by holding another finger to constrain proportions, rotating, and using Edit Shape for fine-tuning. Ideal for neat hems, collars, or geometric pockets.


In short:
Stabilization smooths lines while drawing.
Liquify lets you make precise tweaks afterward.
QuickShape gives you perfect geometry.
▶ For more in depth guidance, read The Secret to Smooth Lines in Procreate
8. 🧵 FinishingTouches
The following small touches can bring more depth and personality to your sketches:
Add texture to give your sketch a hand-drawn, tactile feel
Use shading to create softness and depth
Write notes or labels to personalize and clarify your design
Drop in inspo images or swatches—and keep them private if needed
Export a time-lapse video to show your process or share on socials
Texture
Adding texture helps make your digital sketch feel more tactile, expressive, and less flat.
Add a textured background: Place a paper texture brush on a layer under your sketch. Set your sketch layers to Multiply. This lets the texture subtly show through your lines, giving your work a warm, sketched-on-paper feel.
▶ Paper + Pencil Procreate Brushes include seamless paper textures
Use fabric brushes for garment texture: Linen, denim, canvas, and other textile brushes can add surface variation and depth directly onto your designs.
▶ Try the Free Fabric + Print Brushes for textures like gingham, floral, and denim.
▶ Tutorial: How to Add Fabric + Prints in Procreate
Shading
Flat lines only tell part of the story. Use shading to bring softness, volume, and realism to your sketch.
Use realistic pencil and shading brushes: Look for brushes with natural grain and pencil pressure response to give your shadows a hand-drawn feel. Use soft pencil strokes around seams, folds, or beneath hems to suggest light and form.

Blend with a digital smudge stick: For a soft, smoky ombré effect, use a smudge brush to gently blur your pencil shading. It’s perfect for areas like knees, collars, pleats, or the undercurve of a sleeve.
▶ Pencil + Paper Brush Set includes realistic sketch pencils, shading tools, smudge stick, and seamless paper textures to match
These subtle techniques can make your sketch feel tactile, expressive, and true to how clothing behaves in real life.

Notes & Labels
Adding text to your sketch can adds clarity, personality, and a designer’s touch.
Handwritten annotations: Add fabric notes, construction callouts, or design names directly on your sketch.
One option for hand writing is the Narinder Pencil under the Sketching category (included with Procreate.)
Typed text: If you prefer a types label, tap Actions > Add > Add Text to insert type and adjust spacing, alignment, and font.
Mood Images & Fabric Swatches
Photos, swatches, or inspiration images can help tell the story of your design—whether you're showing fabric choices, referencing silhouettes, or setting a mood.
To import an image or file:
Tap Actions (wrench icon) > Add > Insert a photo or file
The image will appear on its own layer so you can move, resize, or arrange it as part of your layout
Want to keep inspiration images out of your time-lapse video?
Use a Private Layer to hide reference images from the recording.
To insert a private layer:
Tap Actions > Add
Swipe left on Insert a file, Insert a photo, or Take a photo
Choose Insert Private
The image will be added to your canvas, labeled “Private” in the Layers panel
Private layers work like normal—they can be resized, moved, or hidden—but they won’t appear in your time-lapse playback.
This is perfect for keeping your inspiration boards, references, or mood images visible to you—but invisible in your final video.

Export Time-Lapse Videos
Your sketch process is part of the story—and Procreate captures it automatically.
Exporting a time-lapse video is an easy way to showcase your technique, share your design development, or connect with like-minded creatives. It also makes a great addition to a digital portfolio, and clients often appreciate seeing how a concept comes to life.
To export your time-lapse video:
Tap Actions > Video > Export Time-lapse Video
Choose Full Length or 30 Seconds, depending on your platform
Save to Files or Photos, or AirDrop it to your Mac for easy sharing
✅ Recap + What’s Next
This guide is designed to help you elevate your fashion sketches.
We covered how to:
Use gestures and shortcuts to speed up your workflow
Set up a crisp canvas from the start
Organize layers for clean edits and easy experimentation
Work with symmetry (and when to break it)
Use croquis stamps to speed up sketching
Choose the right brushes for sketching, texture, and detail
Smooth your lines, nudge shapes, and snap clean geometry
Add texture, depth, and personal touches that elevate your final work
These are the same tools and techniques I use every day—and they’re also the foundation of my course, built specifically for fashion sketching in Procreate.
▶ If you want a complete, fashion-focused workflow with all the essentials organized for you—figures, flats, brushes, textures, and templates—check out the Procreate for Fashion Design Course
Want a quick reference to keep nearby while you sketch?
▶ Grab the free Procreate Quickstart Checklist
You don’t have to master everything at once— just keep going!
-Amiko